So you want to build and deploy a solar and battery powered Meshtastic router or repeater to help grow your local network’s coverage? Let’s jump in!
I know, I know, you just want to throw your new node in some tiny box with a solar panel the size of your palm glued on the cover, slap the whole thing on a telephone pole somewhere and then snap shots for the ‘gram to show how easy it is to build a repeater network.
That’s fun and it looks cool, but most of those aren’t actually large enough to support long term reliable power production and storage. If you want a deep dive into real geekery, they exist, but it won’t be as easy as this guide to make.
If you’re willing to learn a little bit and accept the fundamental laws of physics, you can easily build one about the size of a toaster oven that requires no soldering for just over $100. You could tweak on this design and probably get slightly smaller and maybe cheaper at the cost of being far more careful and clever. If you want to dive into the details, check out KeithMon’s work here.
This guide is something anyone can follow without being a RISD grad, and yes, the buy-list is at the bottom if you’re impatient.
Let’s start with an overall concept, then we’ll dive into the details. At a high level, your Meshtastic node needs power in order to operate. That power is measured in volts and amps. Think of this as water flowing through a pipe; volts is the water pressure, amps is the amount of water.
When you multiply volts x amps, you get watts, which gives you the energy flowing through the lines.
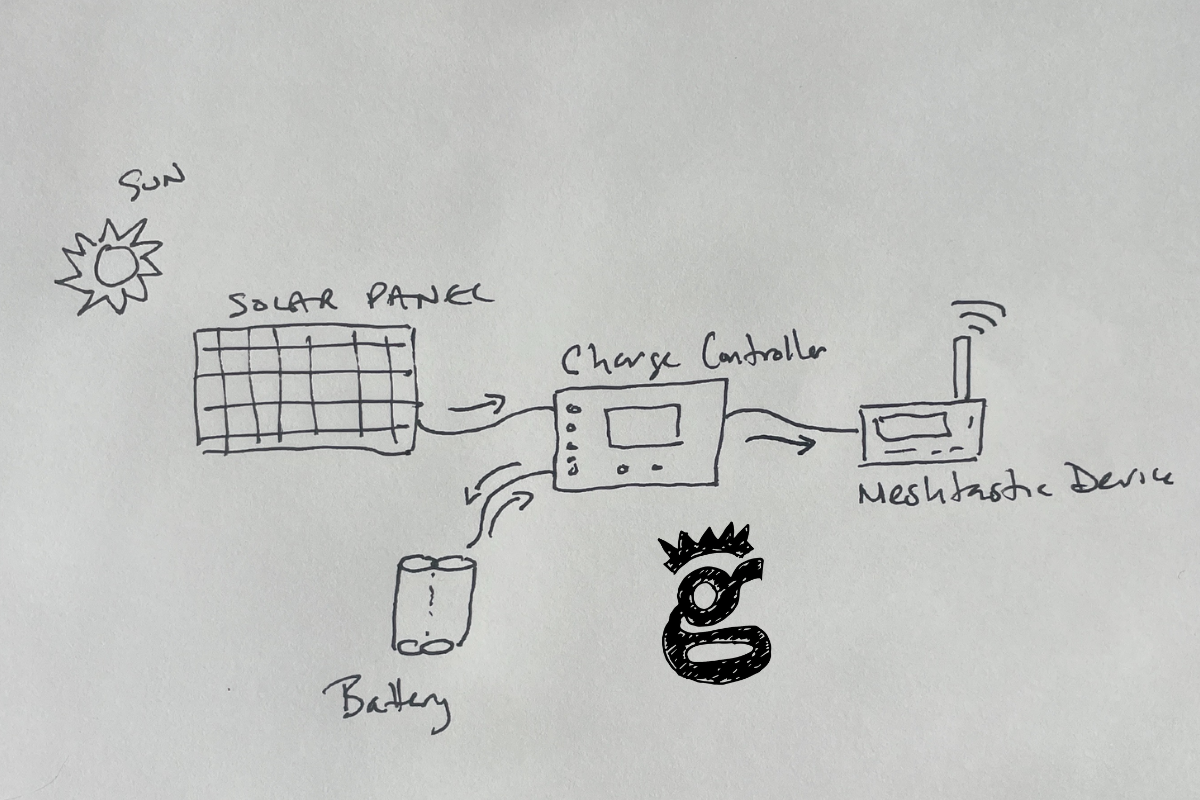
For any powered device you use that isn’t connected to grid power, there’s a 5 part system you need to implement.
- Capture the power (solar panel)
- Store the power (batteries)
- Manage power (charge controller AND a battery management system)
- Use the power (for the actual device)
- Protect the components (enclosure, which you could also just call a fucking box)
The whole thing is a lot of fun to put together, but before you do anything, we’re going to start with finding out the first critical element: How much power do you need?
Whatever else you do, start by KNOWING YOUR POWER REQUIREMENTS! If you get those wrong, you’re wasting time, energy, and money. It’s also pretty easy to get right.
You can measure power with a fancy power supply, like this:

That Meshtastic device, by the way, is a LilyGo T‑beam v1.2 running as a Router (NOT as a client).
You can also measure power using a smaller and cheaper USB device, like this:

That is measuring a LilyGo T‑echo running as a Client.
However you measure it, you MUST measure if you want to build a good, reliable system.
Let’s take a look at the two examples I gave, then we’ll walk through building a system.

We’re comparing two different chips (NRF to ESP) as well as two different modes (Client and Router). Before you start howling about how I should have done this or that, this is just a demonstration, relax. The T‑echo will probably draw less, this measurement was taken towards the end of a charging session. The point here is not what uses more or less power but to make sure you measure YOUR power draw.
System Goals
Let’s lay out my goals for a system. They may be different than yours, but if you know what mine are, you can adjust for yours.
First, I don’t mind spending a little extra money to get good enough quality so that once I build it, it’s unlikely to fail for a few years in the field.
Second, it should be pretty easy to put together. I’m not an EE, I don’t play one on the internet, and fiddle-fucking with the benthic depths of electromagnetic theory to squeeze every possible femto-ohm optimization out of the system is not interesting to me.
Finally, and related to the first thing, the system should reliably work.
So, given the two examples we have above, what’s the first step? If I wanted the cheapest and smallest possible system, I’d build something for the T‑echo. However, those aren’t in stock right now. The T‑beams are in stock, they’re cheap, and the power draw difference isn’t enough to make a huge difference in components.
So, for this article, we’ll focus on building a system for the T‑echo v1.2 running as a Router, with a .047 amp draw at 5 volts.
From here, we just run some basic math to find out how much energy we need to capture and store.
Location
Start with where you’ll put your Meshtastic repeater or router. I live in San Diego, which is one of the sunnier places in the US.

I’ll make the assumption that I’ll never have to store more than 3 days of energy (solar power from the sun) and that I’ll need to be able to fully recharge my system on a short winter day.
The absolute easiest way to figure out what system you need is to use (wait for it) ChatGPT. You can even use this prompt:
Hey, I live in [town] in [country]. I'm building a power system for a Meshtastic device which I've measured drawing [volts] and [amps]. What size battery and solar panel will I need in order to have enough energy to stay powered through our average winter storm and be able to recharge quickly after the storm passes and I'm getting full solar power again?It should return something like this:
For your Meshtastic device to stay powered through an average winter storm in San Diego and recharge quickly afterward, you should consider using a battery with at least 20 watt-hours of capacity and a solar panel of around 5 watts. This setup should provide enough energy resilience and recovery capability for the conditions you described.
Next let’s convert watt-hours to amp hours, which is how many batteries are marketed. It’s not hard; you divide watt hours by the battery voltage.
Batteries & Voltage
Now you’re faced with a decision: What type of battery and battery voltage should you use for Meshtastic? Most of the Meshtastic devices are 5 volt devices (running off a USB connector). I’d suggest building a system that’s as close as possible to that voltage, which gives us a 6 volt system.
You might be tempted to use 18650 Li-ion batteries at this point because they’re easy to install and replace, but for me they’re not the best choice for a few reasons.
First, we’re looking for something that can take hundreds (if not thousands) of charge cycles. This unit will be out in the field, with no maintenance, for years, charging and discharging every day, with occasional deep discharges. Li-ions are pretty good, but LiFePO4 have about 4x the charge cycles of a Li-ion, and are usually rated to last around 5,000 cycles or about 10 years.
Second, wildfires in San Diego are a high hazard, so anything I can do to decrease that, especially for nodes I might deploy out in the backcountry, needs to be as non-flammable as possible; LiFePO4 are about as good as you’ll reasonably get for an off the shelf battery. I’ve bought from Bioenno a bunch, I like them and their customer service. You can probably find cheaper places online if you want to hunt around.
Solar
With a 6 volt LiFePO5 battery selected, it makes the panel selection easier: Get a 6 volt 5 watt panel. I know, I know, you wanted a dissertation on how and why and where to find a 18.97% efficiency panel. Just get a 5 watt 6 volt panel. If you want to dive into it with GPT, go for it.
Charge Controller
Now that you have a battery and a solar panel, you’ll need a charge controller. This is the thing that takes the input from the solar panel, charges the battery, then outputs power to your Meshtastic device. You can build one cheaper (and you can certainly spend more money) but the Renogy Wanderer is a great little unit that I’ve used a bunch.
The Box (Enclosure)
You’ll need a box to put all this in to protect it from the weather. While you and I might just call it a box, it’s variously called a junction box or enclosure in more professional circles. I’d pick one up from Amazon (link above) rather than 3D printing one. You won’t save that much (if any) money 3D printing, and pre-built enclosures are usually water resistant and the door is easy to open/close and latch.
Buy List
Here’s a list of what to buy:
| Item | Approx Cost | Source |
|---|---|---|
| Solar Panel | $40 | Buy Here |
| Battery | $25 | Buy Here |
| Charge Controller | $20 | Buy Here |
| Enclosure | $20 | Buy Here |
Some of those are affiliate links, some are not. If you buy using an affiliate link you’re supporting the writing I do here. There’s no extra cost to you if you do that, and thanks!
Fancy Wiring Diagram, Ikea Level: Easy
Here’s how the setup looks as a diagram:
Solar Panel Mount (3D print)
Finally, you’ll need a way to mount the solar panel. This is where a 3D printer might come in handy using ASA to print a little mount for it. I know, I know, some of you will want to use PETG or PLA. Resist the temptation to go easy ‘n cheap on this one. If you’re in San Diego and reading this (and I have ASA on hand, which I usually do), I’m happy to print one up for ya.
So that’s it! It may not be the “slap ‘n forget” thing you wanted, but if you want a great option for getting a Meshtastic repeater off grid and rockin’ for a long time, this is how I’d do it.
Crush!
Leave a Reply