Sometimes ya just gotta see it being done to learn it. Here’s the best I can do to bring you on the journey of setting up a hotspot. This is the story of Thankful Caramel Quail. The full gear list for this install is here, including options & alternates.
I’d identified a commercial building as a potentially good location for placing a hotspot. It was high (40′ or so), near a busy highway (the 5, an interstate freeway that connects Mexico to Canada along the West Coast of the US), and near a busy border. The San Ysidro border crossing is the fourth busiest land border crossing in the world, and well within the coverage range of this setup.
The surrounding area is mostly flat. To the east there’s a slight rise which would block some RF waves, though they’d have plenty of distance to spread out and possibly bounce around it by the time they got there. I ran an RF simulation on Helium.Vision (preferred choice for pro deployments, learn how to use it here) and it looked pretty darn good with a 3 dBi HNtenna.

Nearby was mostly commercial and mixed use, not super dense residential. The area in general didn’t have many hotspots in it. That density and type of real estate is good for providing needed coverage and not getting clipped by Transmit Reward Scaling.
All of those things (elevation, density, good lines of sight, lots of potential for IoT use) are important for a durably profitable deployment. You can probably get higher earnings *now* by going into a denser area, but you’re not really improving the network. Constantly improving/expanding network coverage is how we’ll all win. Keep it WUPU, yo.
I approached the building owner through a tenant in the building. I contract the tenant to do work for me on an ongoing basis, so it was a straightforward business to explain how having a LoRa gateway on the property would allow me to monitor inventory levels on the products I store there as well as offer coverage to the other tenants and the surrounding area. The building owner asked for a one pager explaining what I was doing so he could run it by his insurance company. I gave him a slightly modified version my standard template.
Then I went up on the roof to make sure I could do what I wanted to do, and we agreed on fair compensation.
I try to keep all my written agreements as simple and clear as possible. You may have different requirements or a different goal, and that is definitely NOT a legal document.
Now that I’d identified a location, confirmed it was clear for my preferred setup, and gotten permission, I had to order the parts and put it all together. For these flat roof installs, it’s a pretty straightforward setup. You order what’s called a “non-penetrating roof mount”, assemble it on the roof, tilt it on it’s side, slide in the longest pole you can find, stand the whole thing up and anchor the base with concrete blocks along with 3 separate guy points fastened to the pole and anchor those guy lines with concrete blocks. It’s super simple and very sturdy.
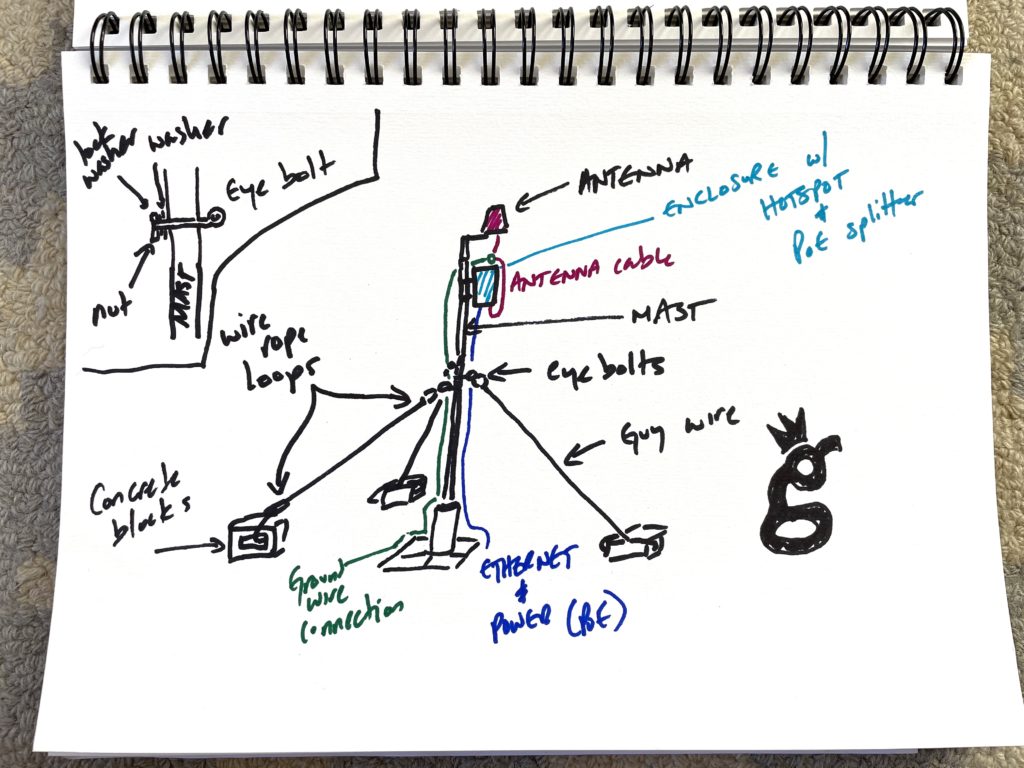
The pole I used was a 21′ foot tube of 4130 chromoly with a wall thickness of .095″ and a diameter of 1.75″ that I got from Competitive Metals over in El Cajon. You can find something like it at any metal shop near you. This is the same pole used by the old ham guys on top of their towers; it’s light, strong, and tough. You can find cheaper poles, but I’ve found that cheaper usually is more expensive in the long run.
Of course, before we got to the roof there was some prep work to be done.
First, I had some LMR400 cable laying around which had the wrong connector on one end (from my early days of pushing the BUY button before double checking what connectors I’d need). Before we jump into cables and connectors, it is WAY easier & cheaper to just order the right cables & connection and not do it yourself. I recommend McGill Microwave for that.
Still, easy ain’t always my game, and I love making things work.
Step one was to cut off the wrong connector. Here we go!
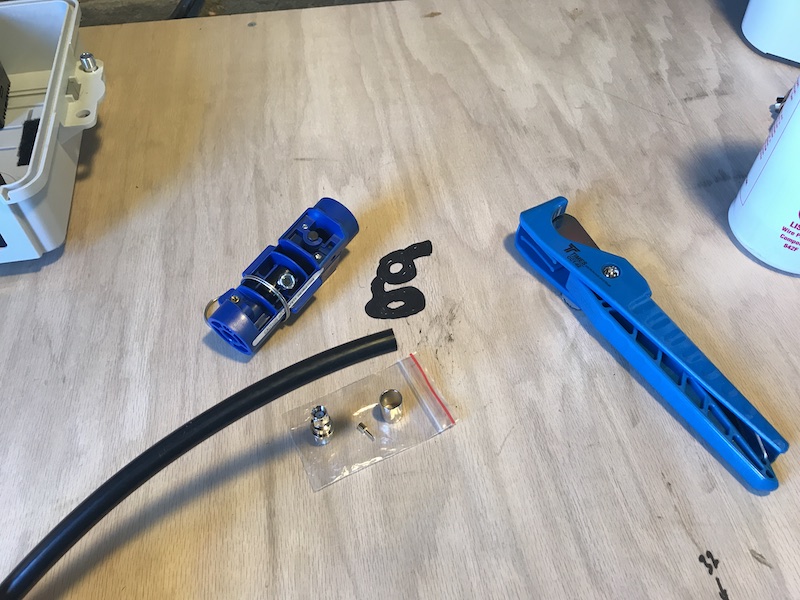
You can do all this stuff with a straight razor blade, but I’m a “right tool for the job” kind of guy. I picked up the proper cable cutters, strippers, prep tool, and crimpers for both this size (LMR400) and LMR240, just in case I need to do that as well.
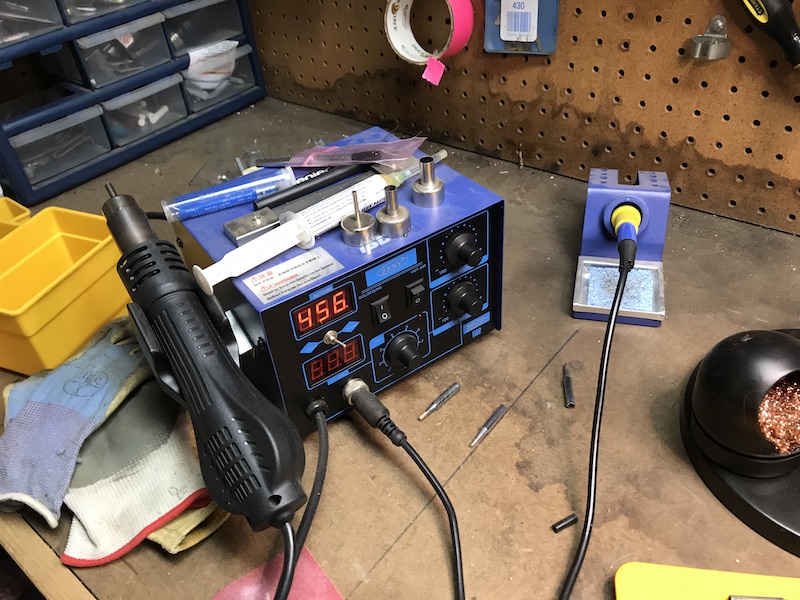
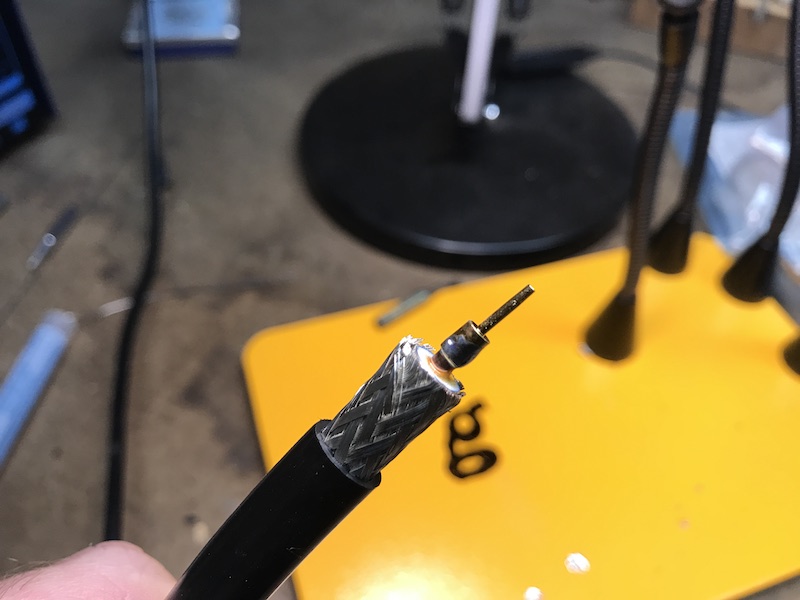
After stripping the cable sheath and the inner core, it was ready for soldering the tip onto the copper inner wire. I blew one tip before I got it right. Yep, I ain’t perfect, not by a long shot.
Here’s what it looked like the second time. 🙂
From there you just slide on the connector, then crimp it. Easy enough with the right tools. Here it is before the crimp connection:
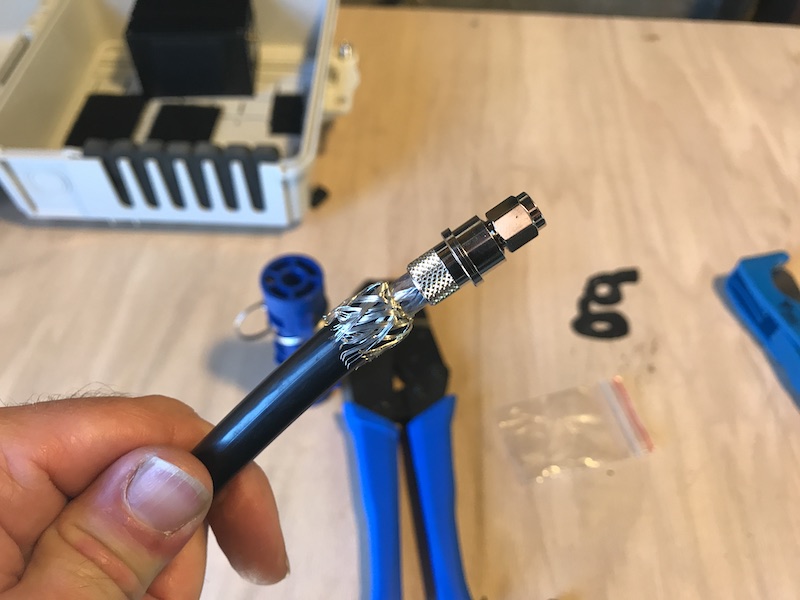
And here’s what it looks like after I crimped it and slid the weather resistant strain boot over the whole thing.
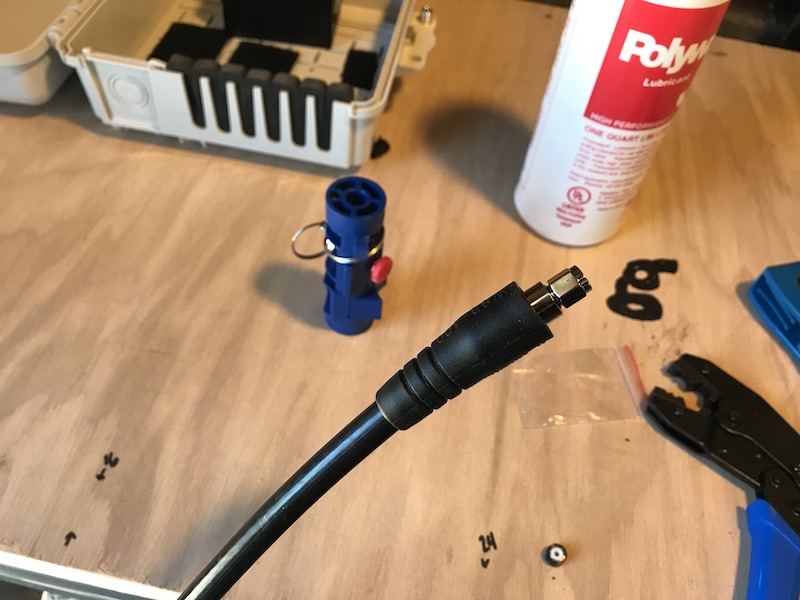
Now, I’ve learned the hard way (having to make extra trips to a mountain install) to test everything in the garage, so out came the VNA (better versions exist now) and I tested the HNTenna with the cable. Here’s what a loose connection will do to your VSWR (which should be well under 2):

And here’s what it looks like when all your connections are tight and your cables are properly made. See how the VSWR went from 50 down to less than 2? Under 2 is what you’re aiming for. That’s golden.

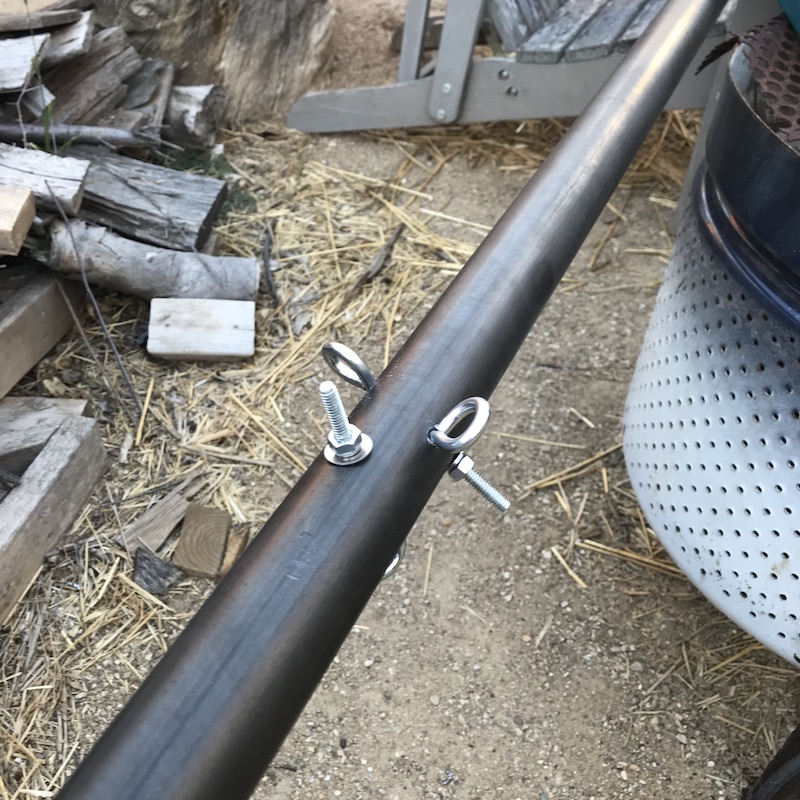
Now that the cable was made, next up was making a quick bracket for the antenna. This is dead simple, requiring just a few holes, a u‑bolt mount, and a vise to twist the aluminum bar.
Here’s drilling the hole. This is where a drill press comes in super handy. Drilling large holes by hand just isn’t as fun or easy. 🙂 You can see I’ve already drilled the clamp holes on the end and the u‑bolt is mounted so I don’t lose it.

Once I had the holes drilled it was over to the vise to give it a 90 degree twist. Keep it simple, superman!
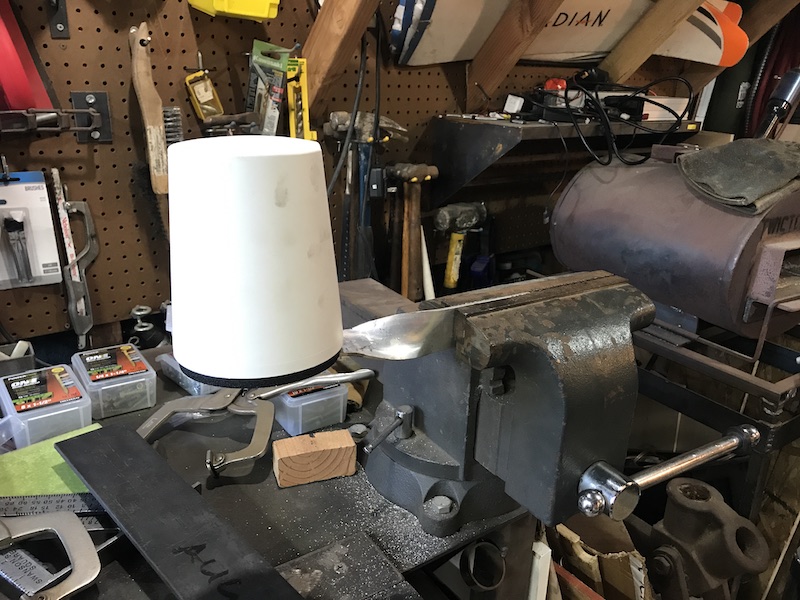
I also wanted to test everything in the backyard. As Paul over at Tourmaline Wireless had drilled into me from the Amateur Jade Hare install, test it at home first!
In the past I’ve carried out my old school drill press and mounted it on that eucalyptus stump, but I didn’t want to fuss with carrying the 140 lb drill press out this time, so I just went with a corded hand drill and sharp 1/4″ bits. It’s not quite as easy with a hand drill, but hell, it ain’t like it’s impossible.
Now comes the cool part, rivnuts! These are a way to make a super clean install on a pole, or any metal. They can be a bit fiddly, but man do they look clean. Here you can see I’ve got one installed and one hole drilled, waiting for a rivnut. Once they’re in, I just use ’em as mounting points for the enclosure. Rivnut kits for this kind of work are pretty cheap, usually under $50.
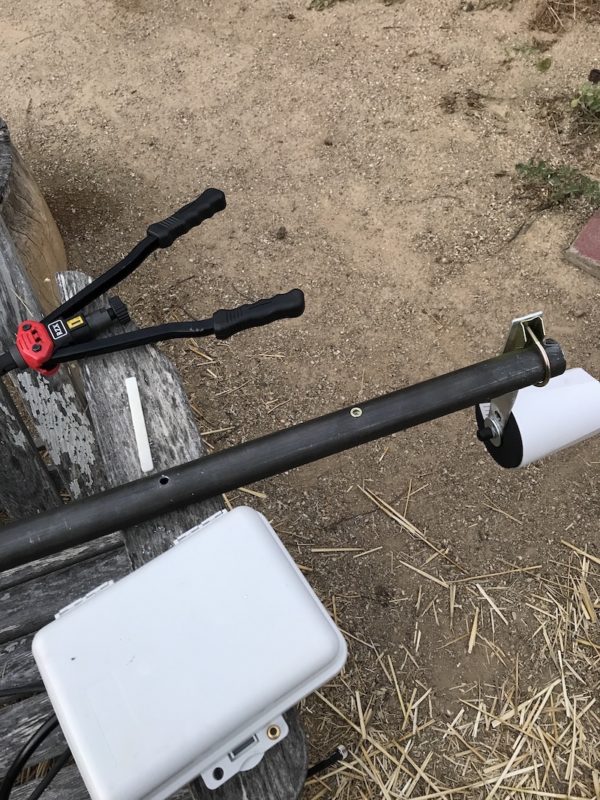
From there you just bolt on the enclosure and your mounting setup is finished! Those 2 small wires and the little black box coming off the RAK is a PoE splitter with a USB‑C connector. We’ll talk about that next.

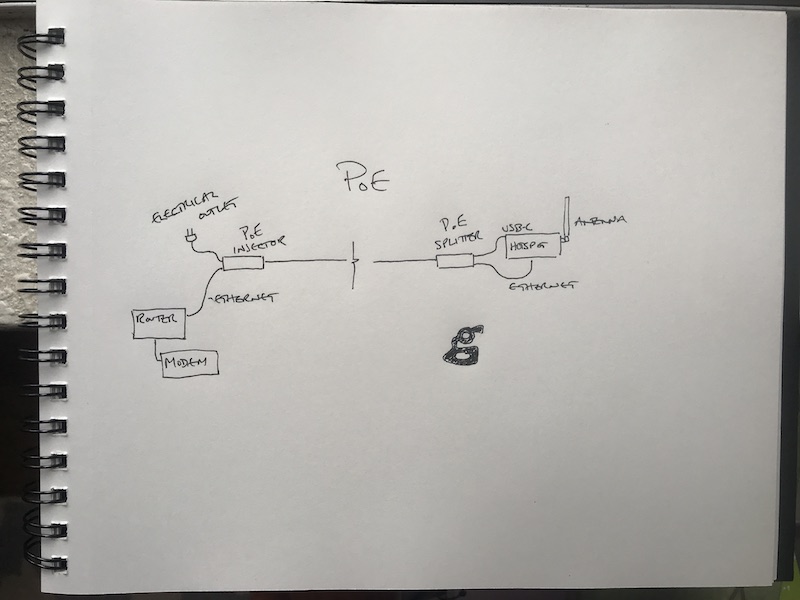
My goal for any on-grid hotspot installation is to connect the hotspot to the router via an ethernet cable carrying PoE, or Power Over Ethernet. I don’t trust WiFi to have a stable connection and WiFi generally won’t punch through exterior walls well, especially when they’re concrete and/or insulated. PoE means you can drop one cable from your requirements (the power cord), which is one less hole to drill in a wall. That’s a good thing.
In this case, we needed a long ethernet cord. I think I used 249′ of Direct Burial Cat6. That’s overkill, 5e would be fine. Direct Burial just means you can drop it outside and it’ll last longer. I buy 500–1,000′ rolls for exactly this reason, and terminating your own ethernet cable is super easy. You can see on the enclosure picture above that the cables just run in through the bottom protected from the weather by foam guides. Yep, simple.

This PoE (Power Over Ethernet) thing confuses a lot of people. Thankful Caramel Quail is a RAK hotspot. It doesn’t take PoE natively, so you need two things, a PoE *injector*, which “injects” power into the ethernet cable down by the router, and a PoE *splitter*, which splits out the power and the ethernet in the enclosure. Some Helium hotspots do PoE natively (like the Nebra Outdoor), so you don’t need a splitter. For hotspots that need both, here’s the diagram:
To make that a little more clear with a video, I shot this for ya:
In any event, with an injector and a splitter and enclosure and all the rest of the tools bought, it was time to get on site and haul up the blocks I’d need to stabilize the pole.
You need 15 of these blocks to stabilize a 20–25′ pole. 6 for the stand, then 3 each for the 3 guy anchor points. All of ’em have to go up. I’ve done this by myself with a ladder, but it’s way easier with two people. Me & @coaxialtasko switched out so we’d both get some work in; here’s me practicing my long unused bowline tying skills.
With the kit hauled up and the cable ran (from the router inside through the building, out a hole where pipes were already punching through, then up onto the roof), all that was left was assembling the base, tilting it up, and wiring the guy lines.
These bases only go together one way, and it’s not always obvious what way that is. Still, you’ll end up with a nice looking and sturdy base using only a crescent wrench and a socket set. Love me some simple tool action.

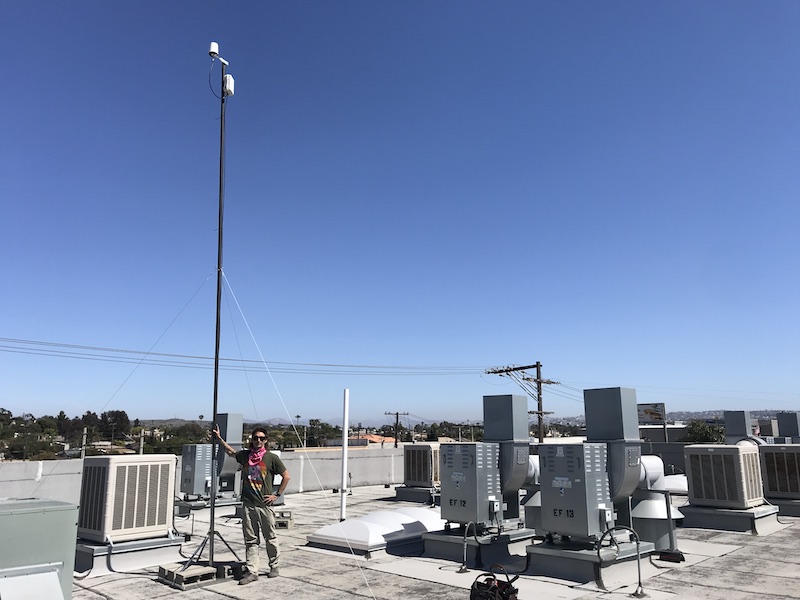
I should’ve got video of the tilt up but we were busy GSD (Gettin’ Shit Done), so here’s the finished product. Yep, that’s my $6k haircut by the artist Manrabbit, with all of Tijuana in clear Line of Sight to the south. You can’t see it from here, but there’s a Proxicast lightning arrestor with grounding lug attached to the antenna. Relax, grounding gods. Sheesh.
That’s it. The hotspot isn’t being relayed, so I’m not focusing (for now) on opening up port 44158. I’ll watch it for a while to see how it does, then I may test different antennas.
My hope with this deployment (and all deployments) is to usefully expand coverage of the Helium network while earning a steady and reliable flow of HNT. If that’s your goal as well and you’d like help doing it, I’m available for hire. Here’s to the healthy and awesome growth of The People’s Network!
Leave a Reply