It seems pretty straightforward; generate power and a connection to the internet, and you’ve got an off grid Helium Hotspot setup. Still, you’ll have a few minor details to sort out, like what type of enclosure, how to mount it, how to make sure it stays weatherproof if you use an external antenna, and how to vent it.
Actually, those aren’t minor, and they’re typically not cheap.
For an off-grid install plan on spending US$1–2k and you’ll be pleasantly surprised. If you want to experience the anguish of cheapness (as I have), try and spend less than $1k. That may cost you $4k as you realize you skimped so you’ll have to double-buy, and you end up with extra almost-good-enough-for-a-serious-remote-install gear laying around the shop. Your choice. 😉
Hey, before we go any further, please know that I’m NOT an electrician, this is NOT professional advice, I’m just a dude who enjoys tinkering and building things. Some of these components, including but not limited to the battery & charger, can cause serious hazard if not correctly installed. Please find a local professional to help you execute a safe deployment.
If you want to just buy an off grid setup from someone, I’d start with IoT Off Grid. If you want to see how I built my own, well, keep reading.
Let’s start with a drawing to give the big picture.
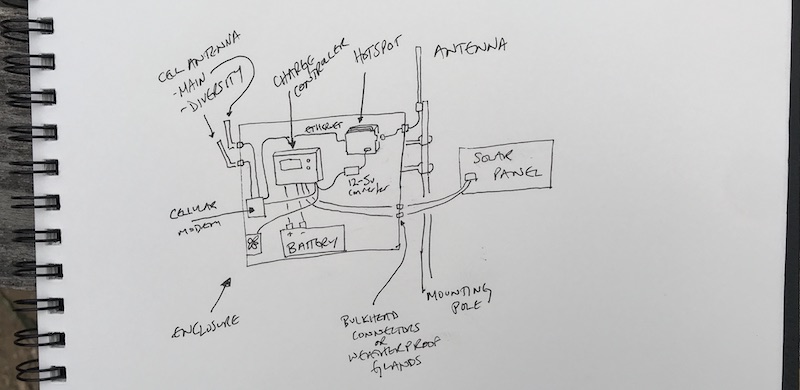
You may see that and say, “Nik, why don’t you just use an outdoor hotspot, like the Nebra?” Well, the outdoor Nebra is perfect for a PoE connection when you’ve got access to power & hardline internet, but:
If you’re going to go off grid you’ll need to protect your battery, charge controller, and cell modem. You’re going to have to buy an enclosure for all that. Might as well put everything in one box (enclosure) and save a little on the hotspot.
There is an updated version of my thinking on off-grid miners, that blog post is here. Much of the below information is outdated, but I’m leaving it up as a record. Enjoy!
Ok, let’s lay out some numbers:
- Power draw of a Helium RAK hotspot: 2–3 watts continuous, measured with a Kill-A-Watt
- Data use of a Helium Hotspot (full fat miner, NOT a DIY): 10 GB down, 20 GB up (that’s erring on the slightly high side)
- Power draw of a typical 1″ vent fan: Budget around 1 watt, but CHECK YOUR SPECS!
- Power draw of a cellular modem: Up to 18 watts for the IBR650 from Cradlepoint, though when I’ve measured it it’s running more like 1 watt.
Ok, so that adds up to 5 watts but when it comes to solar, you should always plan for more. 7.5 watts continuous is pretty safe. Let’s use 8 watts just to give ourselves even more cushion. As it turns out, that’s what my remote setup (a DIY, from way back when that program was open. It’s NOT anymore) is using, as measured via BarkinSpider’s SolarShed directions but using Influx instead of Grafana:

I know that’s a cute picture and pictures can be persuasive, so: –> Before you just take my word for it <–
MAKE SURE YOU MEASURE ALL YOUR POWER DRAWS!
Calculate your panel & battery sizes off of YOUR situation, not mine.
Now you’ll have to figure out 2 things. First, how big a battery will you need? Second, how much solar wattage will you need?
In Southern California I can use a 100 watt panel and a 50 Ah battery. That’s for a remote install that is 6 miles down a rugged trail winding up (and down, and up, and down, and finally up) a mountain. While I don’t mind working hard in pursuit of a worthy goal, I don’t really love *extra* work. Oversizing the panel & battery makes it less likely I’ll need to do extra work.
How do you figure out your battery size?
- Step 1: Add up all your power draws for a 24 hour cycle
- Step 2: Figure out how many cloudy/overcast days a year you’ll have.
- Step 3: Multiple the result from Step 1 x Step 2 x at least 1.5. The larger you make that last number the more expensive you battery will be, but the longer it will last. Do NOT skimp on this.
- Step 4: Shop for batteries. This is my go-to source for batteries. I like nice things, and they make ’em.
What about solar panels? In conjunction with calculating battery requirements, you’ll need to figure out how much solar wattage you’ll need to keep your batteries charged. Use the worst case scenarios: The longest cloudy weather stretch your region encounters in the bitter depths of winter. You’ll thank me when it comes, even though you may not be psyched with the up front cost.
Now that you’ve got all your kit, what will you put it in, and how will you connect it?
Start by measuring the dimensions of everything, then order an enclosure. I get mine from Allied Moulded. They make professional quality outdoor enclosures. They ain’t cheap, but they’re the ones that Helium Inc used when running their first off-grid test, way back in April of 2020. You can DEFINITELY find cheaper versions. My general approach is “buy the best stuff you can afford, then you won’t have to worry about it.” When I’ve gone against that, it usually costs me even more as I have to replace cheap shit.
Measure twice, then measure again, then double check by placing everything in the enclosure before you drill any holes. Then take a day off to think about it. Make a list of the hole sizes you’ll need, plus the cable glands, exhaust vents, fan mount holes, etc.
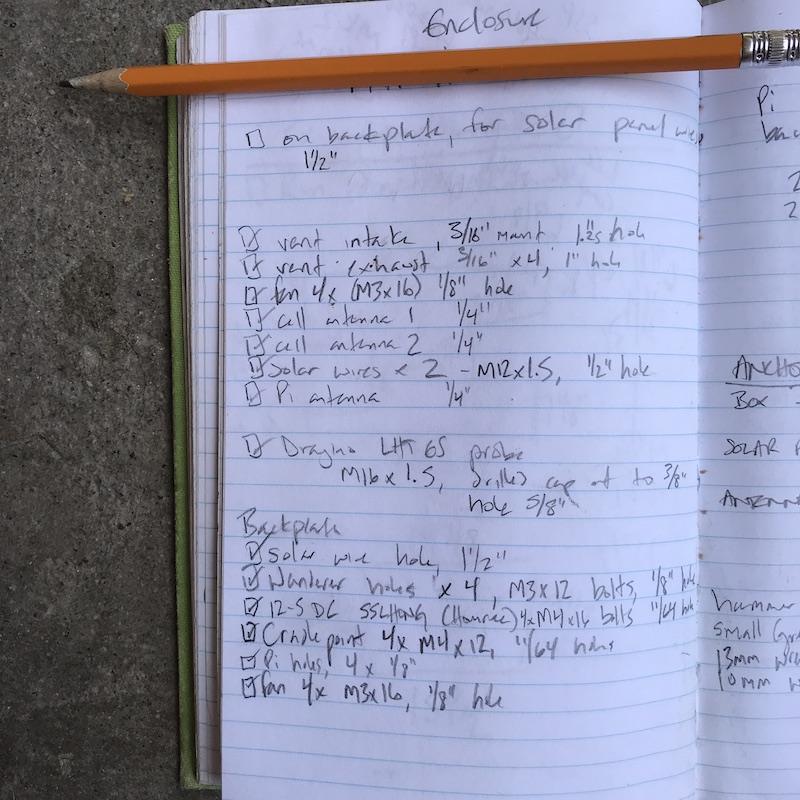
You’ll notice in that list and on my shared sheet a call out for a Dragino LHT65. By the way, that sheet is outdated, so use it to give you a *sense* of what you need, but don’t just go buying everything on the list.
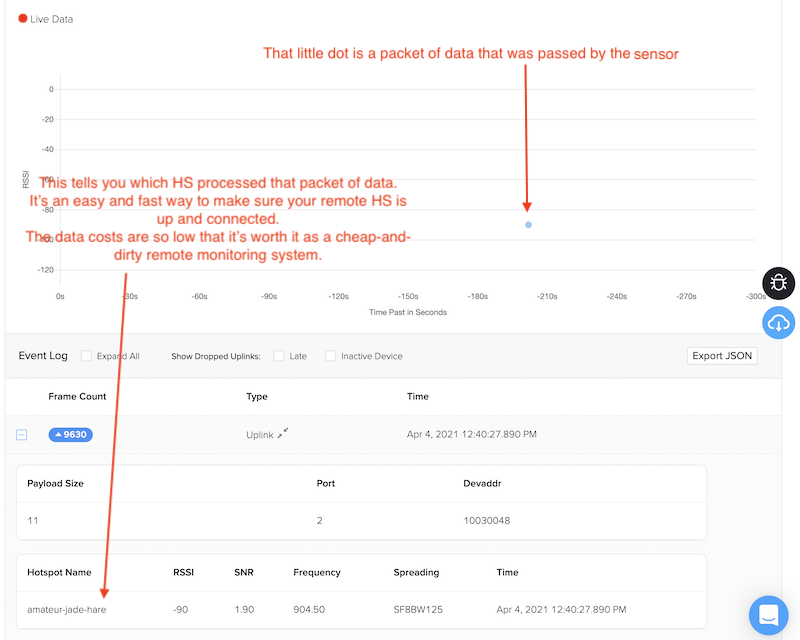
Back to the Dragino! That’s a sensor that gives you temp and humidity, but more importantly it’s a way to check if your remote hotspot is actually working. On Helium Console, you can see what hotspot is processing the packets from that sensor. It’s faster and more accurate than checking Explorer, at least in my experience.
Back to setup. Once you’ve measured and listed all your parts and holes, lay it all out.
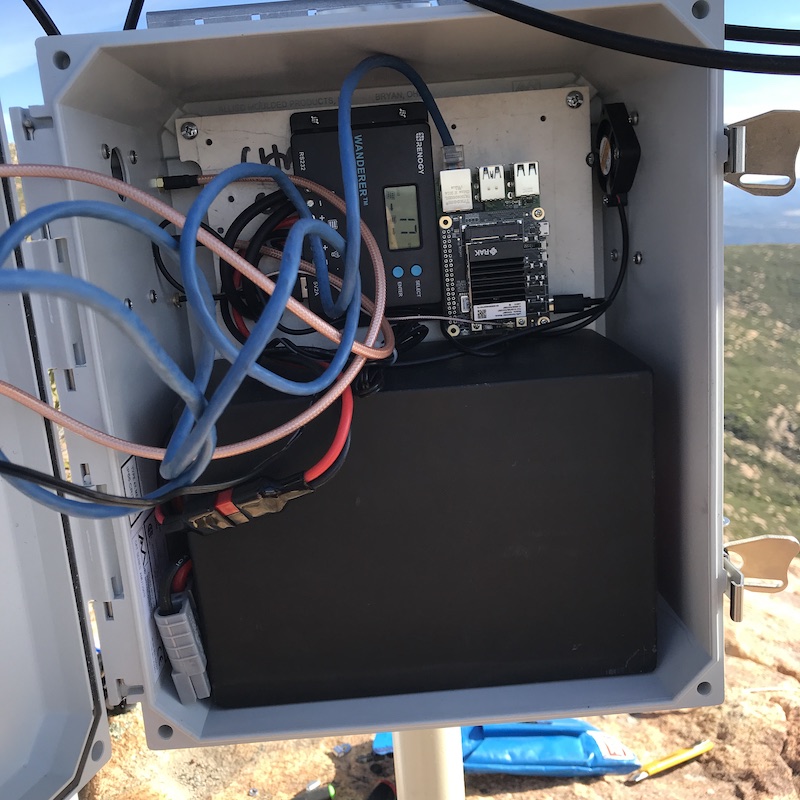
DO NOT BE CONFUSED BY THE PICTURES BELOW, this is for a DIY setup, which is why you’re seeing a Pi and not a hotspot at the top right. The DIY program is closed due to security concerns from fucking gamers who ruined it for everyone. Ok, moving on.
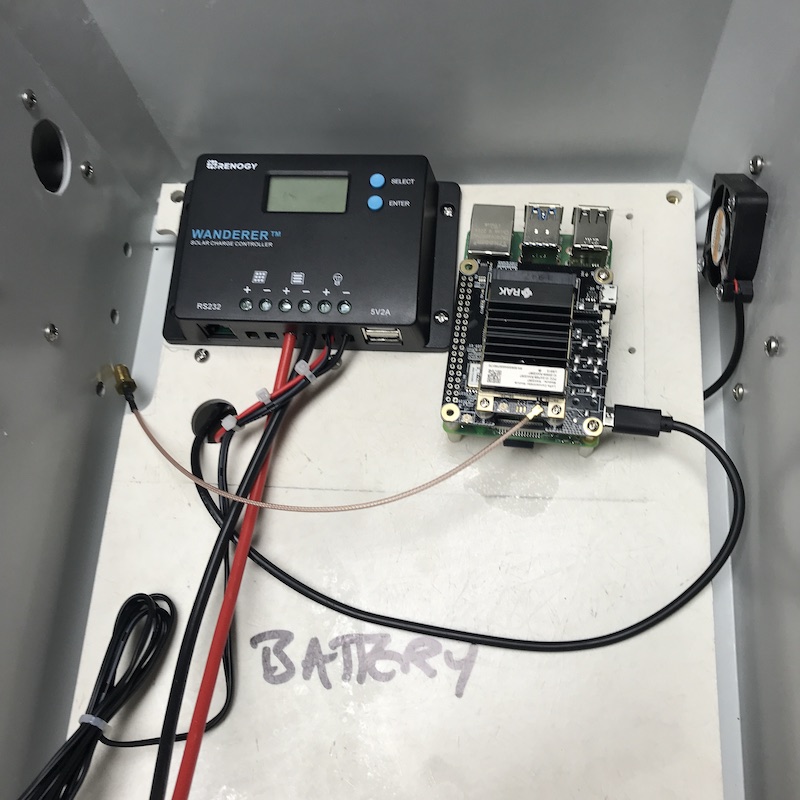
I found it super useful to just write on the backplate where I would put everything. I still made a few mistakes, and the final fit was much tighter than I’d like, but it works. This is the guts of Amateur Jade Hare.
Here’s what it looks like from the back; you can get an idea of the fittings & connections to the pole.

From experience, most people want to use that same antenna. Trust me, you don’t. First, they’re a PITA to hump in.
Second, they’re a PITA to mount. Third, they’re so powerful you have to ask your geeky tech friends for help to dial back the transmission power. Finally, they’re huge wind catchers, so you need to mount guy wires to keep ’em steady. Fun to set up once, but not so amazing that I can recommend ’em.
Learn from my experience and stick with a more appropriate antenna. You’ll probably never thank me because you won’t know the ass-pain you’re missing, but trust me, that’s a hook-up piece of advice.
Ok, that should wrap up both the big picture and a few details on installing a remote Helium hotspot. If you want help putting one up and this post isn’t enough, you can hire me for consulting, more on that here.
If you’d like to see the results of someone who’s done a consult with me, check out this blog post of an off grid commercial roof install.
Post questions in the comments if you have ’em.
RESOURCES
- Solar calcs sheet This is for a DIY hotspot running a Raspberry Pi4 & 2287, not a full fat miner. This just gives you an idea. DO YOUR OWN CALCS! YPDMV
- Olivia Wireless — Only appropriate for DIY miners or Light Hotspots, as they data plan size is tiny.
- A Rough Guide to Helium Hotspot Placement — Before you get all hot and bothered about going remote, see if this’ll help you find an easier, better location.
- Gear List — This’ll give you an idea of what you’ll need to get. It’s definitely NOT the only way to do it.
Leave a Reply