It seems pretty straightforward; generate power and a connection to the internet, and you’ve got an off grid Helium Hotspot setup. Still, you’ll have a few minor details to sort out, like what type of enclosure, how to mount it, how to make sure it stays weatherproof if you use an external antenna, and how to vent it.
Actually, those aren’t minor, and they’re typically not cheap.
For an off-grid install plan on spending US$1-2k and you’ll be pleasantly surprised. If you want to experience the anguish of cheapness (as I have), try and spend less than $1k. That may cost you $4k as you realize you skimped so you’ll have to double-buy, and you end up with extra almost-good-enough-for-a-serious-remote-install gear laying around the shop. Your choice. 😉
Hey, before we go any further, please know that I’m NOT an electrician, this is NOT professional advice, I’m just a dude who enjoys tinkering and building things. Some of these components, including but not limited to the battery & charger, can cause serious hazard if not correctly installed. Please find a local professional to help you execute a safe deployment.
If you want to just buy an off grid setup from someone, I’d start with IoT Off Grid. If you want to see how I built my own, well, keep reading.
Let’s start with a drawing to give the big picture.
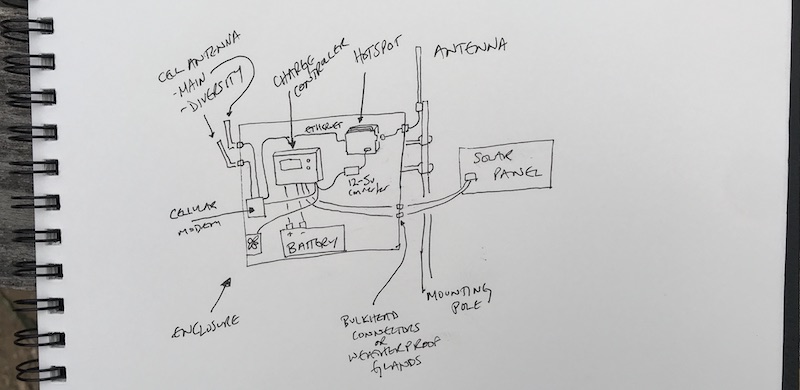
You may see that and say, “Nik, why don’t you just use an outdoor hotspot, like the Nebra?” Well, the outdoor Nebra is perfect for a PoE connection when you’ve got access to power & hardline internet, but:
If you’re going to go off grid you’ll need to protect your battery, charge controller, and cell modem. You’re going to have to buy an enclosure for all that. Might as well put everything in one box (enclosure) and save a little on the hotspot.
There is an updated version of my thinking on off-grid miners, that blog post is here. Much of the below information is outdated, but I’m leaving it up as a record. Enjoy!
Ok, let’s lay out some numbers:
- Power draw of a Helium RAK hotspot: 2-3 watts continuous, measured with a Kill-A-Watt
- Data use of a Helium Hotspot (full fat miner, NOT a DIY): 10 GB down, 20 GB up (that’s erring on the slightly high side)
- Power draw of a typical 1″ vent fan: Budget around 1 watt, but CHECK YOUR SPECS!
- Power draw of a cellular modem: Up to 18 watts for the IBR650 from Cradlepoint, though when I’ve measured it it’s running more like 1 watt.
Ok, so that adds up to 5 watts but when it comes to solar, you should always plan for more. 7.5 watts continuous is pretty safe. Let’s use 8 watts just to give ourselves even more cushion. As it turns out, that’s what my remote setup (a DIY, from way back when that program was open. It’s NOT anymore) is using, as measured via BarkinSpider’s SolarShed directions but using Influx instead of Grafana:
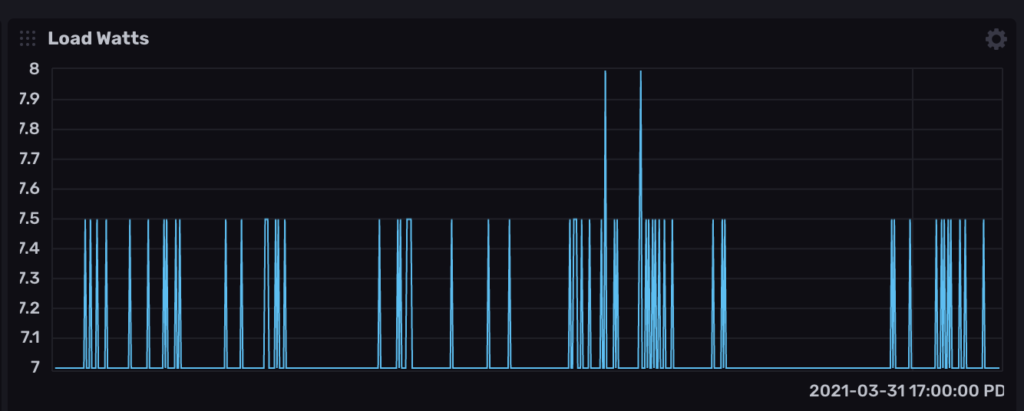
I know that’s a cute picture and pictures can be persuasive, so: –> Before you just take my word for it <–
MAKE SURE YOU MEASURE ALL YOUR POWER DRAWS!
Calculate your panel & battery sizes off of YOUR situation, not mine.
Now you’ll have to figure out 2 things. First, how big a battery will you need? Second, how much solar wattage will you need?
In Southern California I can use a 100 watt panel and a 50 Ah battery. That’s for a remote install that is 6 miles down a rugged trail winding up (and down, and up, and down, and finally up) a mountain. While I don’t mind working hard in pursuit of a worthy goal, I don’t really love *extra* work. Oversizing the panel & battery makes it less likely I’ll need to do extra work.
How do you figure out your battery size?
- Step 1: Add up all your power draws for a 24 hour cycle
- Step 2: Figure out how many cloudy/overcast days a year you’ll have.
- Step 3: Multiple the result from Step 1 x Step 2 x at least 1.5. The larger you make that last number the more expensive you battery will be, but the longer it will last. Do NOT skimp on this.
- Step 4: Shop for batteries. This is my go-to source for batteries. I like nice things, and they make ’em.
What about solar panels? In conjunction with calculating battery requirements, you’ll need to figure out how much solar wattage you’ll need to keep your batteries charged. Use the worst case scenarios: The longest cloudy weather stretch your region encounters in the bitter depths of winter. You’ll thank me when it comes, even though you may not be psyched with the up front cost.
Now that you’ve got all your kit, what will you put it in, and how will you connect it?

Start by measuring the dimensions of everything, then order an enclosure. I get mine from Allied Moulded. They make professional quality outdoor enclosures. They ain’t cheap, but they’re the ones that Helium Inc used when running their first off-grid test, way back in April of 2020. You can DEFINITELY find cheaper versions. My general approach is “buy the best stuff you can afford, then you won’t have to worry about it.” When I’ve gone against that, it usually costs me even more as I have to replace cheap shit.
Measure twice, then measure again, then double check by placing everything in the enclosure before you drill any holes. Then take a day off to think about it. Make a list of the hole sizes you’ll need, plus the cable glands, exhaust vents, fan mount holes, etc.
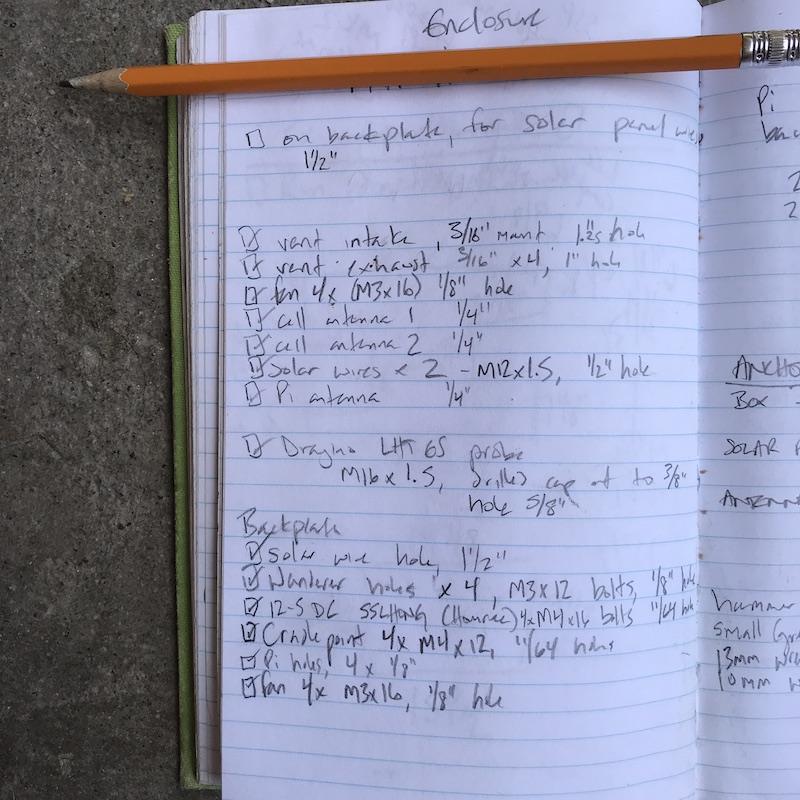
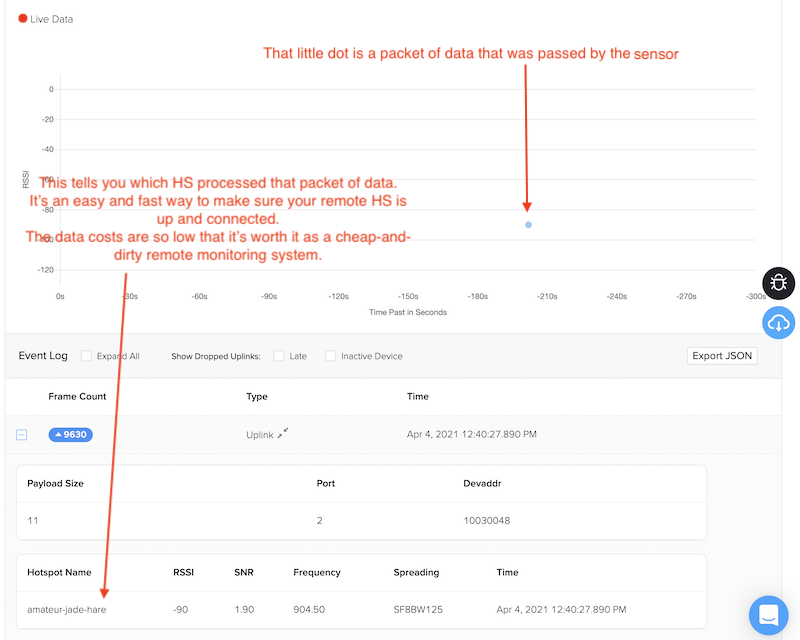
You’ll notice in that list and on my shared sheet a call out for a Dragino LHT65. By the way, that sheet is outdated, so use it to give you a *sense* of what you need, but don’t just go buying everything on the list.
Back to the Dragino! That’s a sensor that gives you temp and humidity, but more importantly it’s a way to check if your remote hotspot is actually working. On Helium Console, you can see what hotspot is processing the packets from that sensor. It’s faster and more accurate than checking Explorer, at least in my experience.
Back to setup. Once you’ve measured and listed all your parts and holes, lay it all out.
DO NOT BE CONFUSED BY THE PICTURES BELOW, this is for a DIY setup, which is why you’re seeing a Pi and not a hotspot at the top right. The DIY program is closed due to security concerns from fucking gamers who ruined it for everyone. Ok, moving on.
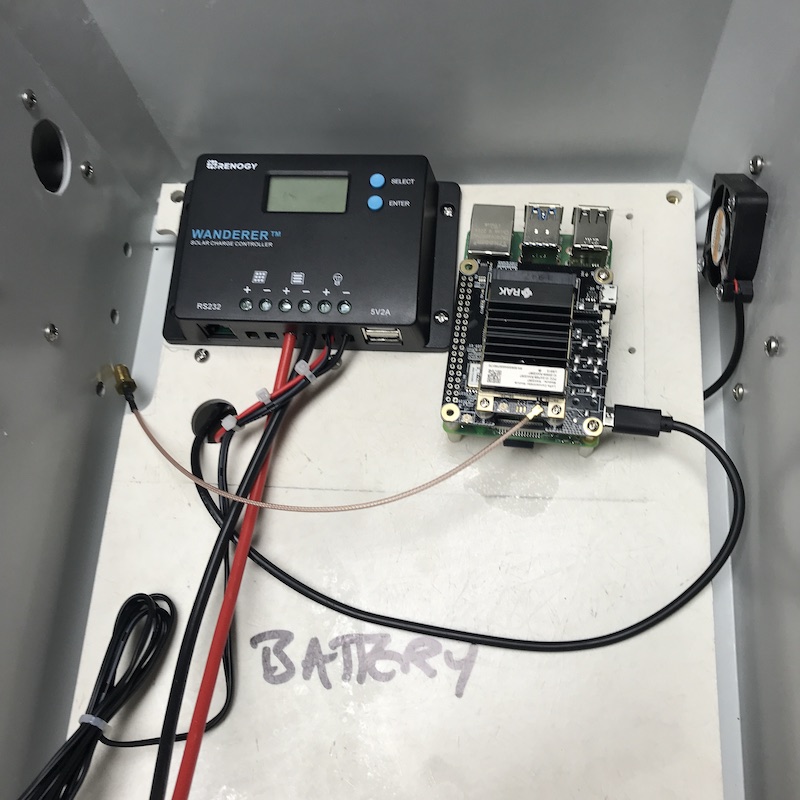
I found it super useful to just write on the backplate where I would put everything. I still made a few mistakes, and the final fit was much tighter than I’d like, but it works. This is the guts of Amateur Jade Hare.
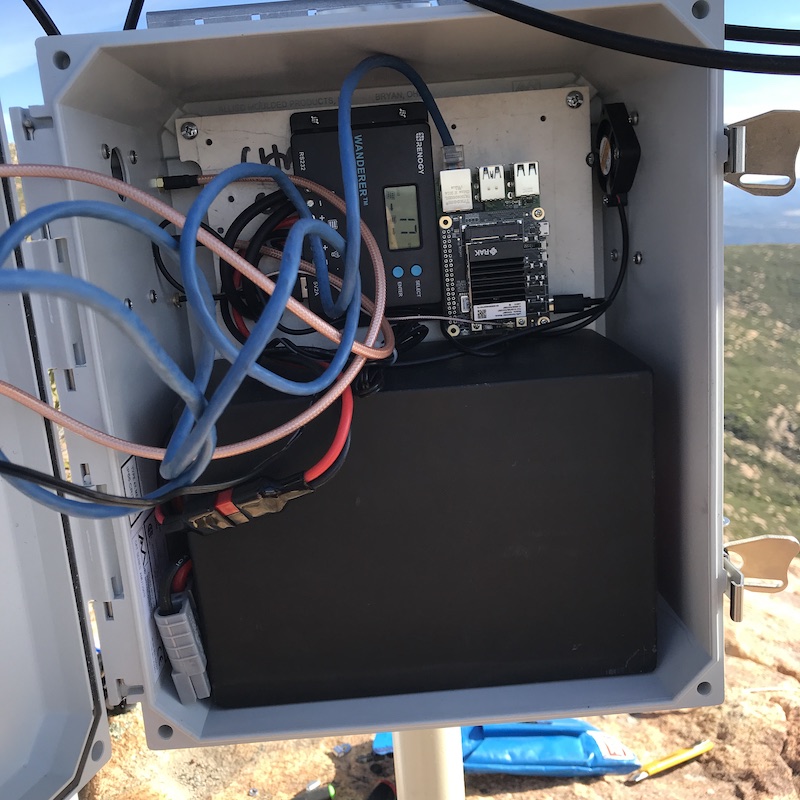
Here’s what it looks like from the back; you can get an idea of the fittings & connections to the pole.

From experience, most people want to use that same antenna. Trust me, you don’t. First, they’re a PITA to hump in. Here’s me at 5 miles in after 3,000′ of vertical gain. Deep in the well of physical misery.
Second, they’re a PITA to mount. Third, they’re so powerful you have to ask your geeky tech friends for help to dial back the transmission power. Finally, they’re huge wind catchers, so you need to mount guy wires to keep ’em steady. Fun to set up once, but not so amazing that I can recommend ’em.
Learn from my experience and stick with a more appropriate antenna. You’ll probably never thank me because you won’t know the ass-pain you’re missing, but trust me, that’s a hook-up piece of advice.
Ok, that should wrap up both the big picture and a few details on installing a remote Helium hotspot. If you want help putting one up and this post isn’t enough, you can hire me for consulting, more on that here.
If you’d like to see the results of someone who’s done a consult with me, check out this blog post of an off grid commercial roof install.
Post questions in the comments if you have ’em.
RESOURCES
- Solar calcs sheet This is for a DIY hotspot running a Raspberry Pi4 & 2287, not a full fat miner. This just gives you an idea. DO YOUR OWN CALCS! YPDMV
- Olivia Wireless – Only appropriate for DIY miners or Light Hotspots, as they data plan size is tiny.
- A Rough Guide to Helium Hotspot Placement – Before you get all hot and bothered about going remote, see if this’ll help you find an easier, better location.
- Gear List – This’ll give you an idea of what you’ll need to get. It’s definitely NOT the only way to do it.
Amazing article. Thanks for all the valuable information! This is something that I plan on doing with at least 1 hotspot this year and I’d like to know a bit more about your services – we can discuss via email.
One initial question I have is about the land that you placed the hotspot on. From the photo it looks like public land? Do you also provide consulting on how to find remote locations and how to legally go about placing a hotspot there?
Hi Derek, that placement required coordinating with multiple agencies and entities; it was not a simple or easy process. 🙂 I can definitely help identify optimal remote locations and help with guiding you through how to legally place a hotspot. Glad the article was useful!
Hi Nik, Indeed interesting article. Sure going to build one of these. (with some modifications). Thanks for that…
Question: such a pool on the top of a mountain… How are your thoughts about lighning. How do you handle that?
Hi Sacha,
Add in a lightning arrestor and a ground wire to any deployment and you’ll be as safe as you can. I mean, it’s a pole up high on a mountain, so it’s more likely to get hit than if you’re down in the valley, but that’s the risks you take, right? 🙂
Hey Nik, amazing setup. I only wonder: does the antenna have a lightning arrester? If not, why don’t you think it’s necessary? Isn’t there a good chance of the hospot getting “roasted” during a thunderstorm? Regards from Berlin!
Hi Mathias,
Wie gehts! Good catch, I didn’t have one on in this photo, whoops! You should always add a lightning arrestor to your antennas, although it doesn’t actually stop lightning, it just diverts the charge around the electronics and to the ground. I’ve added in the one I’ve used in my installs to the gear list.
Thank you. This is a great resource. I am in Southern California and am seriously considering using your “Off Grid Helium Hotspot Parts List” to build my own remote hotspot. I should be receiving several Rak Miners in June and would like to have one remote rig ready to go. Is the gear list posted still the best equipment you recommend? The remote location I choose is on the side of a mountain, so I will go with the 900 MHz 9 dBi Heavy Duty Flat Panel Antenna you have listed.
Hi Trip,
Right on, it’s a fun project! That gear list is an excellent start. I recommend going through it and making sure you understand what each thing is for and how connects with the others. You’ll need to figure out how you’re going to mount it. For example, the gear list assumes a pole mount but doesn’t include a mast or pole. I usually draw out what I’m going to do. Doesn’t have to be a work of art, it just helps you understand how it’ll all go together.
Also, you’ll have different power and data requirements than this one, as that gear list is for a DIY miner, a program that has long since closed. Make sure you factor those in to your calculations.
Ah ok. Appreciate you’re quick response 🙂 I am still learning what everything is for.
I assumed the gear list sheet was for the Jade Hare location, using a Rak miner. Did you place a more powerful solar unit/battery for that? Also the two antennas for the cell modem, in the picture you drew you have those attached to the enclosure box. Did you use some kind of enclosure antenna attachment to protect those? I figure the rig I need will be very similar, with the exception of a directional antenna and I will likely attach the components to some rocks rather than a pole.
Well, it was built from the initial Jade Hare gear list, but AJH is a DIY. It gets complicated, but with a DIY you can basically use much less power & data by offloading most of the work to a cloud miner, which I did. You can’t do that with the RAK, so you’ll probably need a larger battery. I’ve attached the cell antennas directly to the box for some installs and for others ran them up a pole just to give them more elevation. You’ll need to use a gland to weatherproof the seal from inside to outside the enclosure. If you’d like a step-by-step walkthrough I’m available for hire, choose the Strategy & Placement option. 🙂
Thanks, I may hire you for that! I would rather get things right the first time than have to rebuy stuff because it’s wrong. I’m still in the early stages.
Hi Nik, great article and thank you for all that you do. I had a quick question about the battery an the charge controller – did you plug the charge cable from the battery into anywhere or does the charge controller allow charging and discharge through the discharge port of the battery? Thank you!
That battery has two cables. One is a giant grey one that I don’t use, the other is a smaller black/red Anderson powerpole that you use to connect to the solar charge controller.
Hey Nik – This is really awesome! Thank you for being such a great resource to the community. Quick question on the cellular side – What kind of monthly data costs do you incur using the Cradlepoint and Olivia Wireless?
Thanks Ryan! My costs won’t be your costs; I’m just running a packet forwarder as part of the DIY, so my data requirements are under 200MB/miner. Cradlepoint has some 3 year plan that’s included with the $500 purchase, so that’s basically a $0 cost. Olivia for mine is under $10/month for 2 active miners. Look at the UltraMobile plans for a full fat miner, they have unlimited for around $50 and they’re always running “sales”. 😉
Thanks, Nik! I’m still learning about all of this. I have some miners on order and I’m reading and researching as much as I can. I figured since the miner is going to use 20-30gb of data a month I should consider that as part of my plans if deployment makes sense in an off-grid situation.
Nik,
I’m in Orange County so my non-sun days would be similar to yours. So would a 200 wt. – 12 v solar panel be sufficient?
I’ve got access to three commercial buildings but I think the owner would be more convinced if I didn’t have to penetrate the roof.
Bill, that’s double what I’ve got, that should be plenty. 🙂
Hmmm. I guess I misread your Excel Spreadsheet. I want to take your advice and not go bare minimum, but I also don’t want to overspend for obvious reasons. Anyway, thanks for the reply. I believe I will have the ability to put one on a cell tower next to the building (tower came with the building). So I’m pretty sure I’ll be engaging your paid services to consult. Hopefully by the end of July or early August.
So my building owner said I can use the outlet on the roof. But the cable is in the underground parking closet so that’s a lot of cable to reach the miner. I was thinking of using a Cradlepoint in an off-grid format but using the outlet instead of solar. This would seem to be better than tapping into the building wi-fi which I suspect may kick me off a lot and which occasionally needs a reboot on the weekend with me having no access to the modem. Thoughts?
Interesting. May be time to use the RUT240 there, especially if it’s easy to check up on. Last I saw the Cradlepoint was out of stock 🙂
You mentioned a ground wire in an earlier comment. Would you (did you) add a ground rod as well? I couldn’t tell from that previous answer answer whether you just risked it or took those extra steps.
Technically, you should always ground everything and use a ground rod. 🙂
Even though you don’t recommend it, I still would like to know which antenna is that in the picture, the one that looks like a big rectangular panel.
Great Job!
Thank you.
Getting close to putting up my enclosure and about to order a few LHT65 for each deployment.
I see you were mainly using it to assess connectivity but how do we get temp and humidity info about it? Is there any resource you could point to that talks more about using these sensors? Do we pay for data transfer from the sensor or did the manufacturer? It all just seems like pages of code. thank you so much for everything you do!
Hi Greg, check out this post on using the LHT65. 🙂
Hey Nik I am confused and need help about how to setup the 4g modem from cradle point. Basically I already bought all the list except for the internet portion. I hope you get back to me. Thank you
Sure, what are you confused about?
I don’t like solar powered systems because they suck. Not just they cost you tons of money (way more than you would spend over the years for grid electricity), but you need to oversize them waaaaaaaaaaay more than the actual usage is.
You can run an RPI4 from 2x12Ah batterys in parallel for about 6 hours on idle at new age. You may say does the PI drain 4A constantly? Nope battery manufacturers always lie about the site of these crappy lead acid batteries and this is at new age of the battery. Give it a year or more and it’s about 4 hours. So in his case he used 50Ah batt which is going to provide enough for approx 8 hours of darkness, now that is nice except… if your circuit draining them down to 100% where the batt voltage is approx 13.60V (considered depleted) these batteries need about 48 hours to fully charge so you may never want to go down that much.
Then you have to also calculate that on the winters there can be as less as 1-2 hours of sunlight or cloudy all day long.
I don’t know whats the date of this article but I doubt his running it since 1 year. I simply think that this system is way under designed, I would recommend at least 100Ah in batteries unless that location is some real sunny all day long and even then batteries will always degrade. You will eventually have to replace them after 4-5 years.
Hi Gekko, that unit has been running since, oh, November of 2020. It’s made it through the winter months and a cloudy streak. I don’t think you’re getting your math right on the “approx enough for 8 hours of darkness”, I’ve designed the system to last for over 3 days without significant energy input (cloudy winter days.)
I’m not sure this is the right place to ask but… when you install a hotspot off-grid, do you need to pay for that land? If so, how does someone go about doing that?
Depends on the landowner. I’ve seen 90/10 splits, I’ve seen ones where the land owner doesn’t care, and ones where they want $500/month or a 50/50 split. Totally dependent on what they want.
Ahh, okay. Makes sense. Thanks for clarifying, Nik!
Hello Nik,
A couple months ago I set up my hotspot on the flat roof of an apartment building. The internet is through AT&T prepaid using an LTE modem. However, port 44158 is closed and I am “relayed” since day one, because AT&T (as a cgnat) does not provide a public IP address. I checked Verizon and T-Mobile and they also use cgnat… Can you please tell me what carrier you are using and how you managed to get a public IP address?
Thank you!!!
Hi Paul, I’m using Olivia Wireless, which is fine for packet forwarders (future Light Hotspots) but not set up for “full fat” miners. T-Mobile was offering a plan of 100GB for $55/month, but they’ve since closed that down. Have you checked in on the Discord #off-grid-and-enclosures thread?
Hello Paul,
If you are in the Southern California area I may be able to help you figure out the connectivity issue.
Hey Adrian, if you’ve got a good solution please let me know, would love to share that info with the Helium community!
A company from Portugal is starting to manufacture these: https://store.bevotech.com/product/stand-alone-hotspot-outdoor/
A bit pricy, especially when you throw in their 4G modem.
Rad, off grids are the most fun ones!
Any suggestions how to make sure it works during cold and snowy winter? It gets to – 25 – 30 sometimes in my region…
To mitigate snow you’ve got some options; larger batteries, larger panels, or snow removal. It’s not all complicated (like automated snow removal) but it will probably get expensive. I’ve heard of folks insulating their enclosures for winter, but I haven’t done that myself.
Hi Nik! If you’re using a outdoor helium miner, ex. Kerlink outdoor miner, how you will go for the power supply? Thanks
You’ll need power, usually from a solar panel with a battery and charge controller.
Pingback: Packable Off Grid Helium Miners - Gristle King - A Guide to Helium
Hi Nik and community – Has anyone found an LTE modem/carrier option for full fat miners that allows port forwarding? I’m also concerned about most unlimited plans that throttle speeds down to 128kbps after 40-60GB of data as my miners are already using close to 150GB of data per month which will just continue to go up as the network grows and usage increases. And I don’t know how mining performance will behave at the throttled speeds as I see my miners using up to 600kbps or more multiple times a day. Please share any ideas or suggestions, thanks!
Hi Bryce, try this post for the port forwarding setup. As far as data, there are no good options as far as I know right now for full fat miners.
So are you able to open port 44158 on the mifi unit your using for internet on this setup or is it relayed?
Hi Brock,
Just for clarity, a “MiFi” and a cell router like the 240 are different things. On a router like the 240, you can generally open the port, although that can depend on your carrier. On a typical MiFi device, you probably can’t.
Your the man, I just drew this schematic in my head and it looked very much like yours except my box was hidden in a fake bird house lol.
Hi Nik,
My miner is using around 5-6 GB data per day, any thought how can I reduce it because I have metered connection (100GB per month). Please guide me if any solution you know.
Thanks in advance 🙂