With a generous assist from the folks over at HNTenna, here’s a step by step method for setting up your RUT 240 (the cell modem that allows an off grid Helium Hotspot to connect to the internet.)
I’ll start by saying that off grid set ups are not for the faint of heart, the easily discouraged, or folks who avoid challenges. You WILL run into challenges. Batteries will go bad. Miners will overheat. Your data plan will need to be far larger than normal (100 GB/month is what you want as of Nov 2021.) Don’t do off grids unless you’re willing to proactively solve those, usually on your own.
UPDATE — OFF GRID DATA PLANS
The latest advice (25Nov2021) is to NOT do any of the below, but to get a standard SIM card plan (I know this doesn’t sound right) of 2 GB @ 4G and unlimited at 3G $15/month T‑mobile and let them be relayed.
If you’re determined to still go forward with this, try Proslashers instructions for the 240, over here. If you buy a pre-built VPN from him, use gristleking at checkout for $10 off your order.
Off grid set ups ARE for folks who love rad projects, who are willing to problem solve, and who get more joy out of figuring shit out rather than having a plug ‘n play solution handed to ’em. Nothing wrong with either one, but there’s a definite success formula here that does not favor “Please do this for me” mindsets.
Before we dig in, let me make a semi-official disclaimer: This post is a set of guidelines that have been successfully used to set up a RUT 240. No one involved in this is offering any official support, though I’ll help as best I can via the Comments section at the bottom of the post. If this setup doesn’t work for you, please do NOT DM me. Post to comments so we can all learn from your challenges.
Teltonkia (makers of the RUT240) have recently posted a video on how to set it up. I’ll leave our old guide in here for posterity, but here’s how Teltonika recommends you do it:
The “Old” Way (for Posterity only, we no longer recommend this)
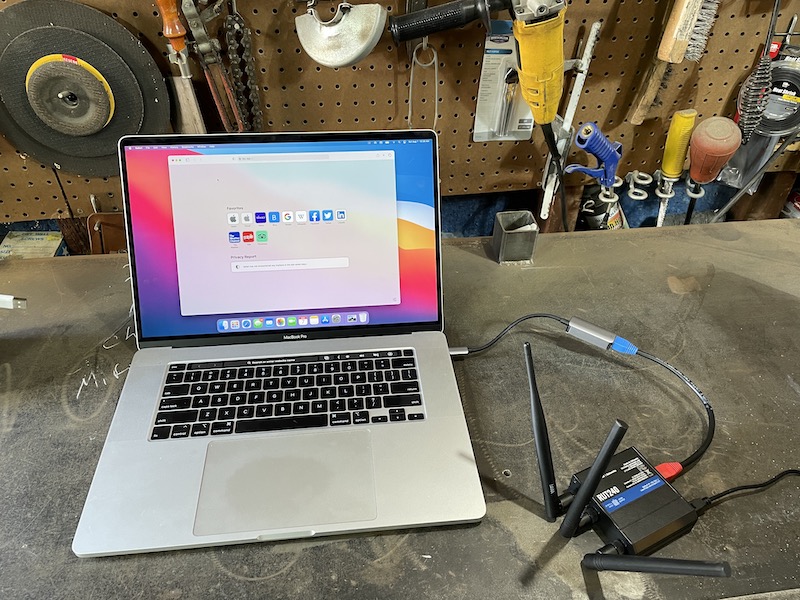
Start by turning off your computer WiFi, then connecting your computer via an ethernet cable to the RUT240’s LAN port. I used an adaptor to get from Ethernet to USB‑C; you can get those on Amazon.
Power up the RUT 240. Wait.
On your computer, navigate to 192.168.1.1 in your URL.

Enter admin01 for the password and click the LOGIN button.
You will be prompted to enter a new password. Do it, then click SAVE. Keep in mind that the modem can take a while to “think”, so just be patient after you hit SAVE on this, and any other screen.
You now have 2 options, one simple, one complicated. They have both worked. Try the simple one and see if it works. If it doesn’t, try the complicated one.
Option 1 — Setup Wizard
System —> Setup Wizard —>
Step 1
Set local time, enter password
Step 2
Uncheck Auto APN
APN —> Custom—> [enter your APN if you got a static IP]
Step 3 —> Skip
Step 4 Wifi —>
WiFi SSID: [Name it whatever you want]
Password: [your password]
Leave WiFi enabled for now, it’ll make setup easier later on when the system is installed, you’ll just need the laptop to access it.
Write down the Router Serial & MAC address, then log into to rms.teltonika.lt
Add Device using the MAC address & Serial number
Go to System Management and look for:
Reboot
Select auto-reboot every 24 hours by checking every day of the week.
Log out. You’re done.
Option 2 — Let’s Get Geeky: Not true static IP, but static DHCP lease
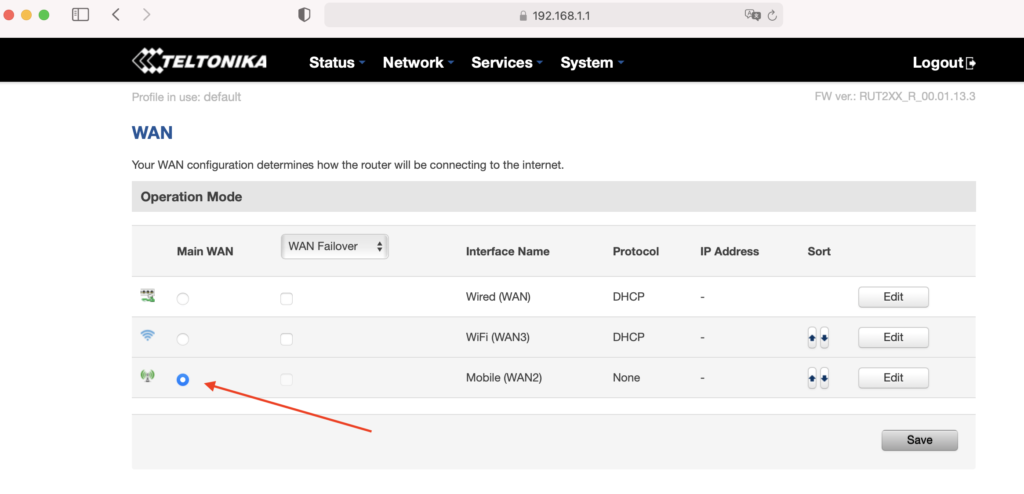
Start from just after you set the password on your RUT 240, above. Now, on the top menu bar, navigate to Network –> WAN. You’ll see a screen like this, usually with Wired (WAN) selected.
Select Mobile as the Main WAN, then SAVE.
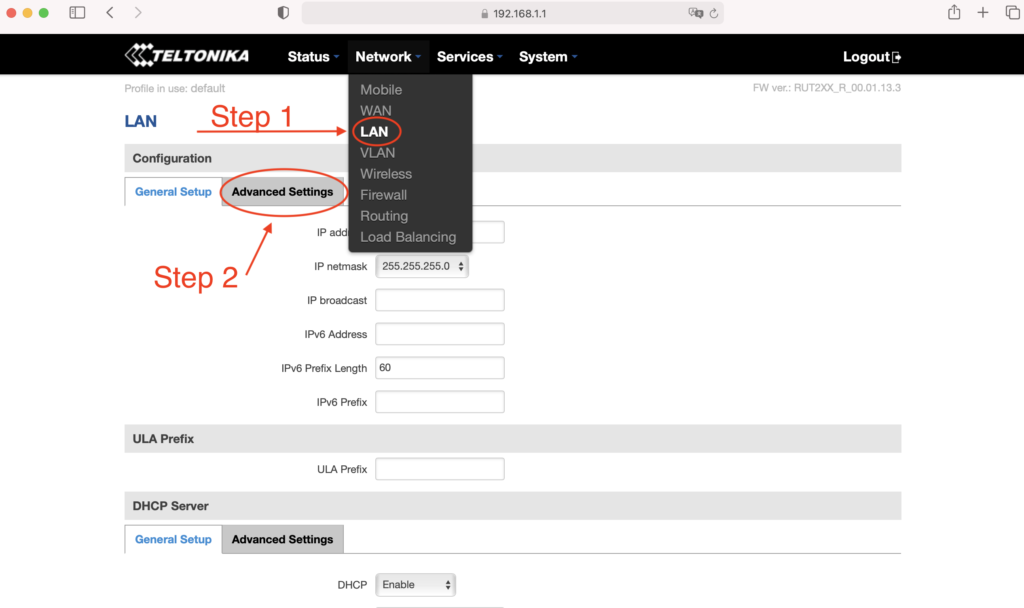
Next, in the top menu bar go to Network –> LAN and select the Advanced Settings tab.
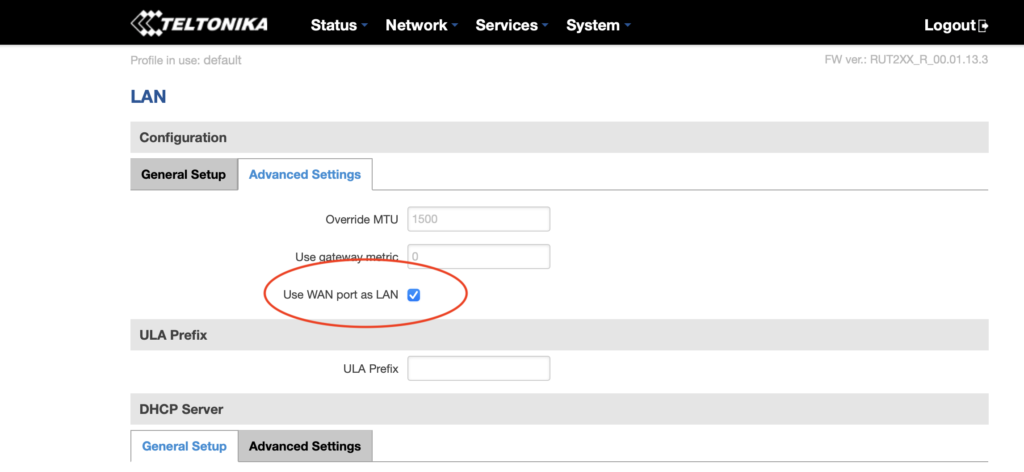
Select Use WAN port as LAN, then SAVE.
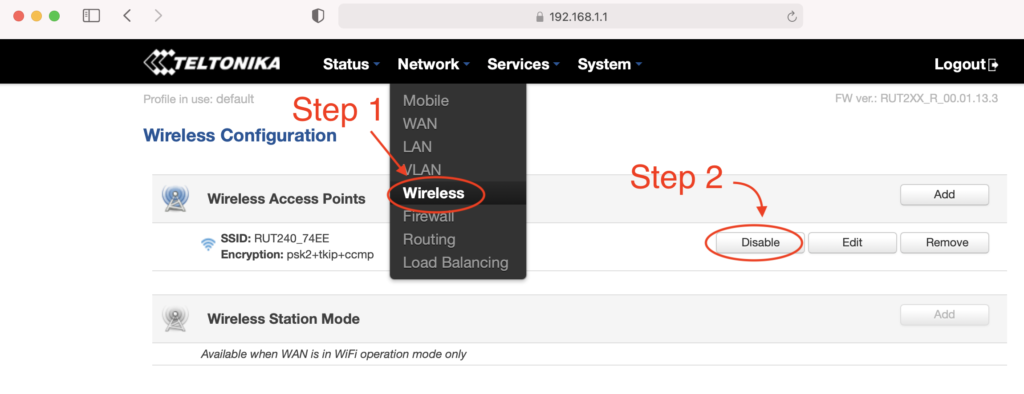
Now navigate to Network –> Wireless, where you’ll disable the WiFi. This’ll disable the wireless access point and save you power, which is important for off-grid setups 🙂
You’re crushing it. Just keep going. Ready for the next part? Read it carefully first, then execute.
Before continuing, do the following in order:
- Unplug the ethernet cable that is connected to your computer from the LAN port on the RUT240
- Plug the ethernet cable into the WAN port on the RUT240.
- Connect the Helium Hotspot to the LAN port on the RUT240 with the ethernet cable supplied
- Power on the Hotspot.
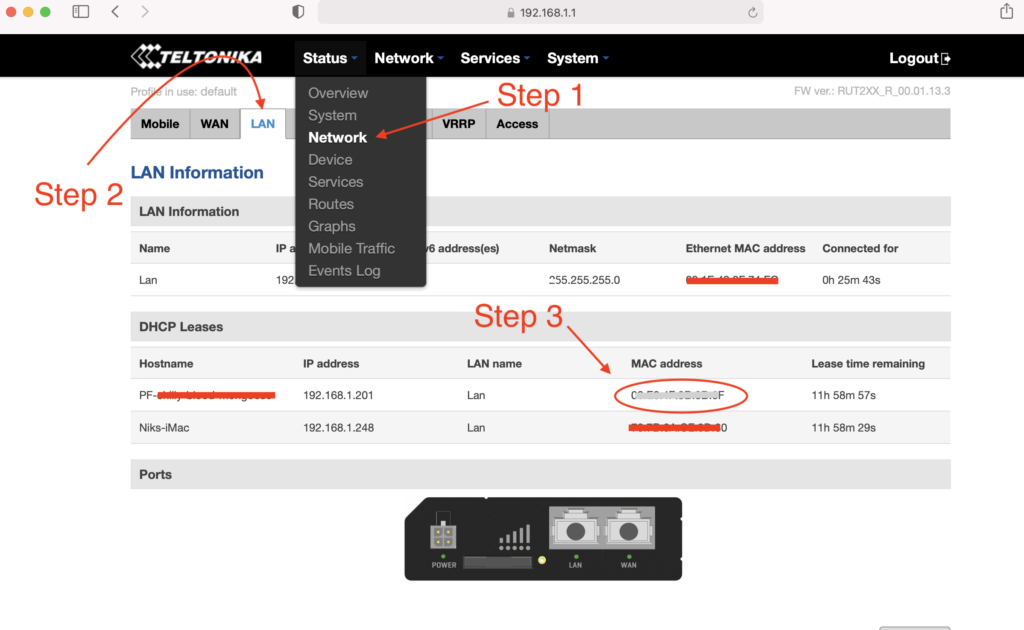
Nice work! Now, navigate to Status –> Network and click on the LAN tab. Find the MAC address of the Helium hotspot, highlight the MAC and copy it.
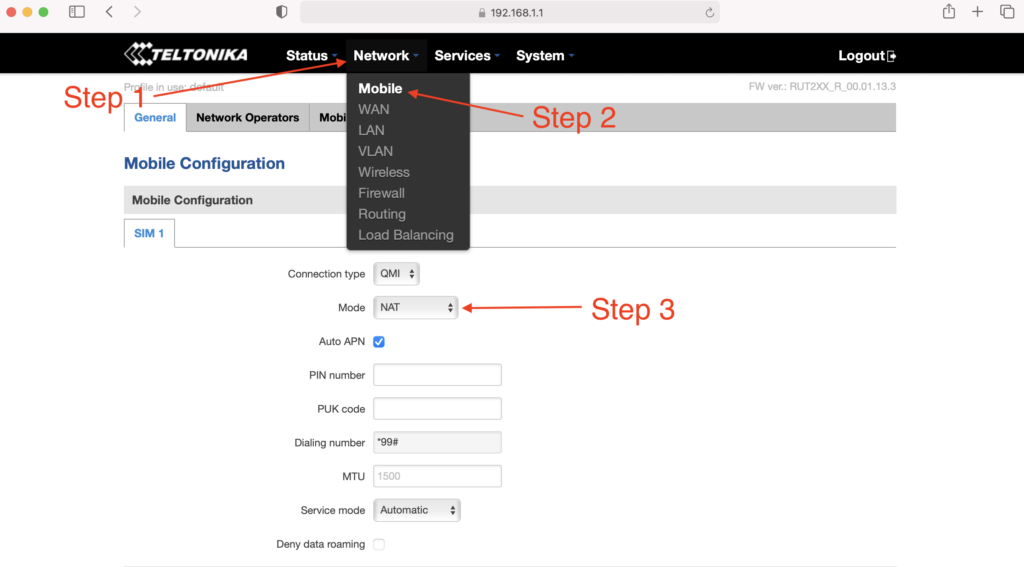
With the MAC address copied, navigate to Network –> Mobile. Look for Mode and select Passthrough.
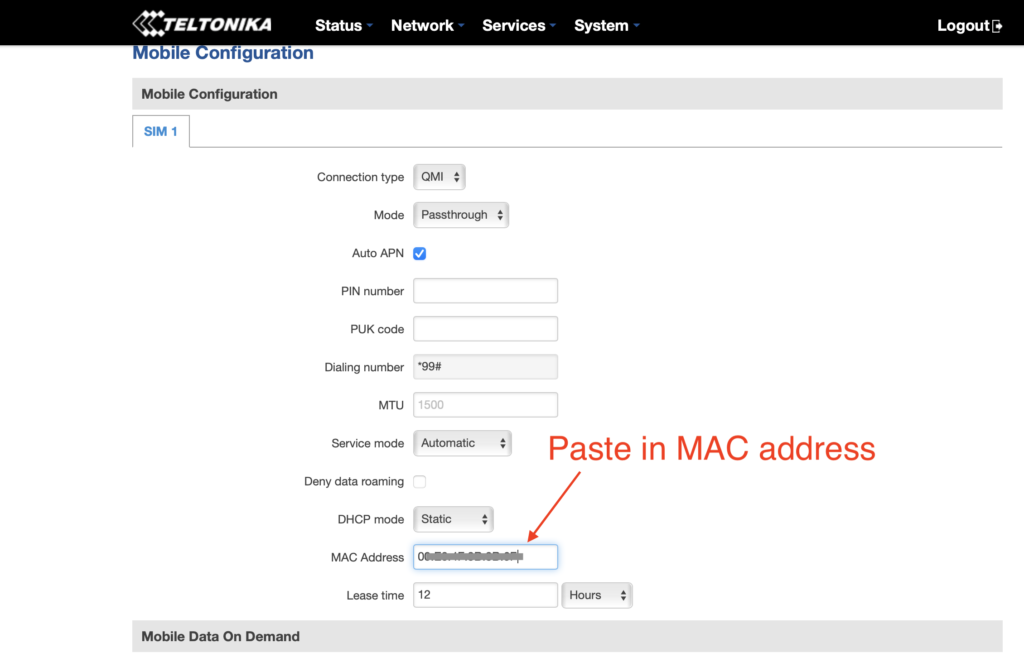
New fields will appear. Locate the MAC Address field and paste the copied MAC address of the helium hotspot. Click SAVE.
One more thing…you have to enter your APN. I had to do this, but forgot to take screenshots of it. See where it says Auto APN on that screen, and the box is checked? Uncheck that, then follow what makes sense and enter in your APN (your SIM card provider will be where you get that.)
If that becomes a huge PITA and a sticking point, I’ll update this tutorial.
How Much Data Will Your Off Grid Hotspot Need?
UPDATE: For an off grid miner as of November 2021, you’re going to want 100 GB/month, and that still may not be enough. For a long time, the 50 GB/month plan called out below with T‑mobile was enough, but with the blockchain size growing, it’s no longer cutting it. I’ll leave the rest of this in here for posterity, but any reference to plans lower than 100 GB/month is outdated and wrong.
Here’s a graph of the network data traffic for a group of hotspots on a 10 minute average:
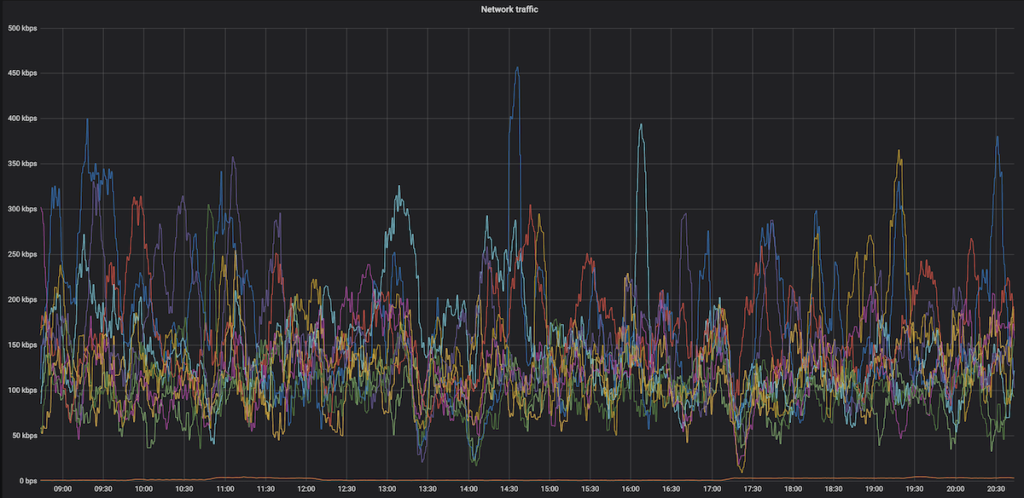
Yep, that highest of high spikes is 450 kbps, and almost everything is below 300 kpbs. So, while data is important (you need a lot of it), speed is usually not. With that said, I’m getting reports in the field of 650 kbps and above spikes that temporarily shut down hotspots. Be ready with patience when that happens.
Recently I’ve heard from folks testing 4G speeds reporting that a 15 Mbit up/down (vs 10 down and .8 up) gave a 250% increase in HNT rewards, so speed may matter more than we thought. This is definitely worth further investigation, and the T‑mobile planned called out below may not be fast enough or large enough for you, depending on the local speed of your 4G connection.
What SIM card should you use?
T‑mobile has a BUSINESS (NOT personal) plan that’s $50 for 50GB at 4G speed, then unlimited data at 3G speed, which is supposed to be 3 mbps minimum. That should work MOST of the time for us. If you have a plan that’s working for you ALL the time, please add it to the Comments section below.
I’ve got a T‑mobile rep who is clued into what we need, his details follow.
The plan is available nationwide in the US, and as far as the rep knows it’s not going away any time soon.
T‑Mobile doesn’t guarantee the speed (apparently there are no speed guarantees in the world of telco wireless), but I’ve got clients who’ve been using this and it’s working fine most of the time.
Here’s the rep I talked to. We went through the whole Helium scenario, so when you call him he’ll be prepped. Just tell him Nik from Gristleking sent ya, that should jog his memory.
Abu McLean
In order to protect his email from the bots: ABUBAKAR.MCLEAN17 then use the little @ symbol then put in T‑Mobile.com
Direct: 615–445-4008
Hours: 9:15AM to 6:15PM CST (Mon – Fri)
- You’ll need a business account. You can’t (as far as I know) run this off your social security number.
- Ask for the 50 GB at $50/month plan with unlimited data at 3G after the 50.
- You can get a Static IP for $5 more, ask for a “SOC Static Public IP”. UPDATE, MAR 21, 2022: You don’t need a static IP for much longer, this may not be worth it.
- SIM card price is the same: $20 + sales tax (~$2) per SIM card
If you email him, would you cc me (my first name, which is Nik, then @ and this website) so I can keep track of how it’s going and any snags that come up?
Oh, you’re in Canada? Here’s what a client sent me:
FYI — I found a cell carrier with a static IP that doesn’t get relayed in Canada. If you call Rogers, get a hold of their small biz department and ask for a static IP, they’ll mail you a SIM card that works with the RUT240 instructions on your blog. The only problem is that because this is Canada, its $120/month for 50 GB + $20/month for every 10 GB after that, and it’s $12/month for the static IP. Ouch!
-M in the great Canadia
This guide was almost entirely written by the crew at HNTenna and passed on to me. With their permission and with a few changes, I’m making it available to you. Rock on!

Leave a Reply