This is a project taking you through the basics of how to use the Helium LoRaWAN for projects around the home. Relax, we won’t be automating your entire house and accidentally unleashing Terminator. This is just a very simple start into using Helium.
At the end, if you follow all the directions, you’ll have a light that turns on when a door or gate opens. Super simple. Here’s what it looks like in broad strokes.
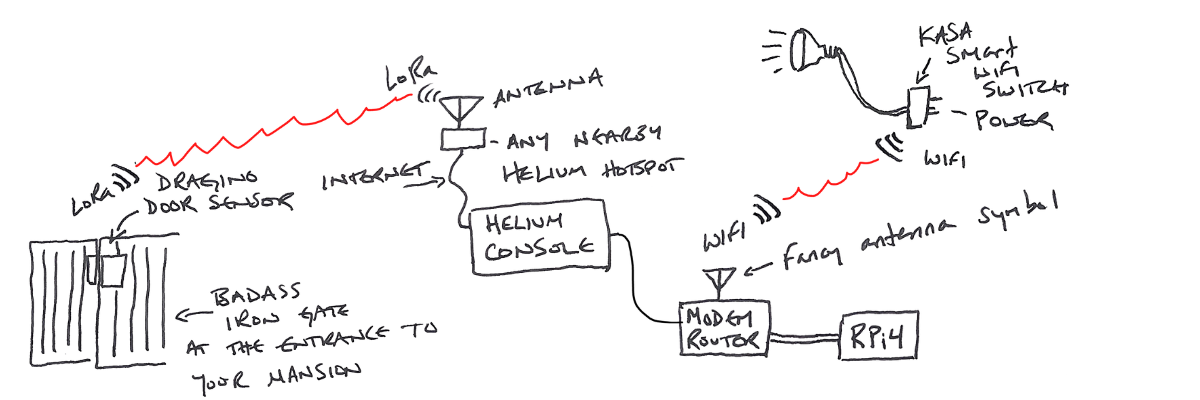
Obviously you have a badass iron gate at the entrance to your mansion. You’re in crypto, right?
Here’s how the flow works in writing, with a little more detail.
The door sensor sends an “open” or “close” packet of data along with and identification of the sensor (“I’m a door sensor named 2r782sdhvwjf, and the door is now open”) over LoRa to any nearby Hotspot.
That Hotspot passes the info on to the Helium router via the internet. When the data gets to the router, the router says, “Hey, anyone want to buy this packet from 2r782sdhvwjf?”
Your Console account (which you’ve set up to watch for packet from 2r782sdhvwjf) says “Hell yes I’ll buy that packet!”, pays with Helium data credits, and receives the packet data.
The data from the packet goes into your Console, where it’s decoded and passed on to an “integration”. The integration in this case is to an MQTT (Message Queuing Telemetry Transport) “broker”.
A “broker” in this case is an application that receives and forwards MQTT messages. That MQTT message is sent by the broker to an open source program called “Home Assistant”. Home Assistant lives on the Raspberry Pi.
The Raspberry Pi receives the data from the MQTT broker, processes it in Home Assistant, and spits out a nice little “open” or “close” message which it then transmits over WiFi to your Kasa (or any smart plug) saying, “Hey dawg, door’s open, get that light on stat!”
And that’s it, at broad strokes. Ok, let’s dive into how to do this thing at home. We’ll start with spending money, about $130 total. Relax, most of that is the Raspberry Pi, and once you have one you can use it to do all sorts of other things. Think of the Pi as a Swiss Army knife. This time you’re buying it for cutting bread with the knife, but in the future you can use the corkscrew for wine, the screwdriver for opening that wooden shipping box with the Lister engine you’ll wonder how you lived without, and the tweezers for removing that SD card. But…let’s not get ahead of ourselves.
Purchase List
[ninja_tables id=“6052”]I put in the option for an indoor or an outdoor Kasa plug, which depends on where you have your light plugged in.
Once you’ve received all the physical things we’ll go through the following steps in order:
- Door Sensor
- Add the sensor as a Device
- Add a Decoder function
- Home Assistant (HA)
- Install on RPi and confirm it’s available on your network
- Configure Home Assistant
- MQTT Messaging Broker
- Connect everything
Aight! Let’s get this party started!
Add The Sensor To Helium Console
Step one: Add the door sensor to Helium Console. Now, this is written in December of 2022, about a month (maybe more) before we make the giant switch from Helium running Console for everyone (10 device free limit) over to when you’ll need to find another LNS (LoRaWAN Network Server). These specific instructions may not apply forever, but the broad strokes will.
Find the DEVEUI, APPEUI, and APPKEY associated with your sensor. If they’re not in the box, you’ll have to do some fiddly bits and buy one more thing for about $15. If that’s the case, lemme know in the comments and I’ll do up a tutorial on that for you. Easy when you know how. Daunting when you don’t.
Ok, I’ll assume you got the DEVEUI, APPEUI, and APPKEY. Enter them into the appropriate fields in Console (or whatever you end up using.). It should something like this:
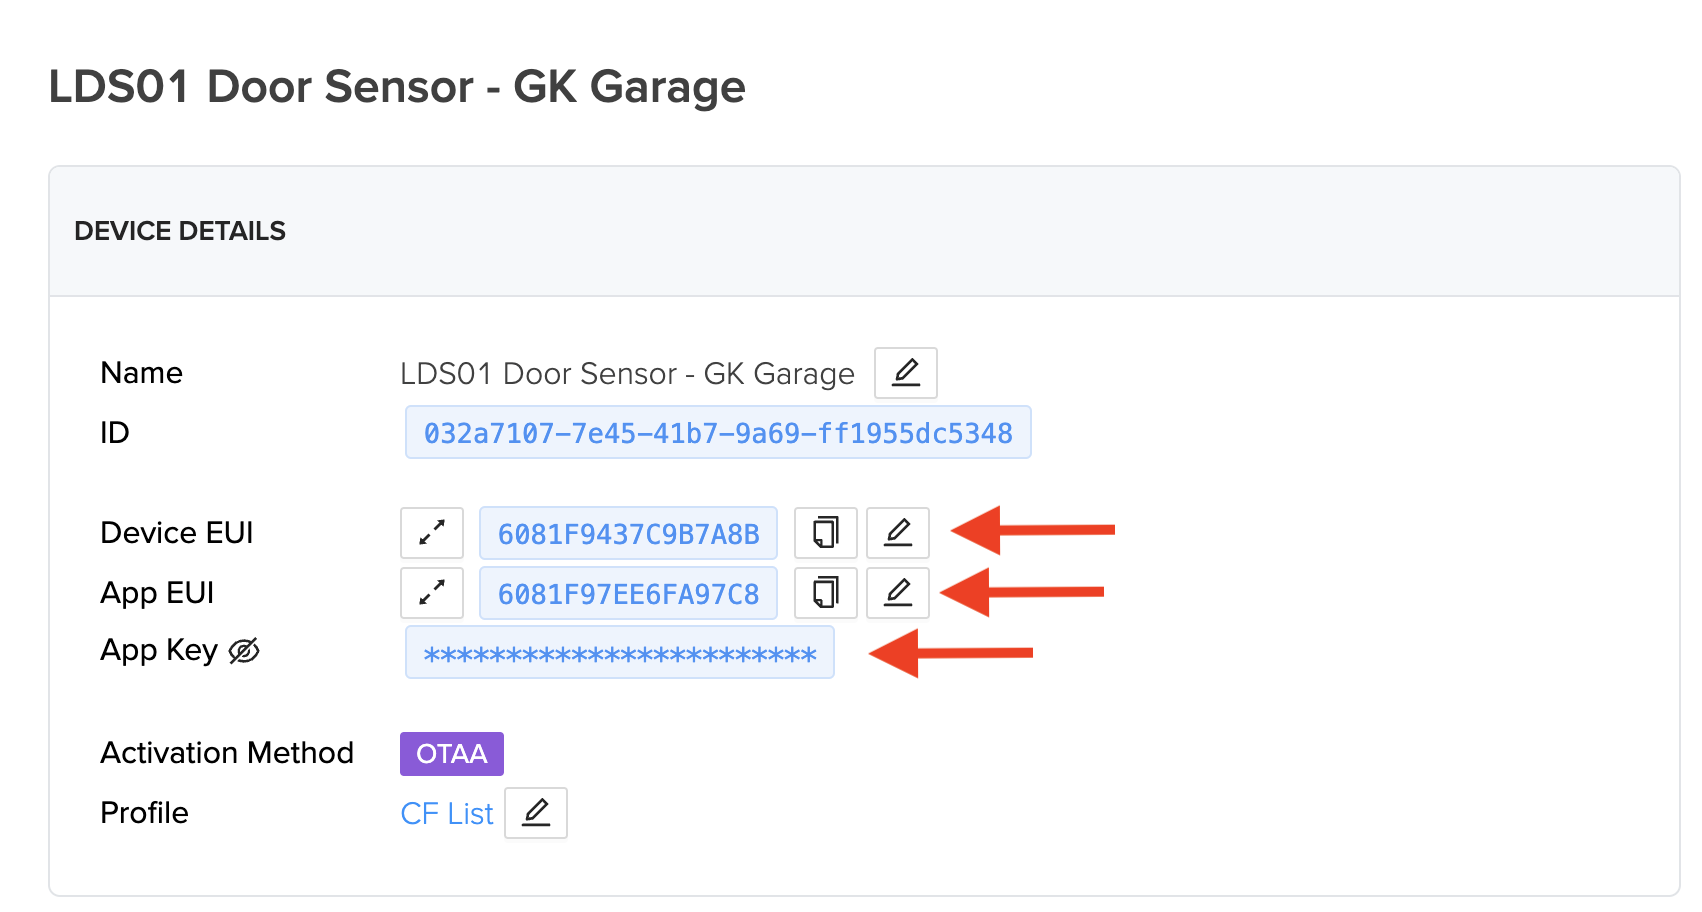
Ok, so conceptually, what we’ve done so far is tell the Helium network that whenever any Hotspot receives data from this sensor (identified by the all the APP/DEV EUI keys) that you’ll buy that data. Relax, it won’t cost you that much, and if you want you can limit how often you’ll buy it or from how many different Hotspots you want to buy it (if multiple Hotspots “hear” it).
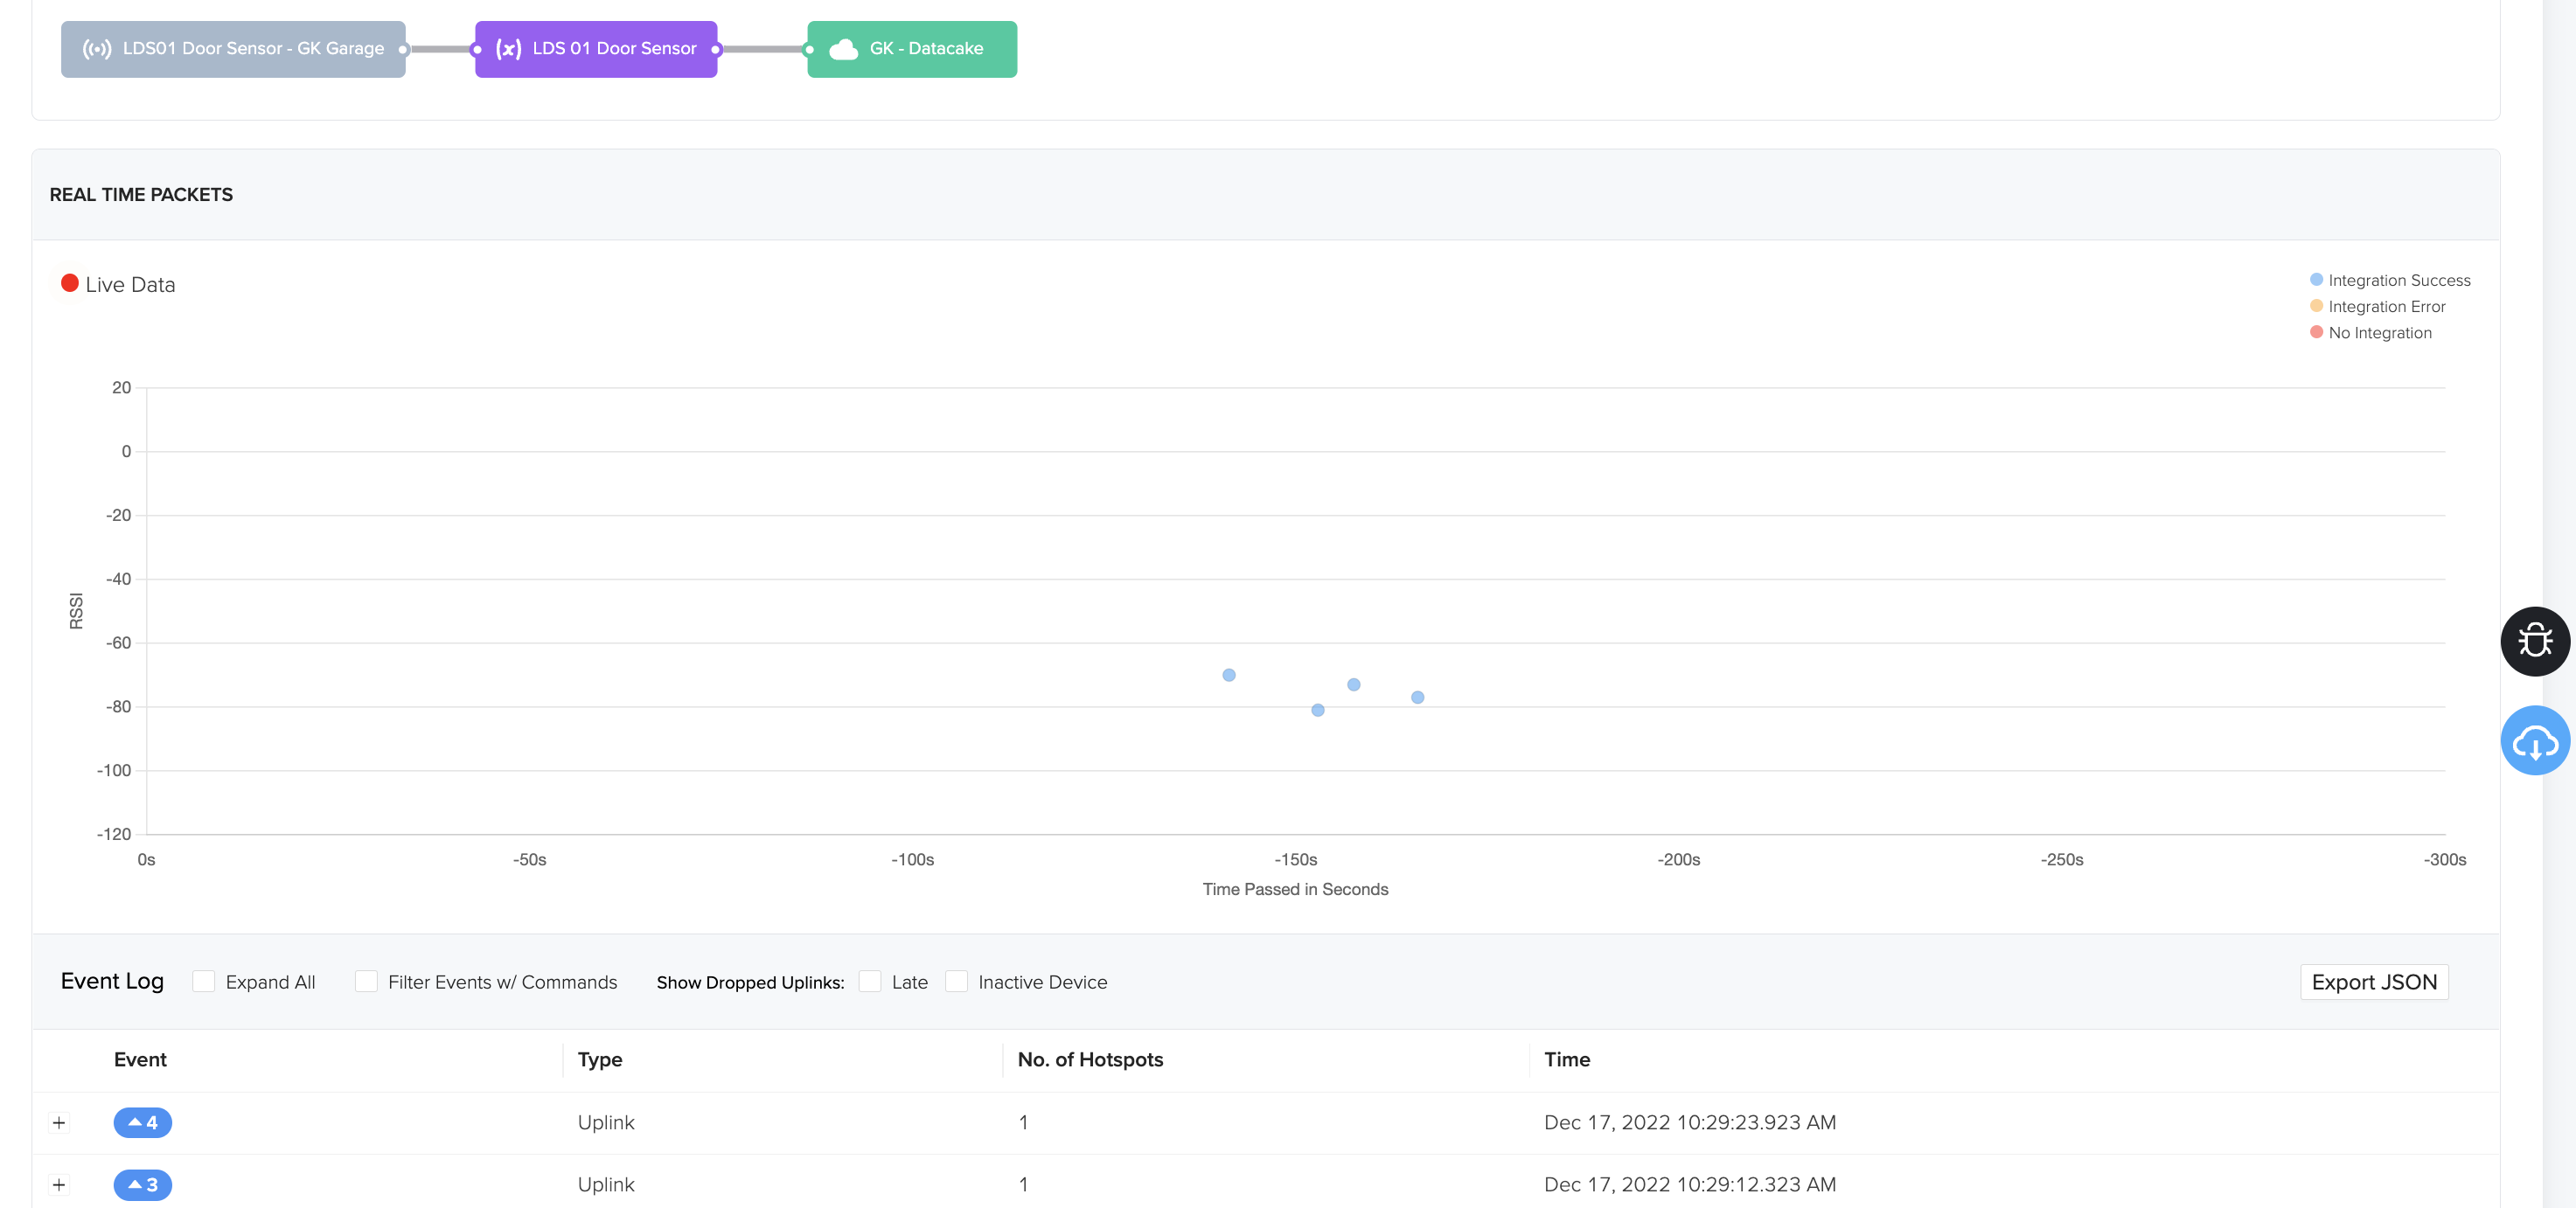
To make sure we’re getting packets through, go ahead and move the sensor/magnet apart a few times, as if the door was opening and closing. Pro tip: Do NOT install the sensor until the very end, otherwise you may be doing a bunch of walking back and forth to your door.
You should see little dots marching across the screen on the Device page, like this.
Cool, so you’ve bought the data, now you have to decode it. Semi-confusingly, this data will need several modifications in how its presented along the path sketched out above. Think of it this way: Not all computers speak the same language, and each time the data moves from one system to another, it (usually) needs to be translated. This “decoding” is the first translation.
Add The Decoder
For this (and any) sensor, the manufacturer will usually provide you with the decoder to use. In this case, Helium also maintains a Github repository with a decoder for this device. Confusingly, the decoder for this device in Helium’s Github is called an LDS02, even though the device is an LDS01. I’ma use the Helium-suggested LDS02version below. If you use any other decoder you’ll have to make some changes to the code further down. If this is your first time doing this, just use Helium’s version. Here’s how to do that if you’ve never used Github before.
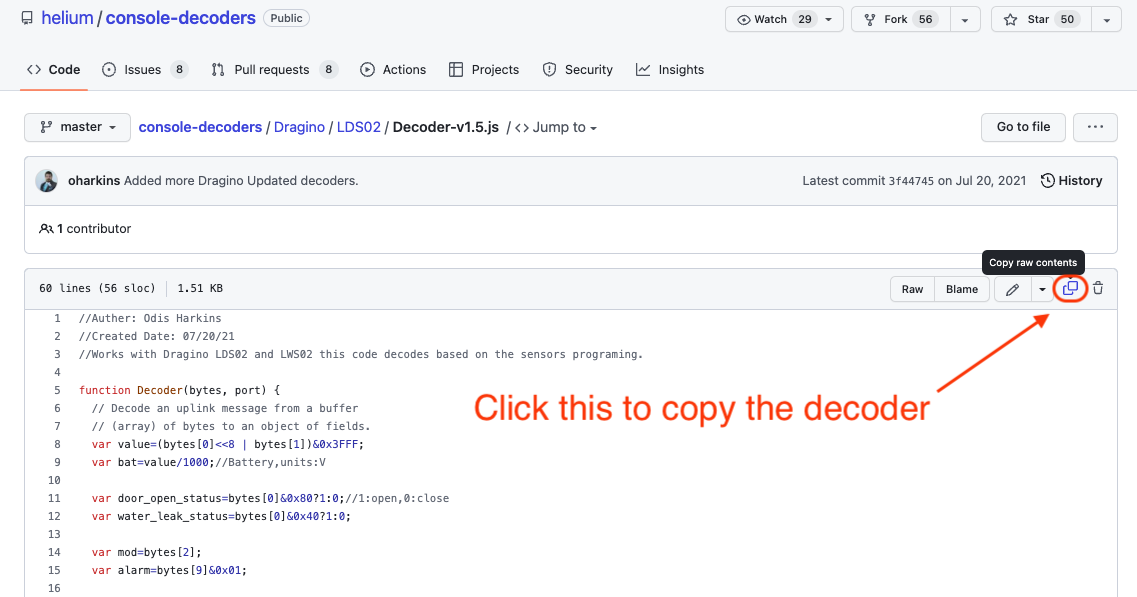
Go to the page here, and look for “Decoder-v1.5.js” in the list of files.
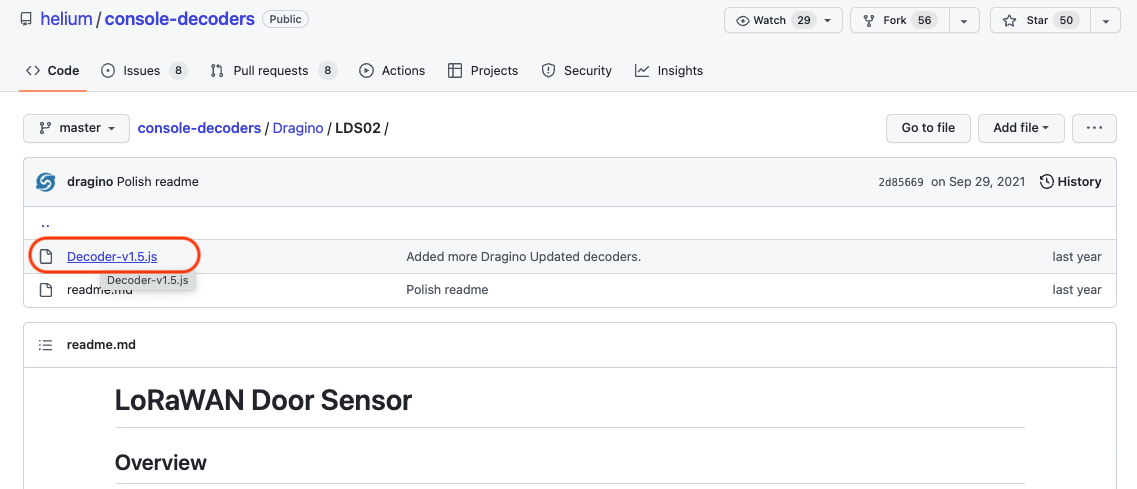
Click on that and you’ll see a box with a bunch of code. Click the little double-square button up in the top right to copy this. You’ll be pasting this into the Helium Console next.
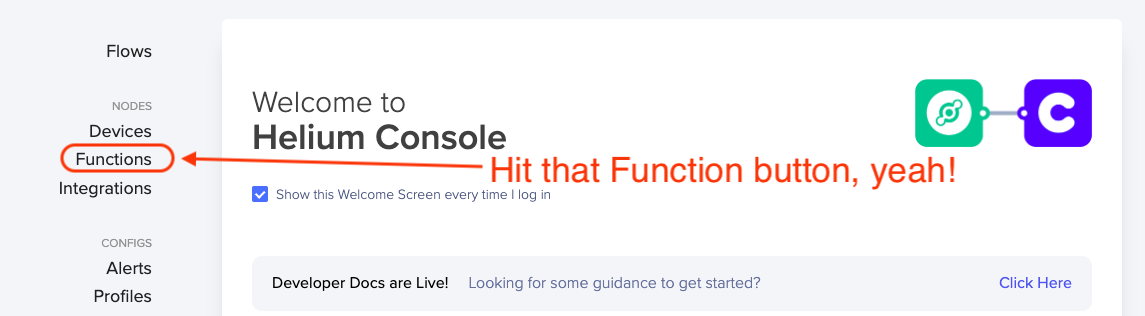
Now that you’ve got the decoder copied onto your clipboard, head over to Console and look for Functions on the left menu.
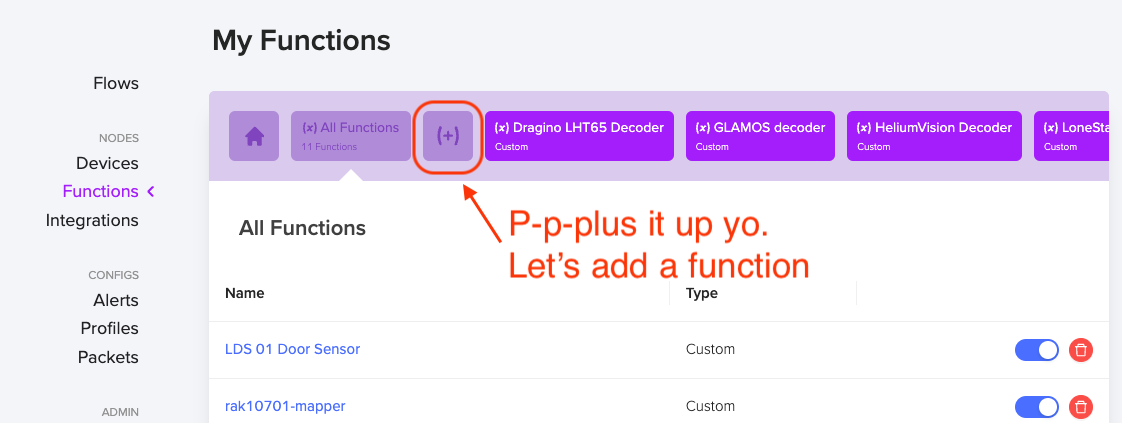
You’re crushing, nice work. Now we’re going to add a Function, pasting in the code you just copied. Hit the plus button.
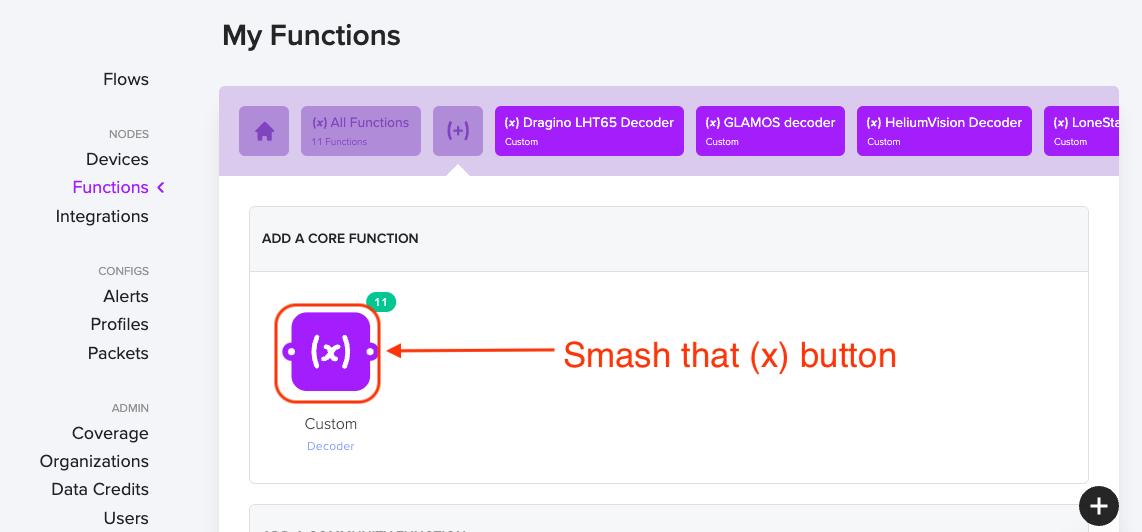
Ok, we’re going custom here, ’cause you’re worth it. Hit the Custom decoder button.
That’ll take you to the function page, where you’ll name your function (I called mine LSD 01 Door Sensor) and then you’ll paste in the code from the github decoder.
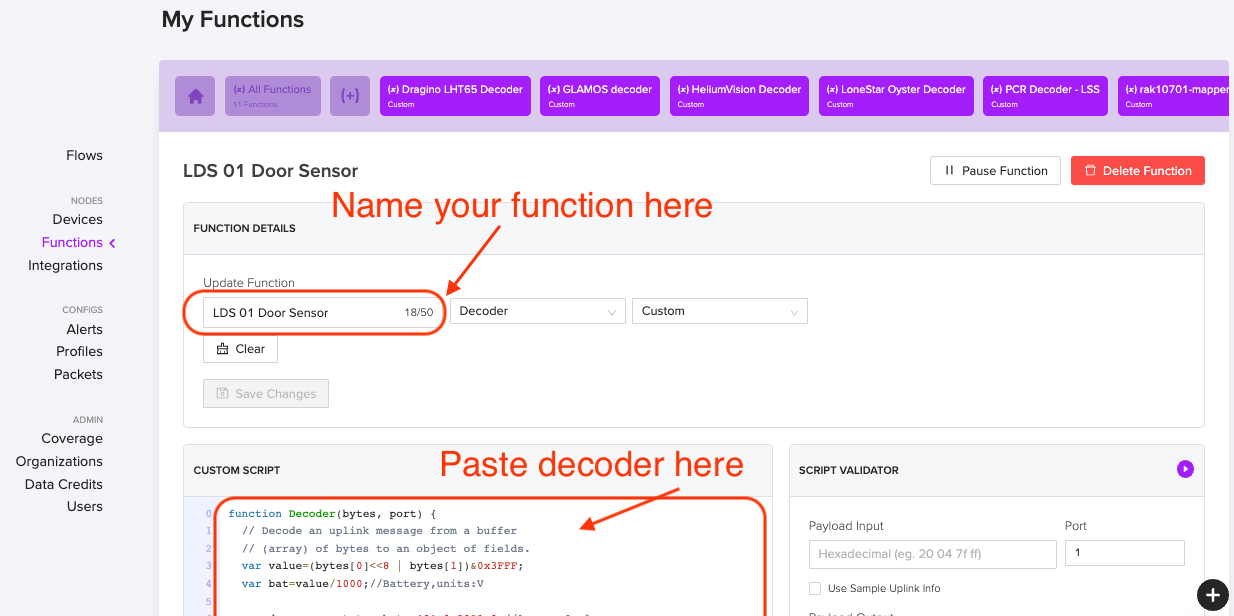
Remember, this isn’t the Device you’re naming, it’s the Function. Once you have this Function decoder in Console, you can add a ton of devices and have all of them use the same Decoder Function. Cool, huh?
Now, if you just wanted to know if the door is open or closed whenever you looked at a dashboard, you could do one more step (add an integration to Datacake) and you’d be done. The flow would look like this in Console:
However, I don’t think that’s ultra useful. I mean, you’d have to open up a Datacake dashboard just to see if the door’s open. That ain’t automagic, that’s a PITA. Onward!
Set Up Home Assistant On A Raspberry Pi
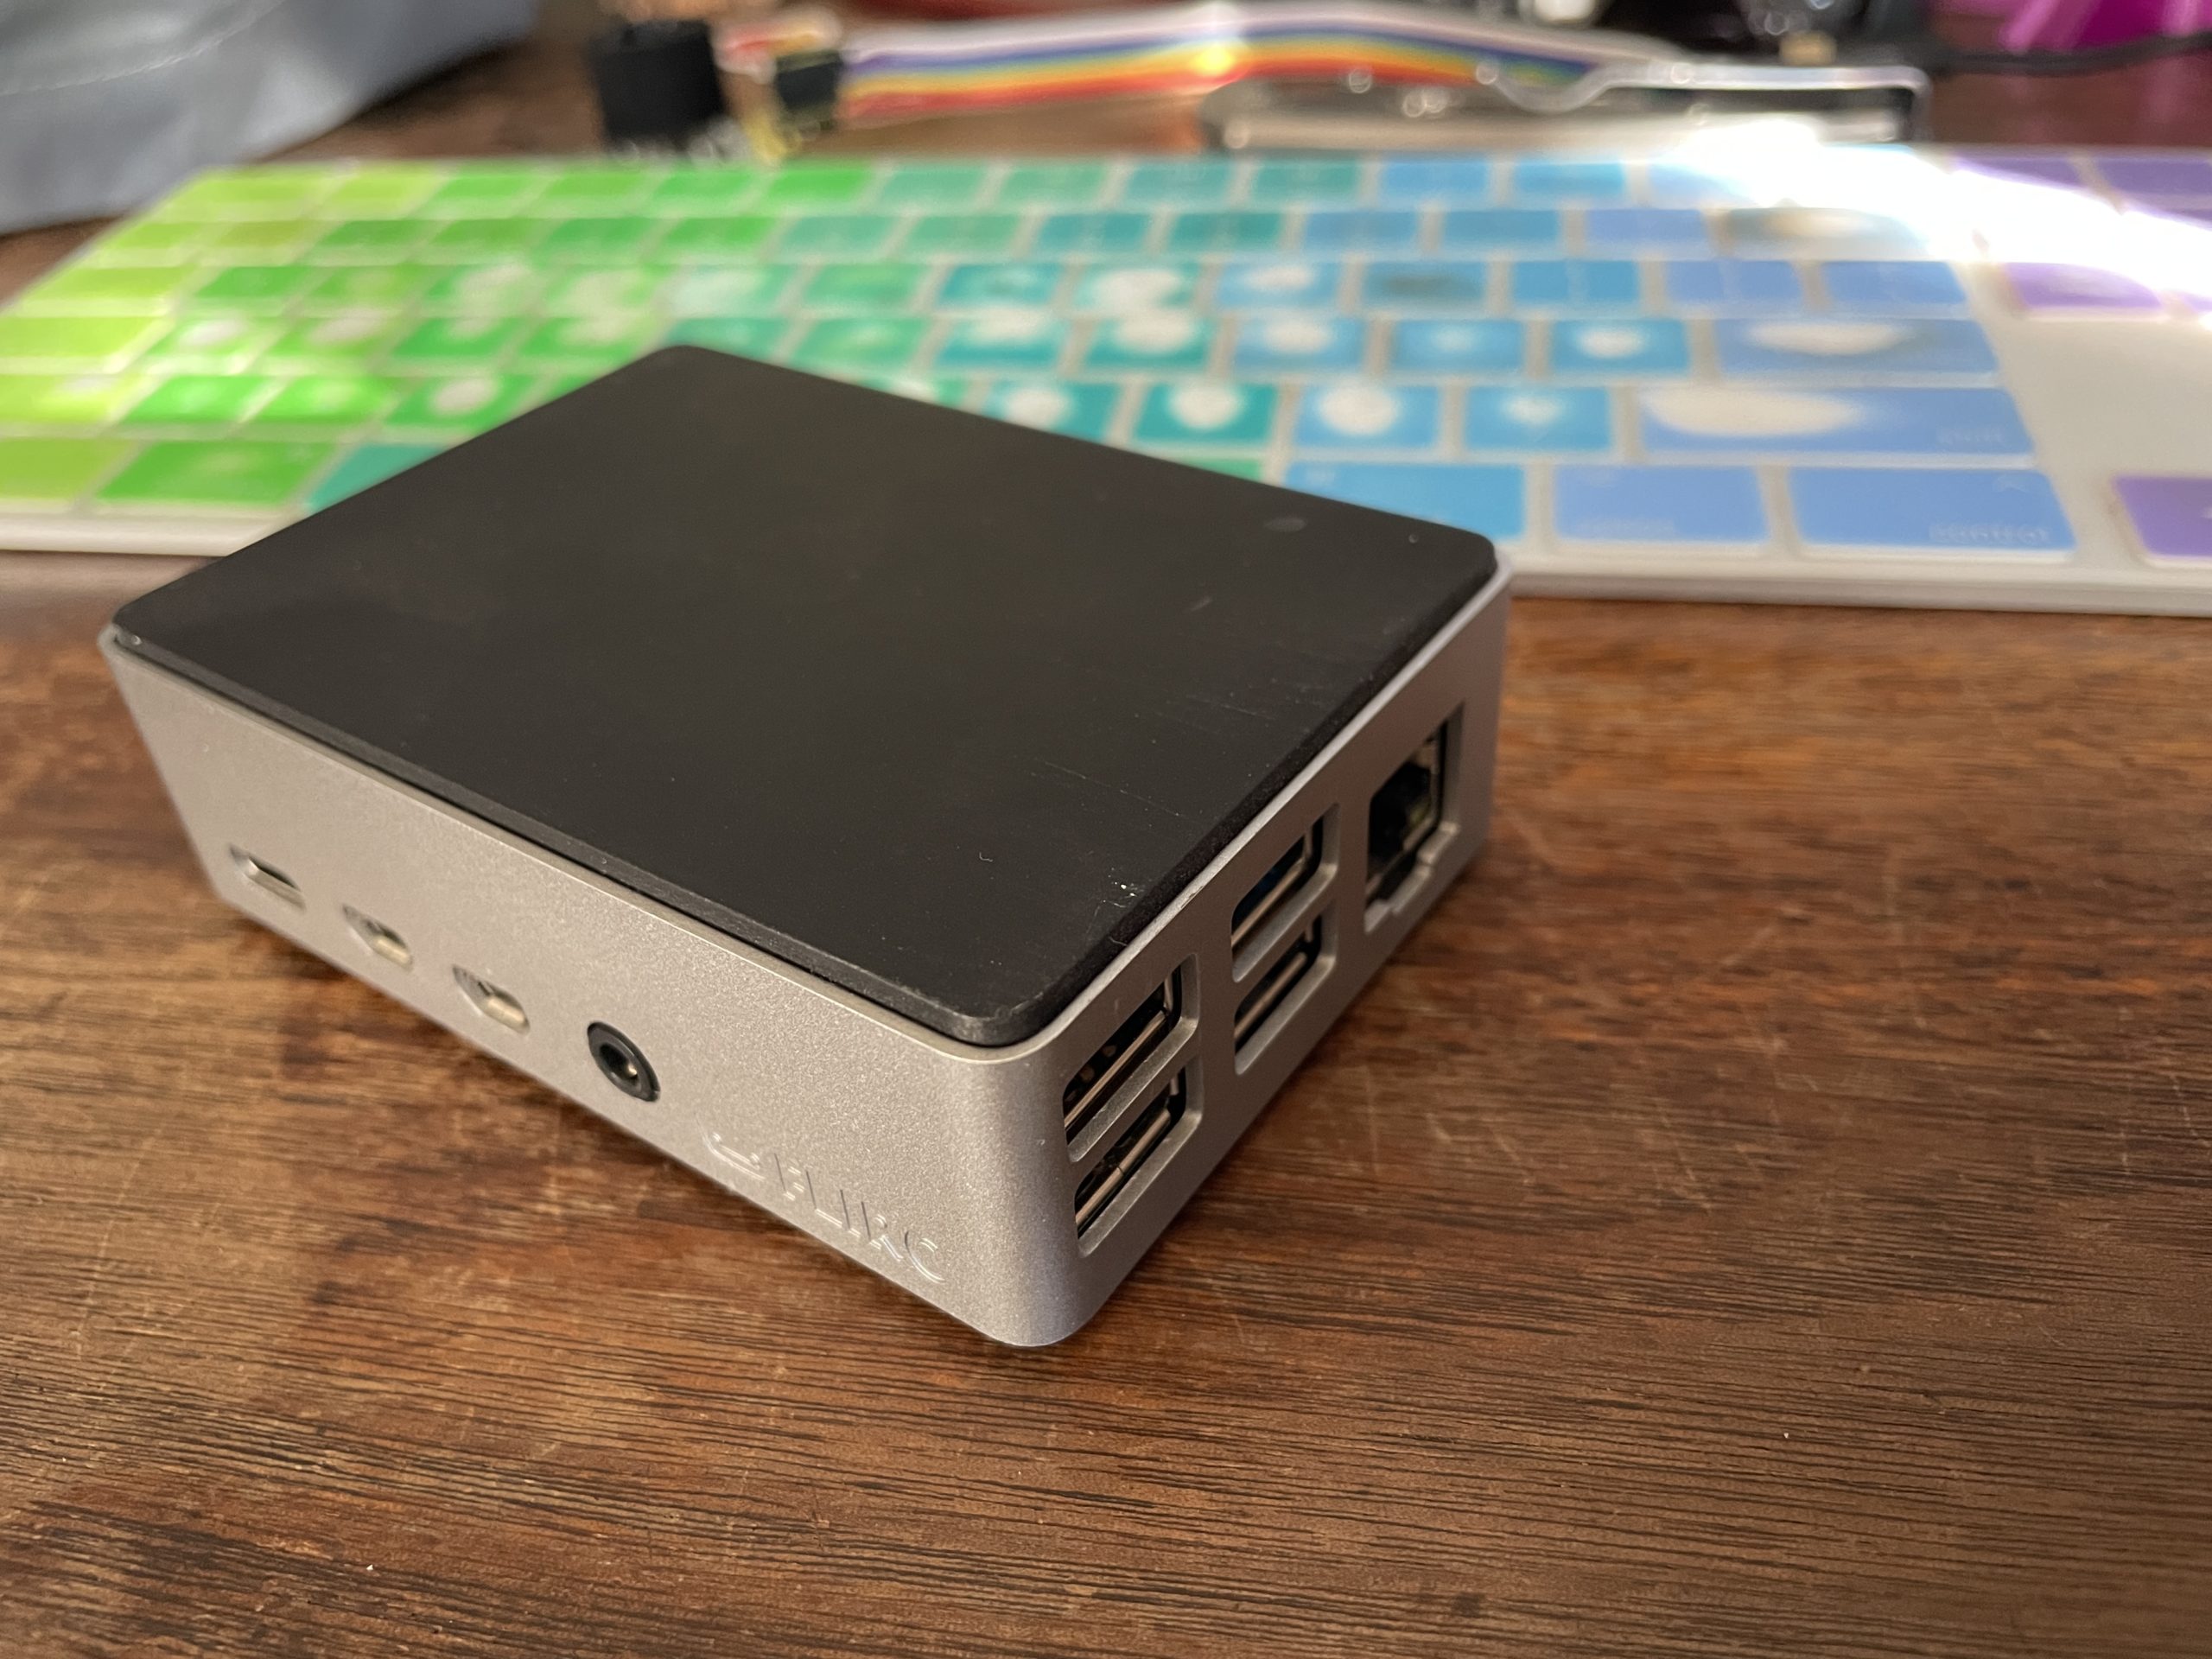
Let’s fire up that Raspberry Pi you bought! I put mine in a very snazzy FLIRC case, but you don’t have to.
Now, despite my love for explaining things, the internetz has done a far better job of Pi tutorials than I have, so I’ll just leave ya with what the good folks over at Home Assistant (HA) have written as far as setting up HA on your Pi. Come back when you’re done!
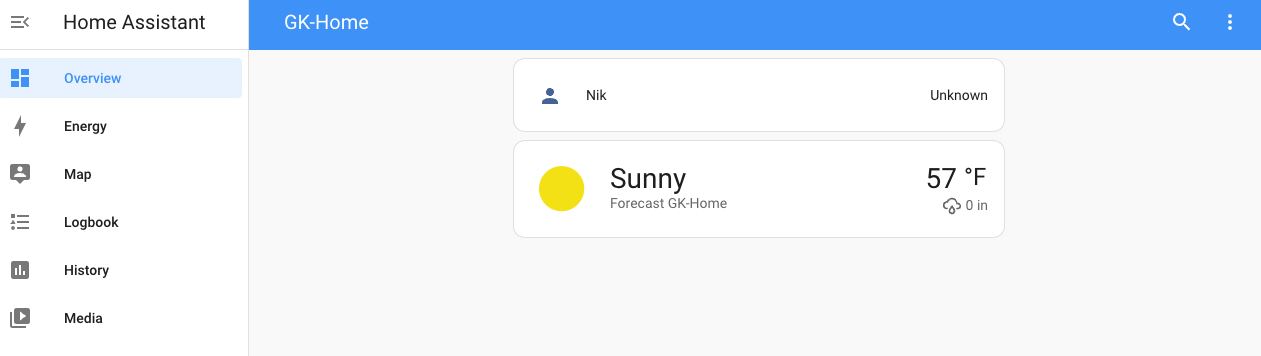
It should look something like this when you’ve finished. I mean, it might not be sunny and 57°F, but hey, that’s the bitter depths of winter here in San Diego.
Great! For now, we’ll leave Home Assistant and make sure we’ve got a reliable place for our MQTT broker (coming up next) to check in with Home Assistant.
Set Up A Publicly Accessible IP Address
Step 1 of the MQTT flow is to set up an IP address that Helium Console will connect to the broker on. The Helium Console MQTT Integration will need to connect to this broker at a publicly accessible ip address and port. Unless you have a fixed ip address (you probably don’t), you should set it up so that you can refer to this address with a name that does not change.
I used the free service provided by https://www.noip.com/ (check out that link for how to do it all, and heads up…port forwarding is a little tricky for first timers!)
With noip.com, I can get to my home network using an address like “gksupernet.hopto.org”. That’ll send it to my current IP address as well as whatever my public IP address changes to next month when my internet service provider rolls it.
Now that we’ve set it up so you’ve got a reliable URL to send to (gksupernet.hopto.org, or whatever you set up on noip.com), let’s jump back into Home Assistant.
First, let’s set your HA profile to Advanced mode. Go to your Profile (down in the bottom left menu, it’ll be your name), then scroll down until you see Advanced Mode and turn it on.

Add the Mosquitto Broker to Home Assistant
Next, we’ll add the MQTT broker add-on. This is basically a translator and message forwarder for IoT devices. You can dive in here if you want, but for now, thinking of it as a translator/forwarder is probably fine. Instructions on how to add the “Mosquitto Broker” are here if you want ’em direct from the horse’s mouth. I’ll do the paint-by-numbers next just in case ya need it.
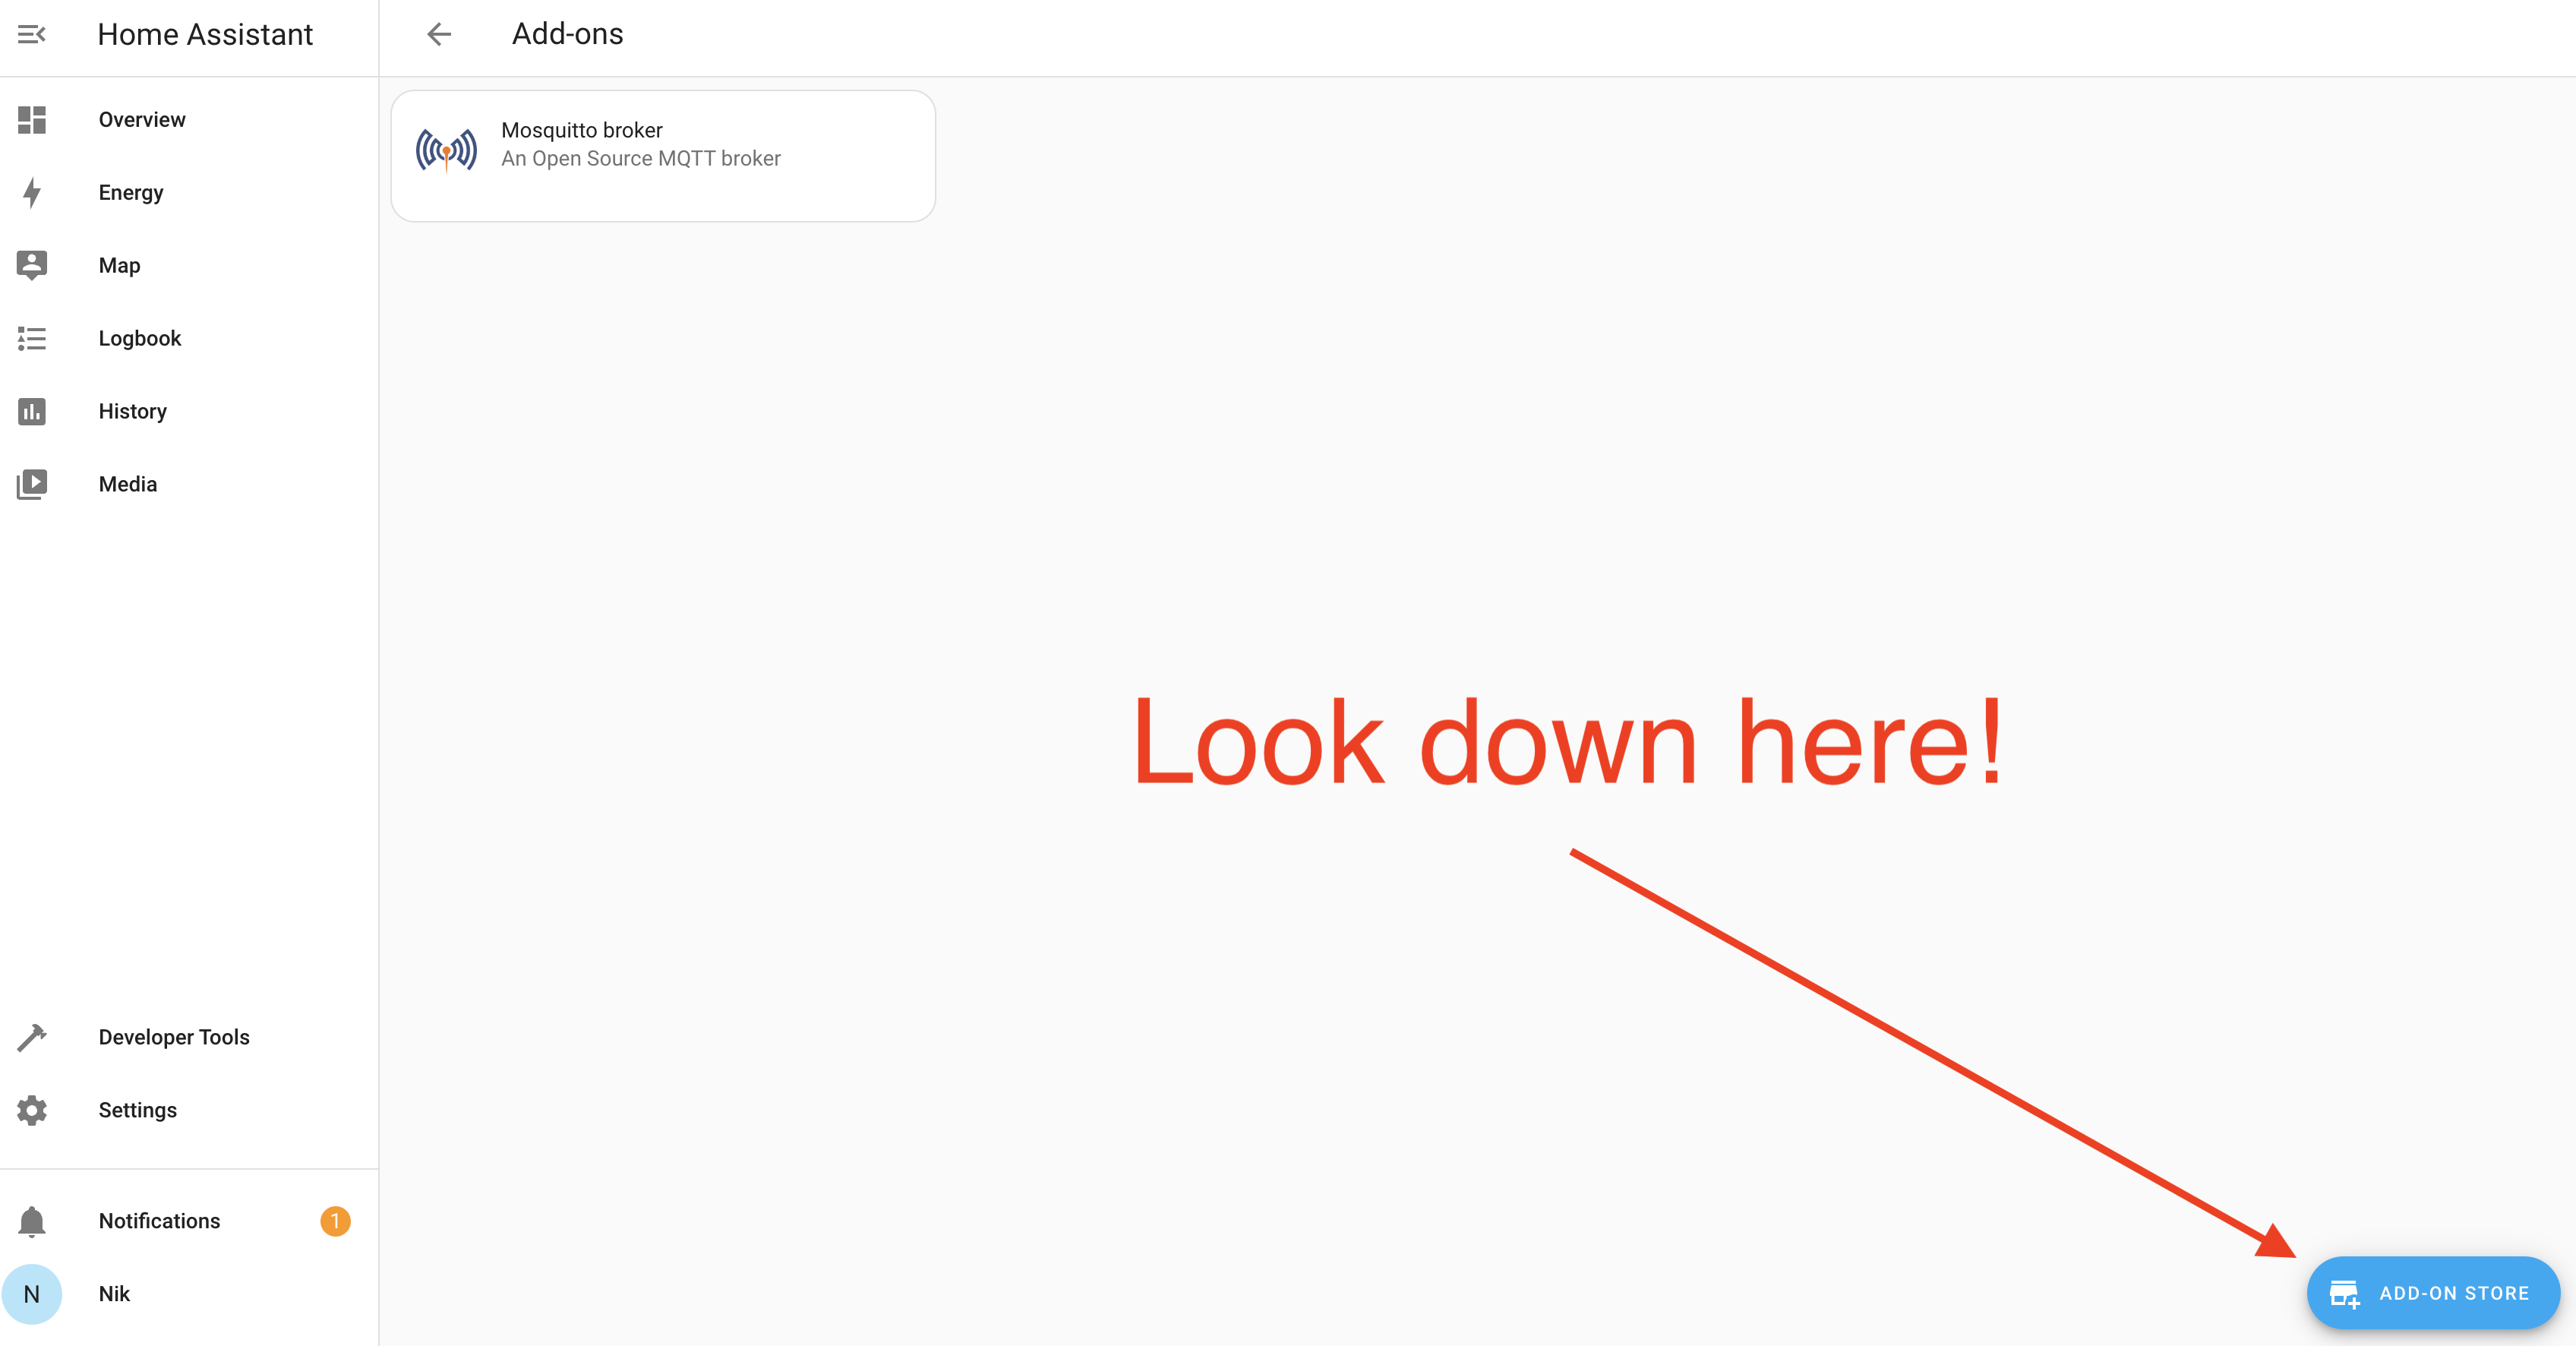
Start in your Home Assistant “front end” (I have mine saved as a bookmark), and look for the Add On Store.
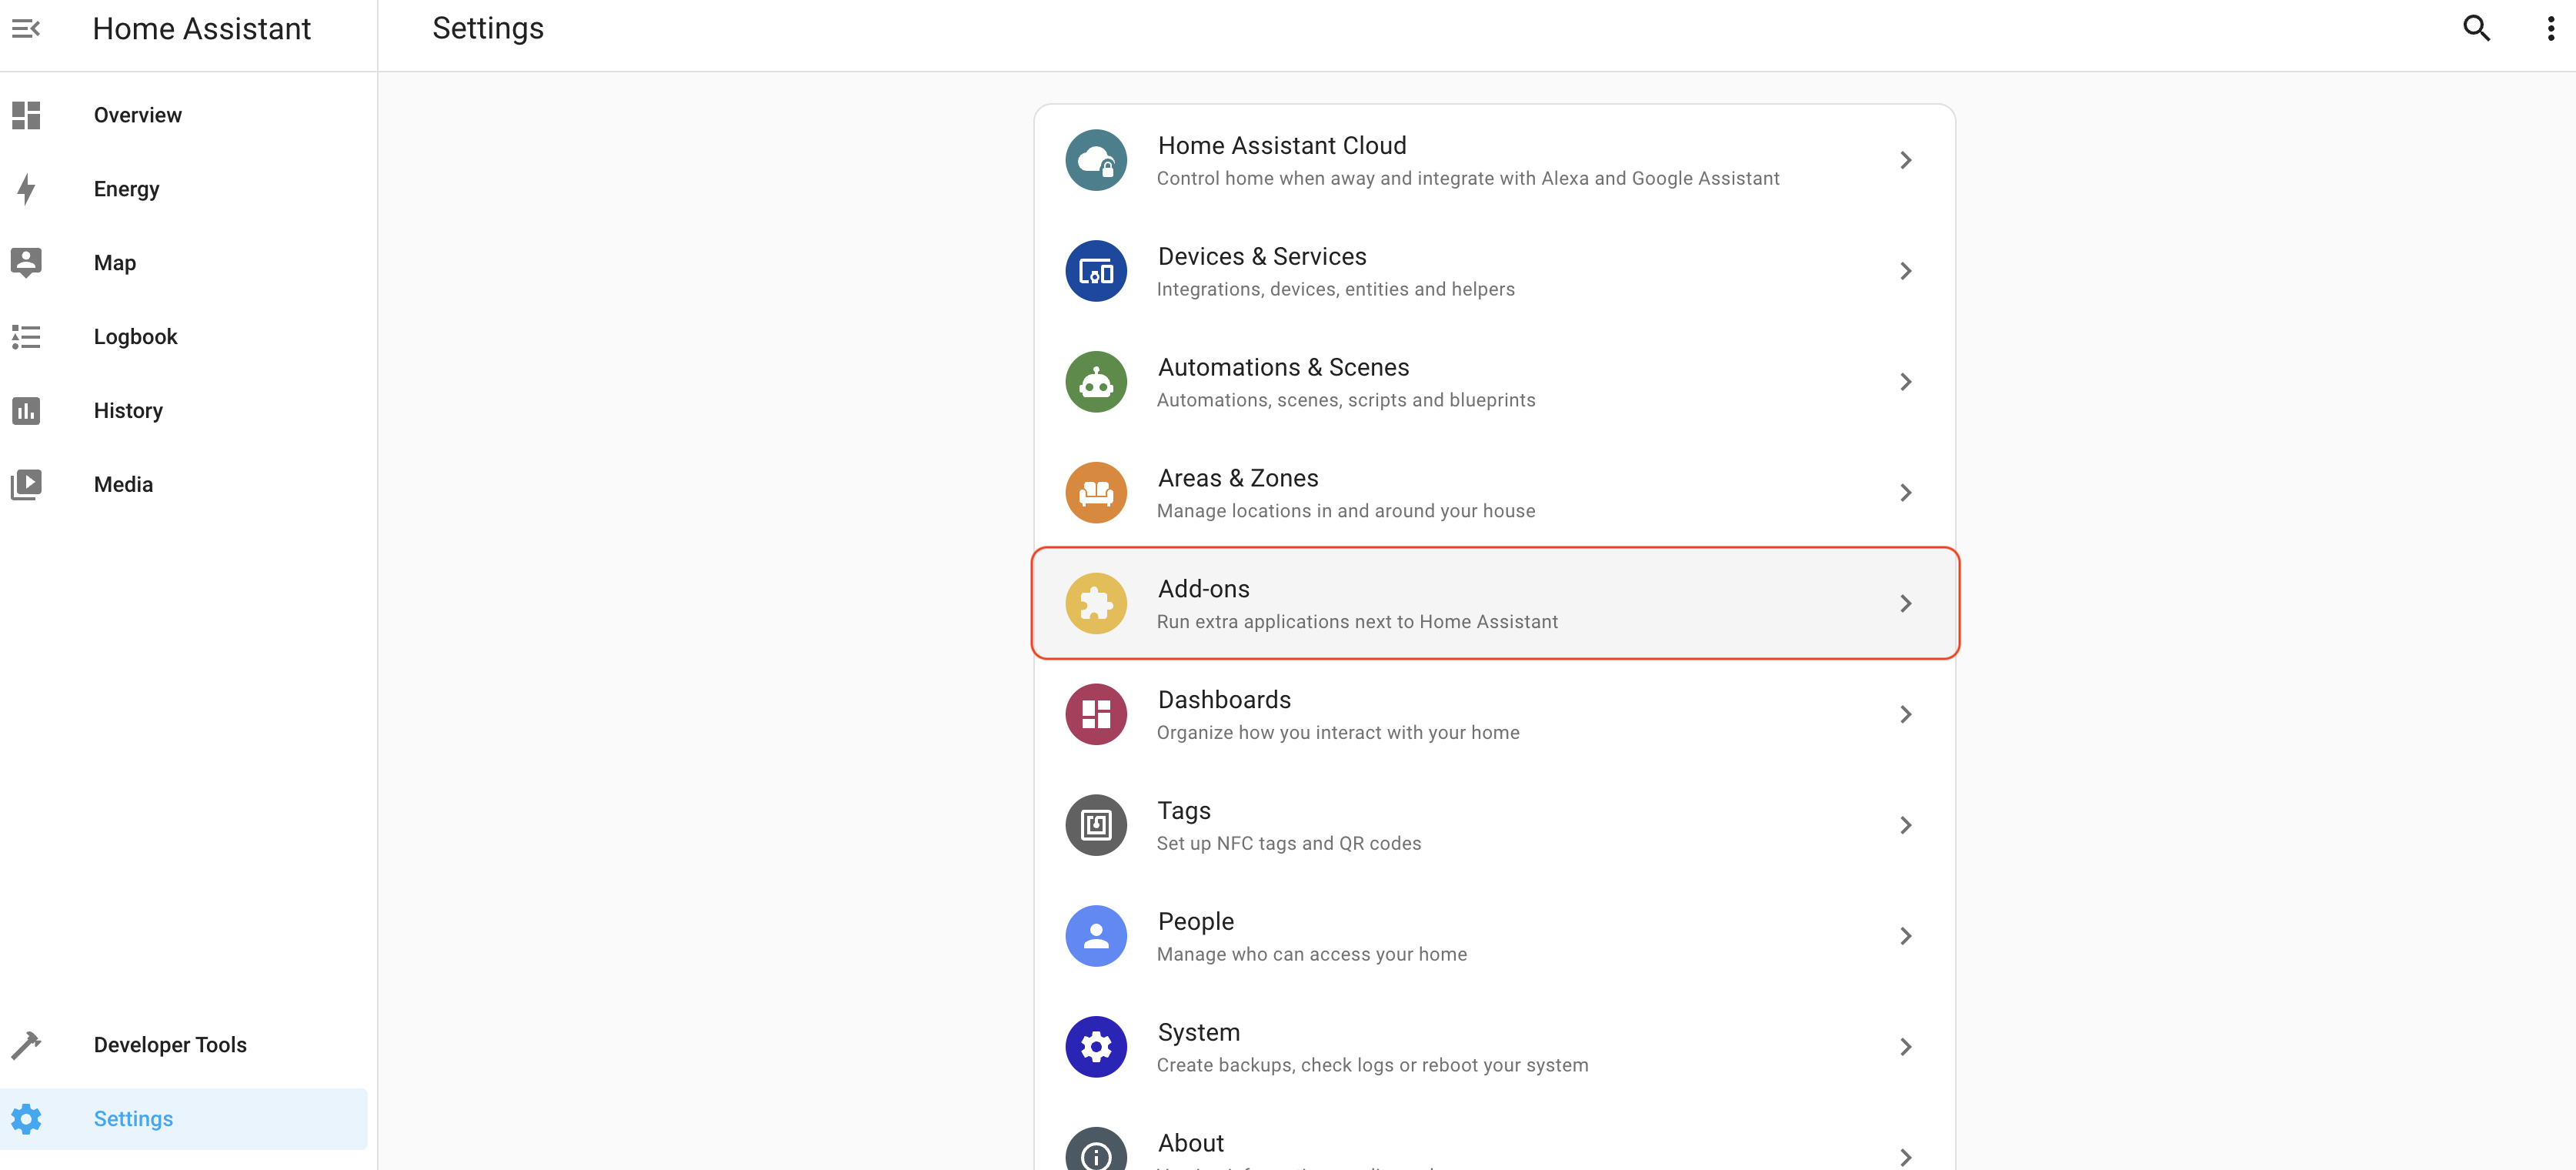
Once you go to Add Ons, look at the bottom right for the Add On store.
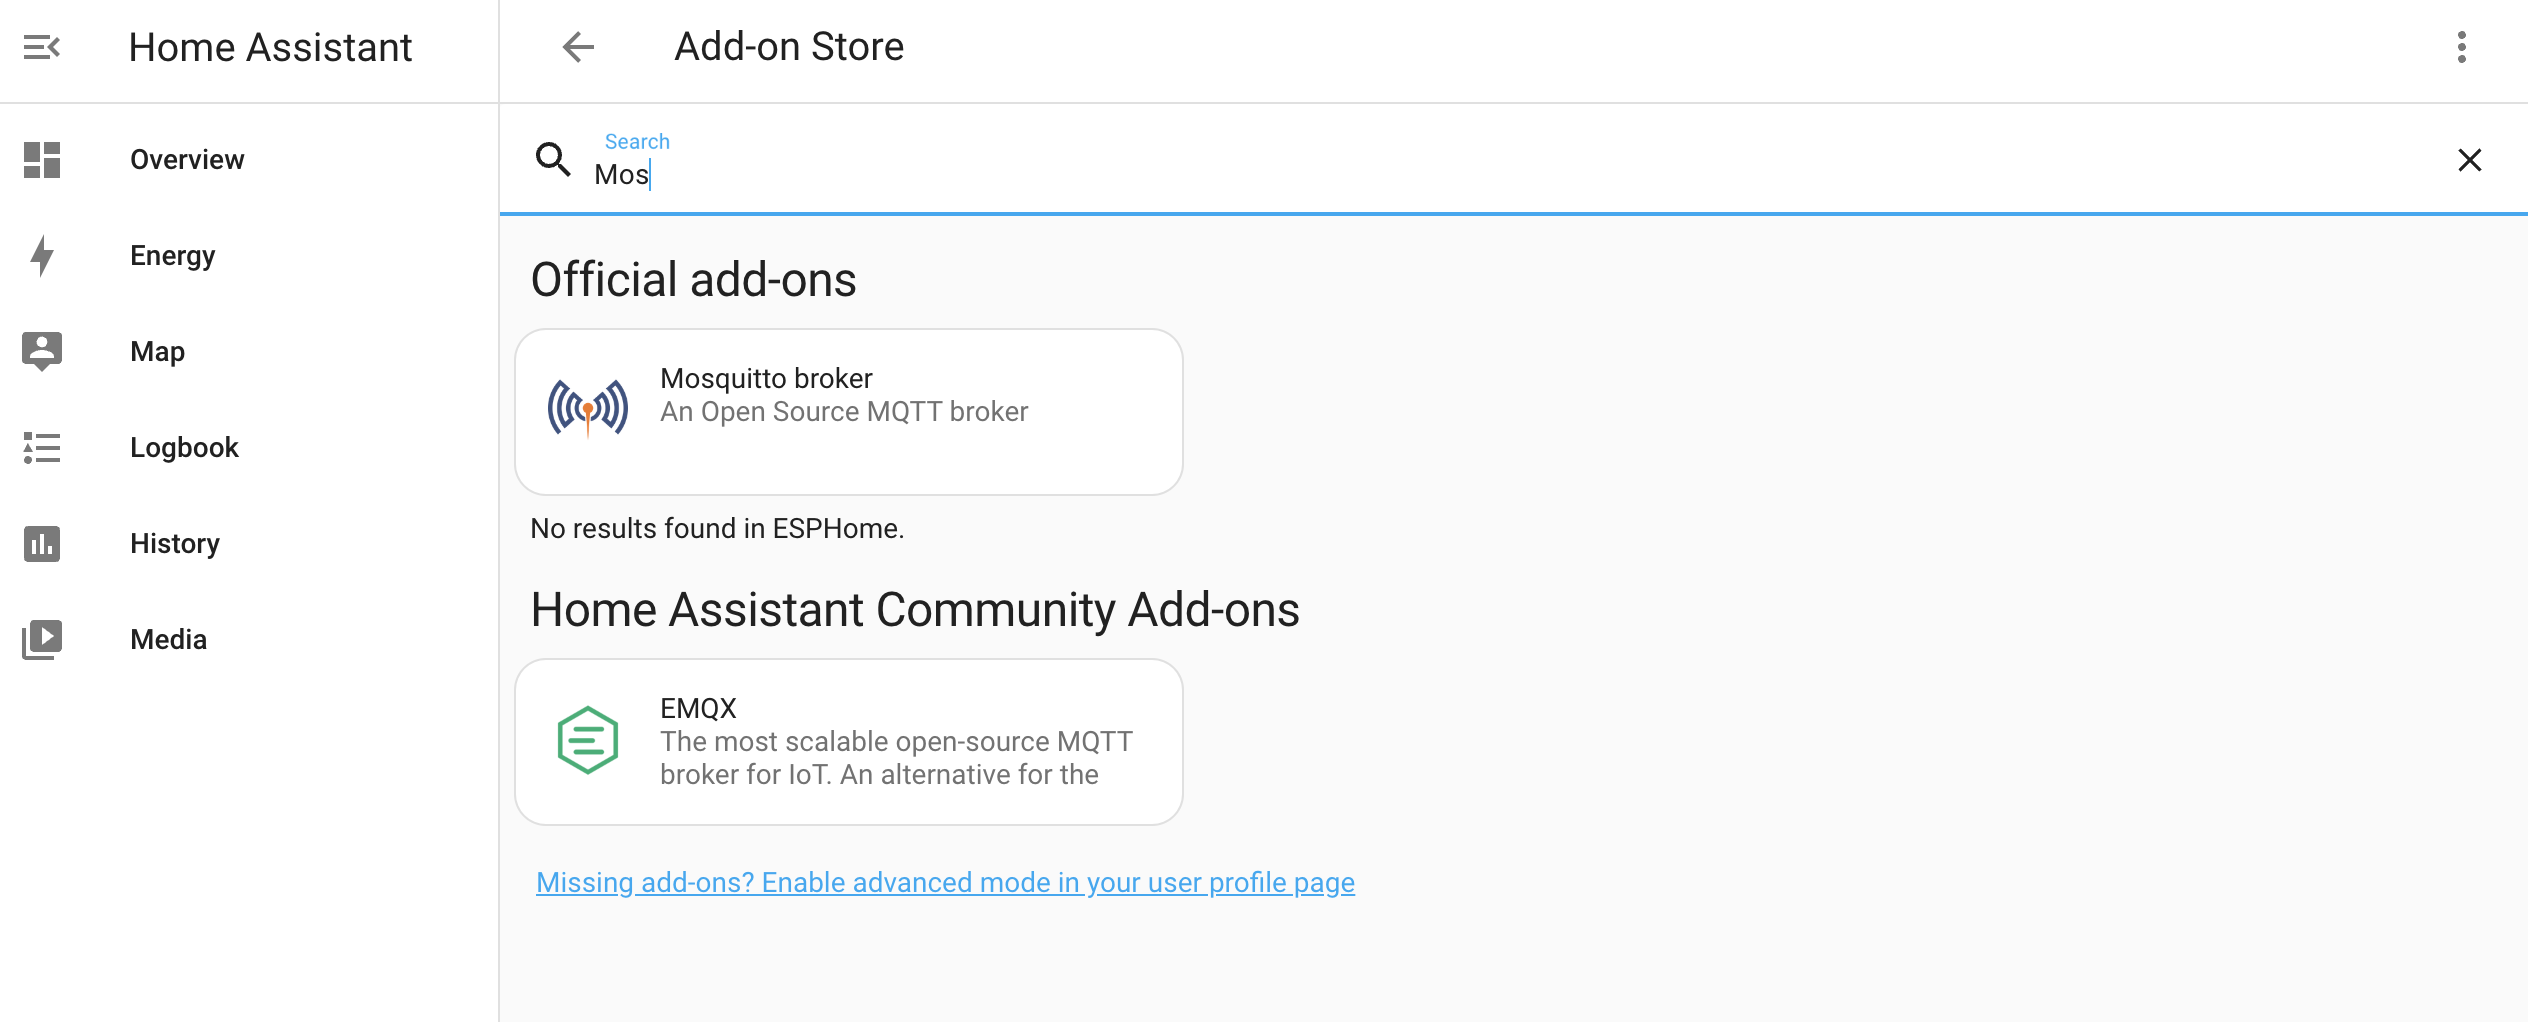
In the store, search “Mosquitto Broker” and install the Add On. That should look like this.
Once you’ve installed Mosquitto broker, next you’ll need to set up a user. Go back to the main menu (NOT in the Mosquitto Add On) and look for Settings–>People
Then look for the User tab, and set up a user. I set up “mqtt-user” and used “asd;lfjas;ldkfjasd;lfjkas” for a password. No, that’s not really my password. Sheesh.

Saweet!
AIGHT, let’s set up a port forward!
For this specific guide, you only need to set up one port forward: 1883. That’s the default port for an MQTT broker. Having that port open on your network and forwarding it to the local IP of the RPi running Home Assistant means the MQTT broker can receive messages from Helium Console and pass them on to Home Assistant. Conceptually, that looks like this:
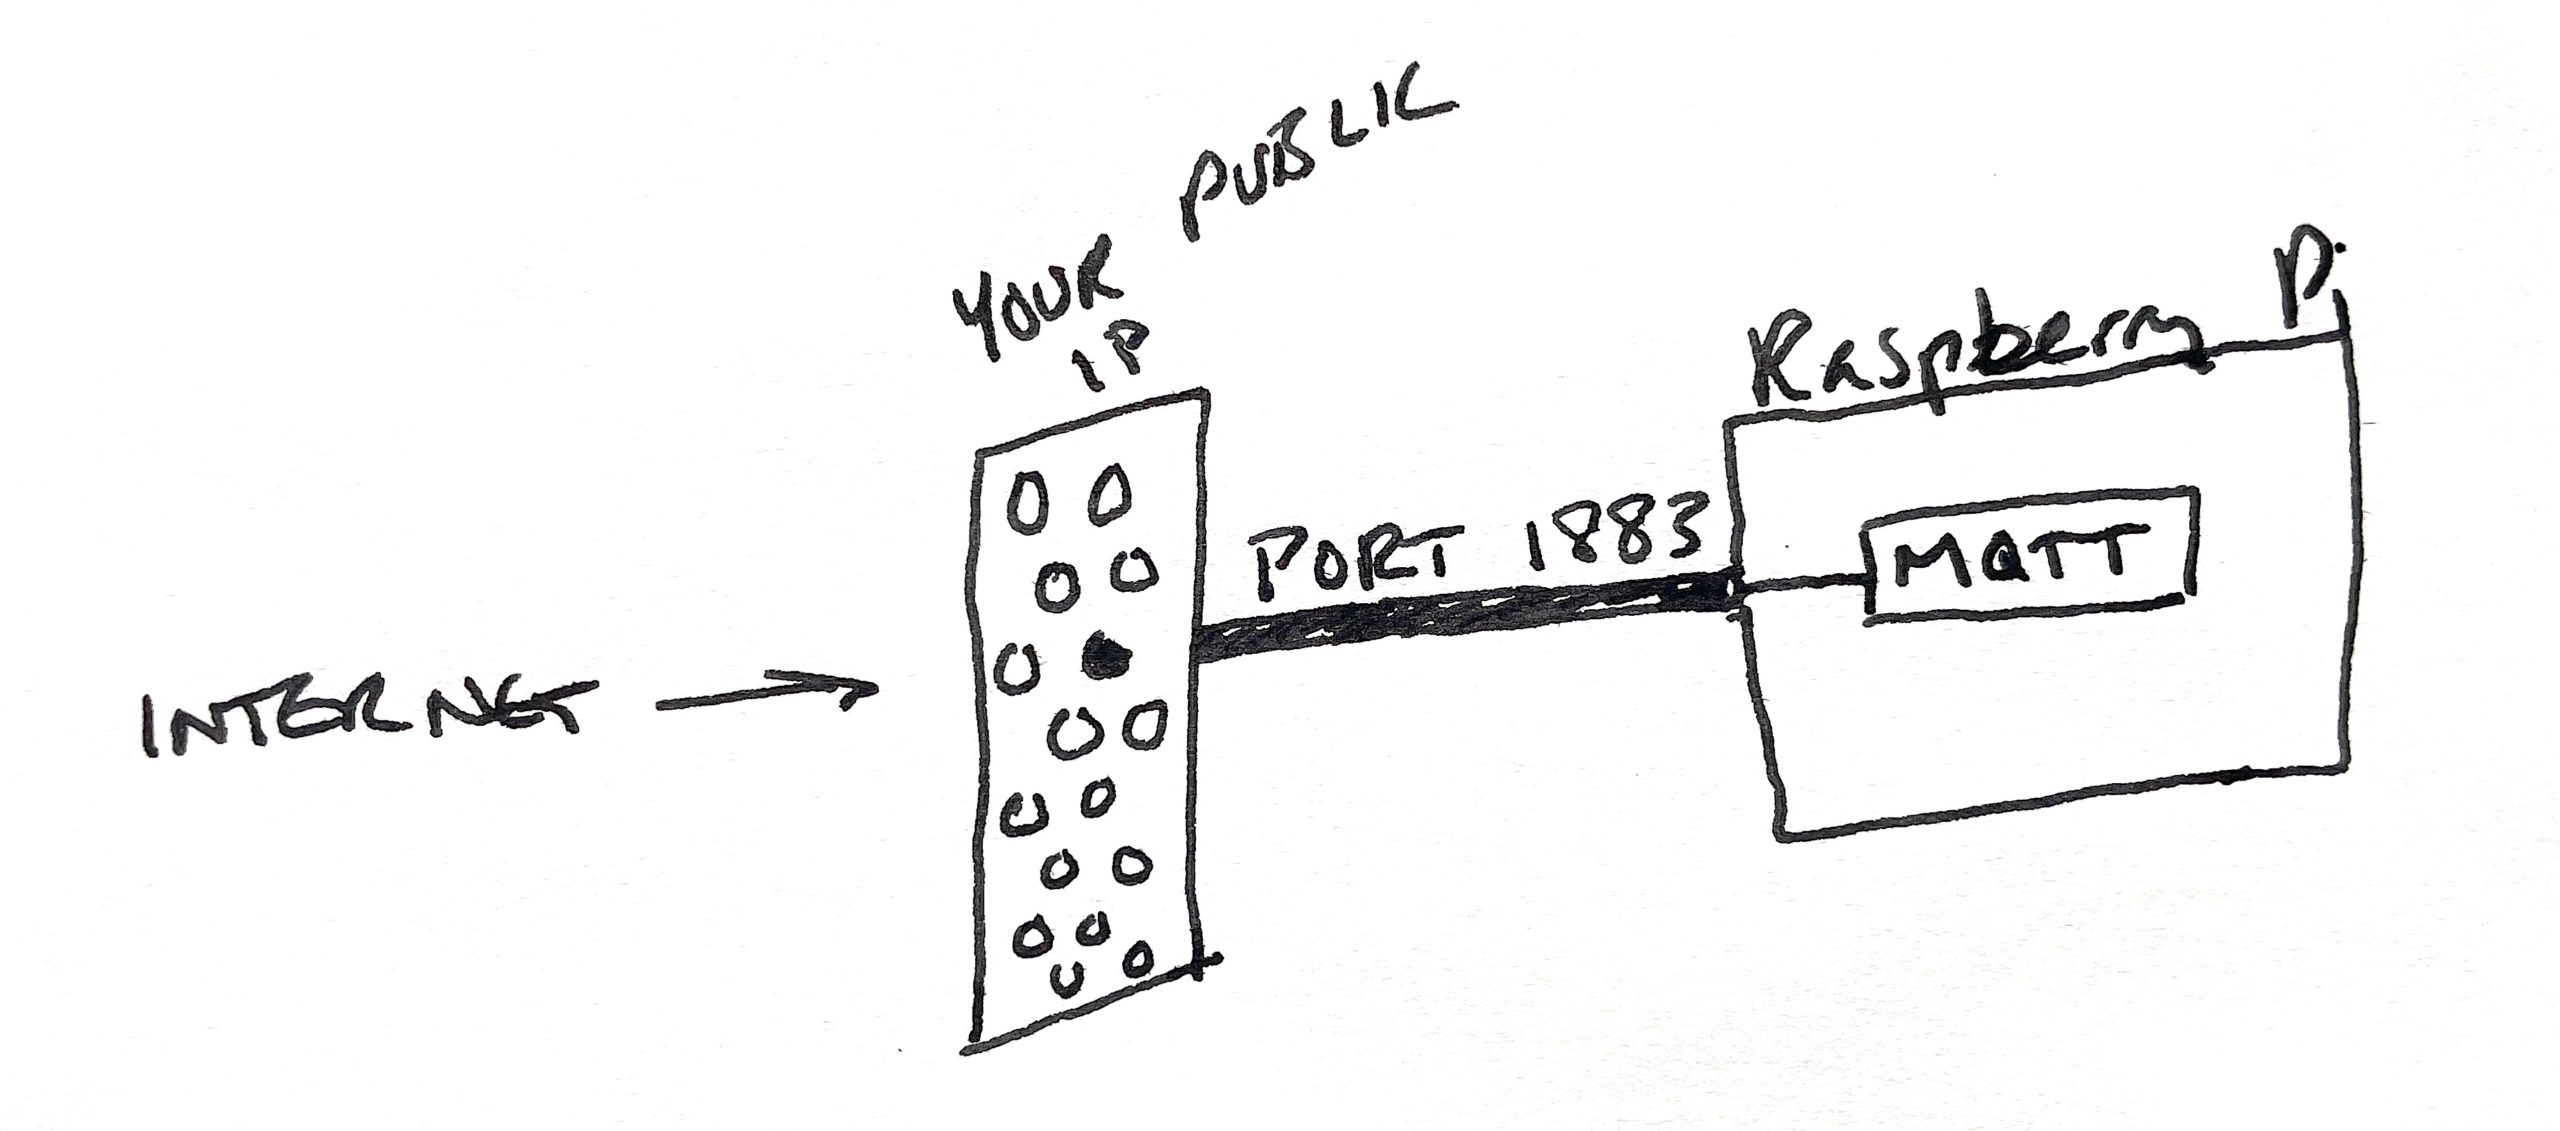
Port forwards poke a very specific hole in your network that is open to the outside world. If you think of your public IP as your home address that will take someone to your “front door on the internet”, a port forward is like a tunnel from that door to a specific place in your house. That place could be a room, or a thing. In this case, the port forward is to one part (the MQTT broker) of one thing (the Raspberry Pi) on your network.
So, we’re in kind of an odd spot here. “Port forwarding” is one of those things that is custom to your router. The absolute best way to figure it out is to Google [your router model] and “how to port forward”, then follow the directions. It may be (has always been for me) a pain in the ass, but eventually I get it. You’re welcome to jump into the GK Discord and ask questions, usually there are a few helpful folks in #general.
What you should have when you finish is a publicly accessible address of your broker. It’ll look something like this:
mqtt://myusername:mysecurepw@gksupernet.hopto.org:1883
Substitute your user name, password, and the dynamic public IP you set up with noip.com above and everything *should* work.
Now, that URL prolly does nothing for you, but you need to check that your set up is correct! We’ll do that next.
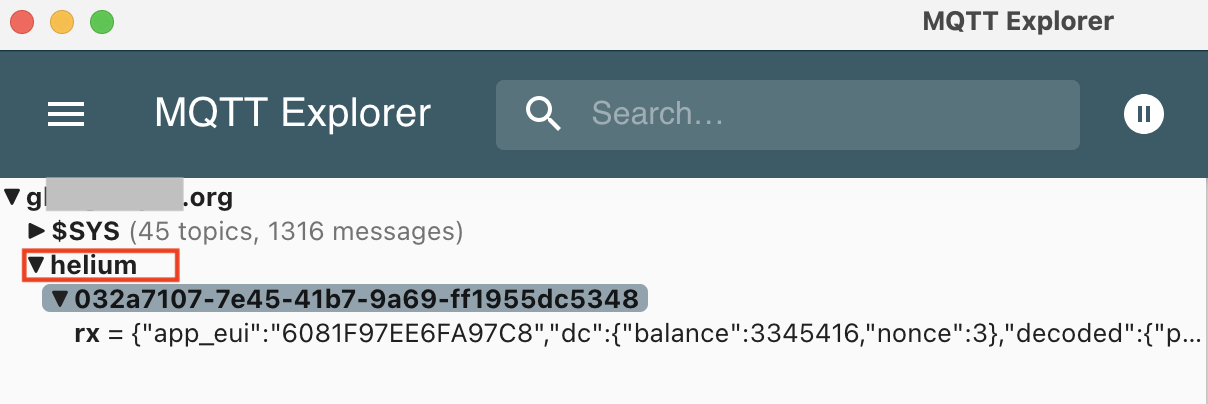
Download the MQTT Explorer app, fill in your creds, and test the connection. Once the connection tests out as good (it may take some fiddling, and you may need to restart Home Assistant), open and close the door a few times. You should see something like this in MQTT Explorer (as long as you’re seeing “helium” under the $SYS, you’re fine).
Now that we’ve got the port forward set up and tested so that Helium Console can send the data it gets and decodes from your sensor to the MQTT app running on Home Assistant, let’s go back to Console and get ‘er firing!
Setting up the MQTT Integration on Console
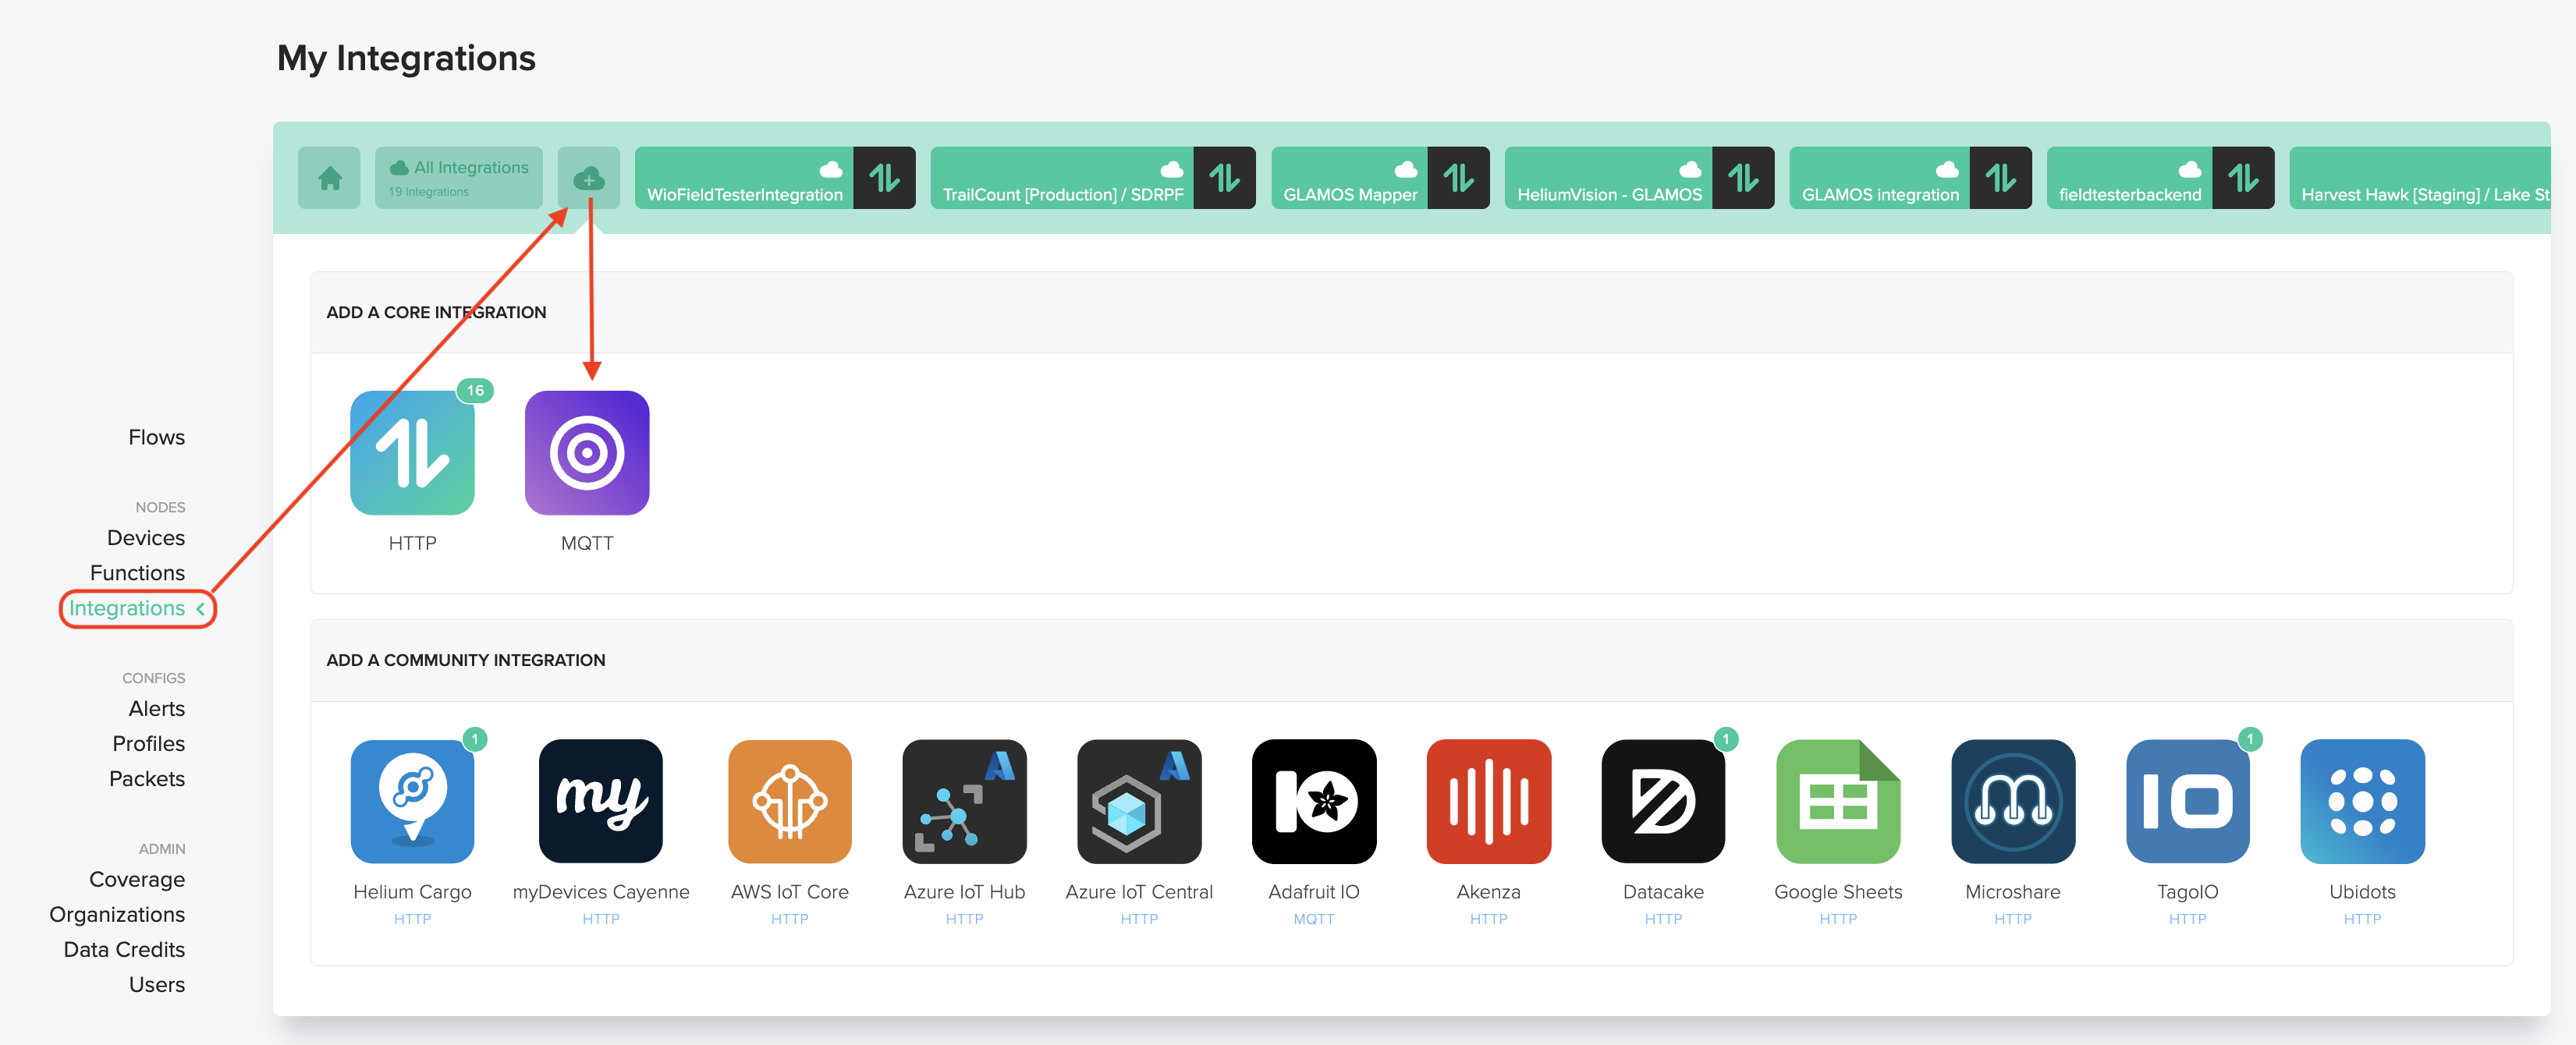
In Helium Console, look for “Integrations” in the left menu, then click the “+” button and select MQTT.
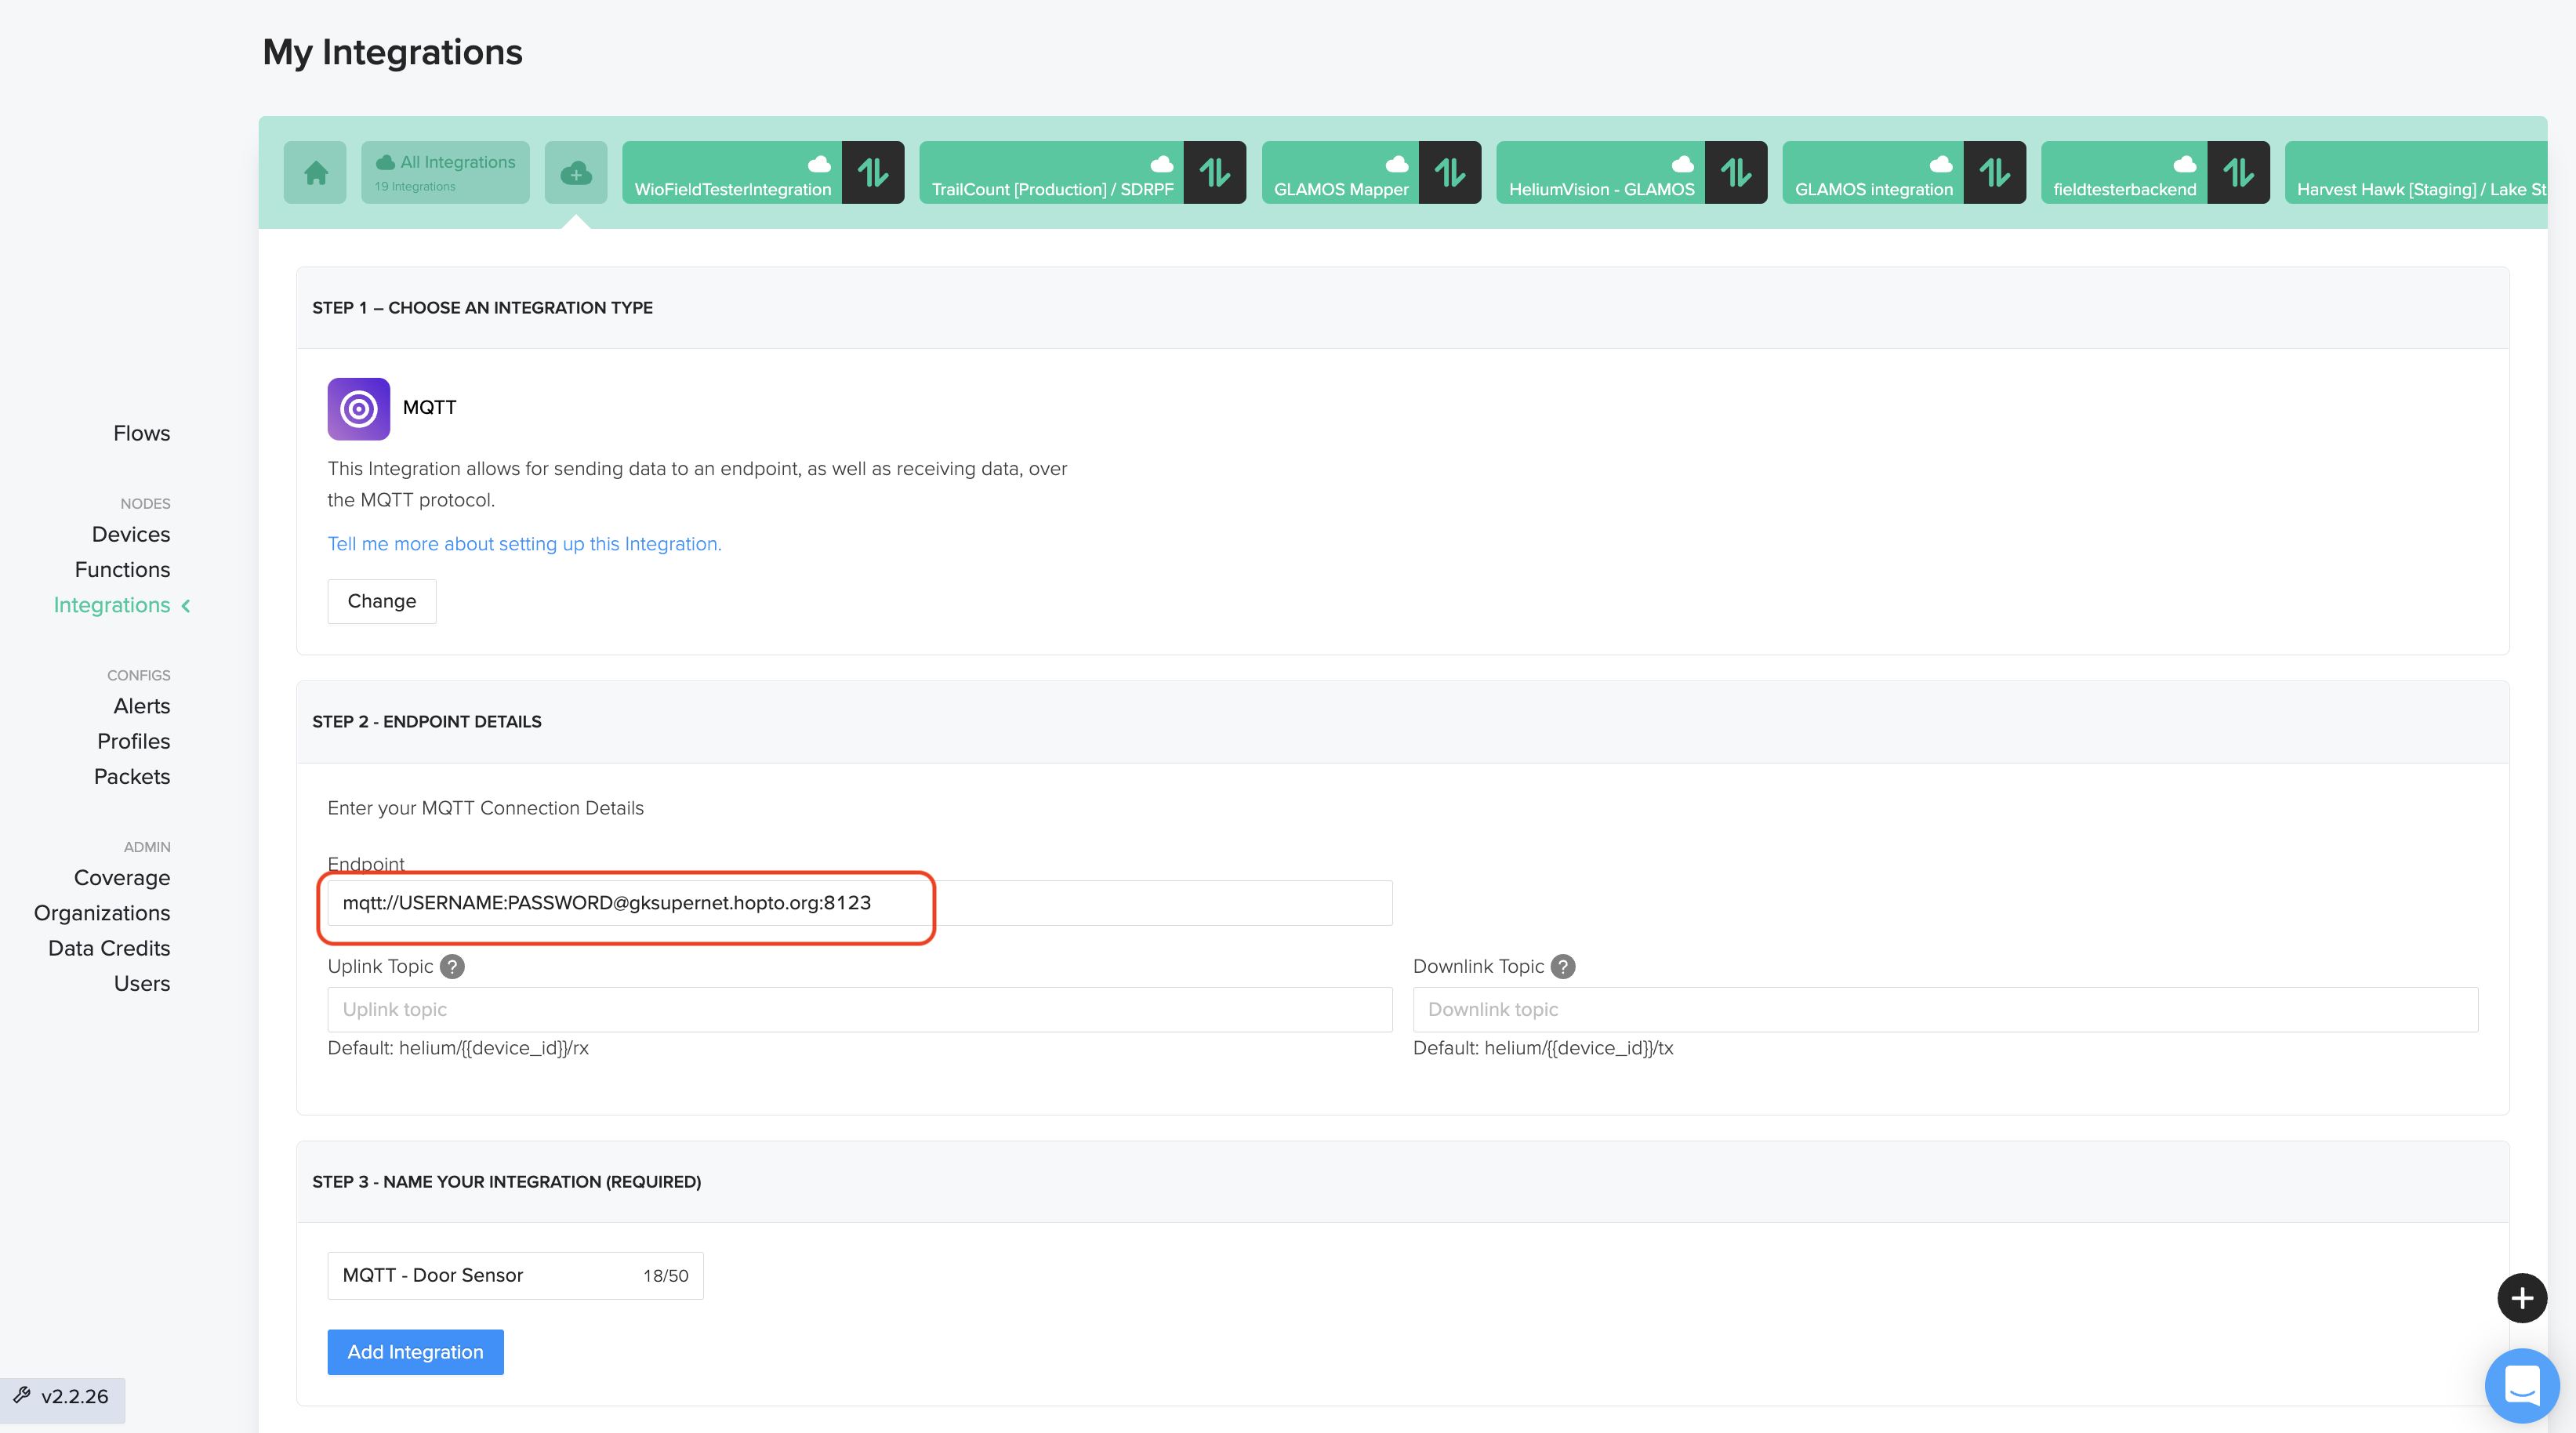
Then fill in the address you set up earlier, like this. It’ll be something like this: mqtt://USERNAME:PASSWORD@gksupernet.hopto.org:8123
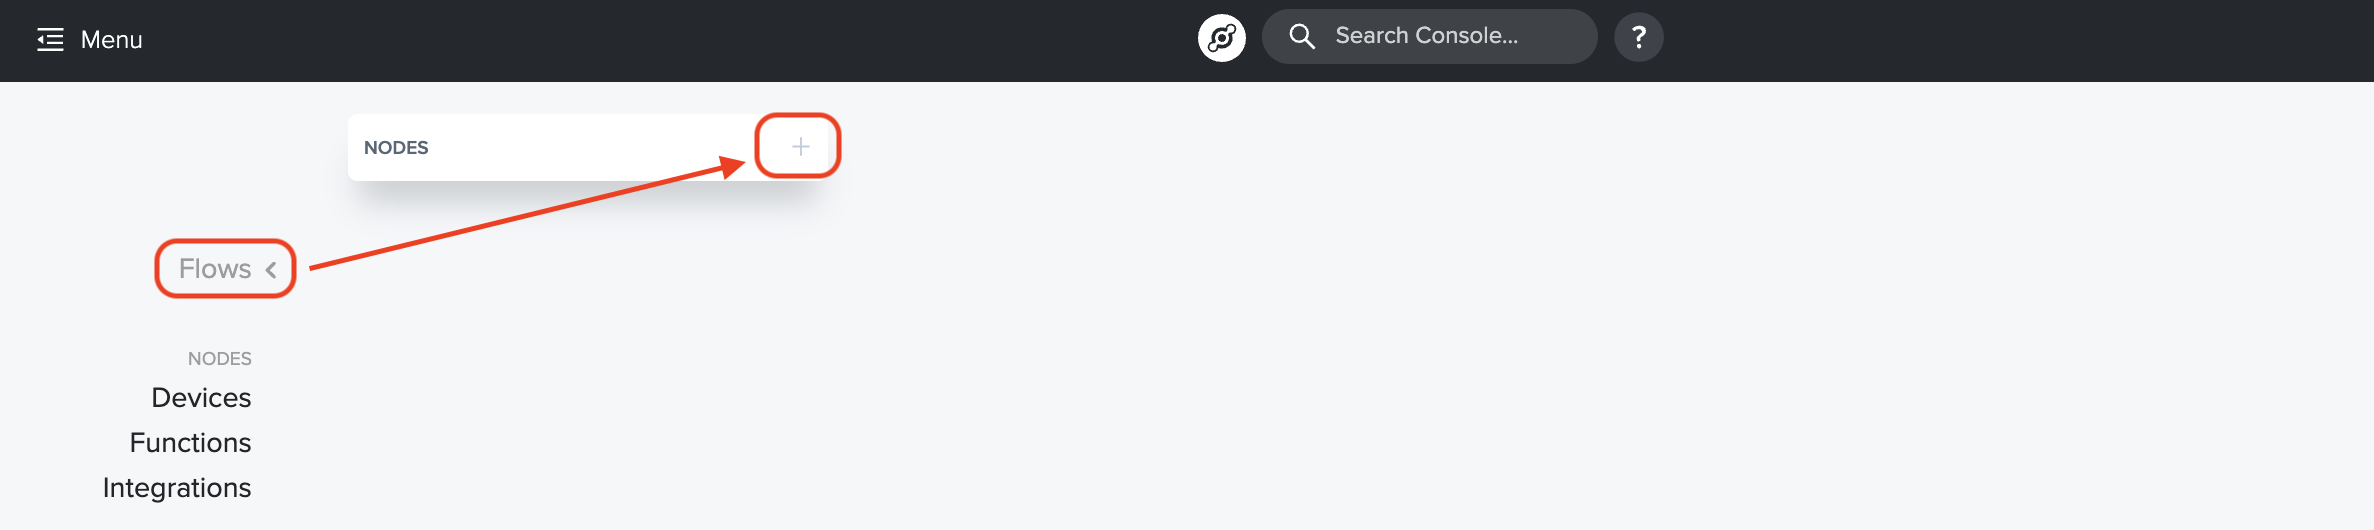
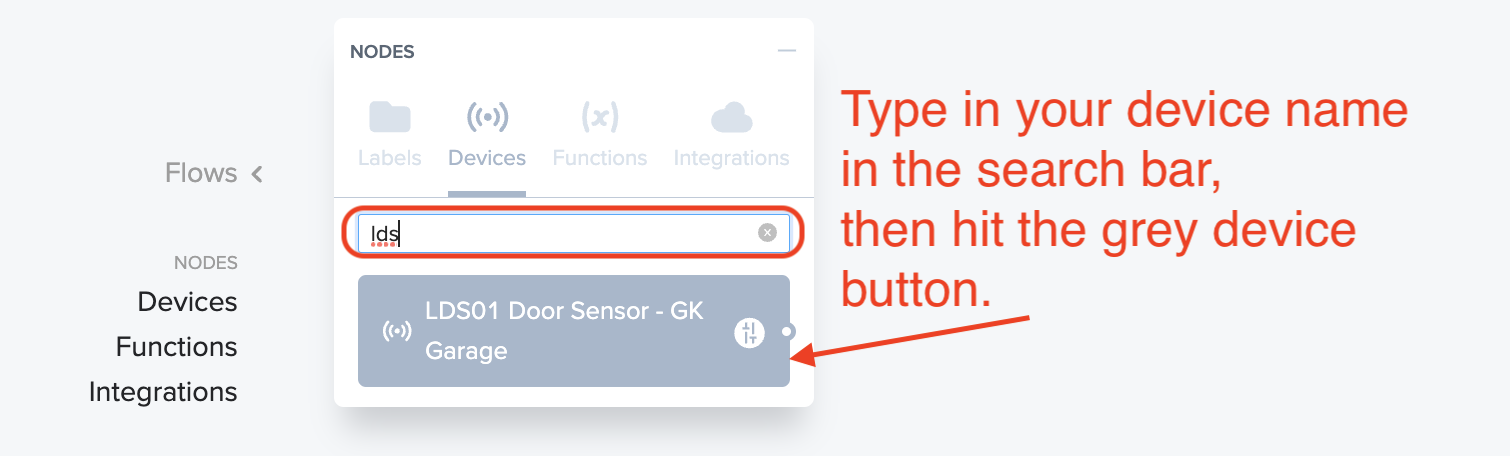
Once the Integration is set up we’ll put together a Flow in Console. This is probably the only place in all of my ultra-limited coding experience where they added a drag ‘n drop to make things easy. Start off with the Flows menu item, then look for Nodes and hit the “+” sign.
Now, the next 3 steps are straightforward. You’re going to find your Device, your Function, and your Integration, and add them all to the Flow board. I’ll show you how to add the Device, after that it’s the same thing for Function & Integration. You got this!
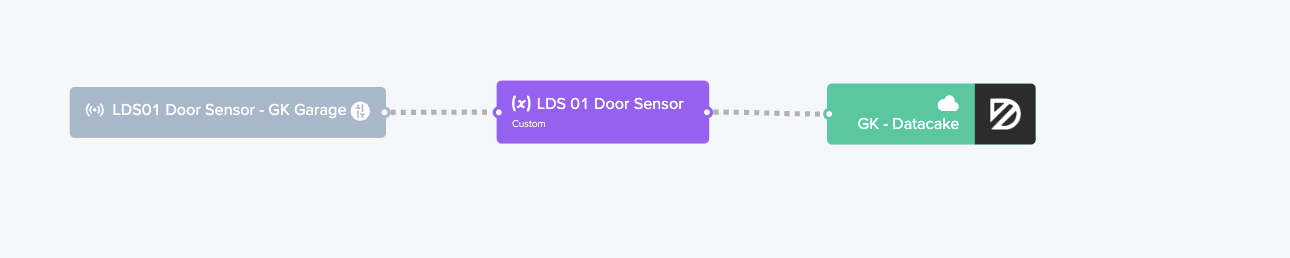
When you’re done adding those, your Flow board will look like this:
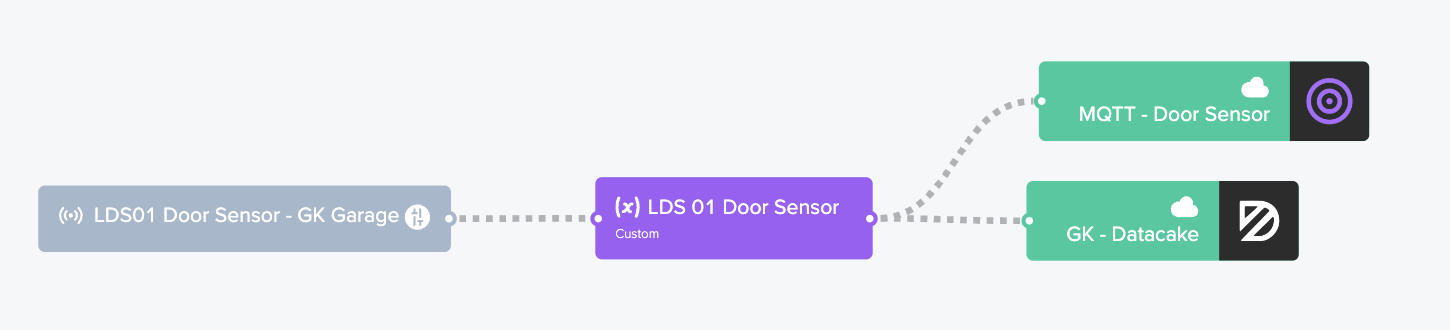
Yes, I still have the Datacake integration in there. Relax, you don’t need to. All those dotted lines should be moving like ants crawling; that’s how you know information is flowing from left to right. It’s no guarantee that the thing on the right is receiving it correctly though. 🙂
Next up: Setting this up so when the MQTT gets the message it translates it to “open” or “close”
Creating a Door “Binary Sensor” in HA
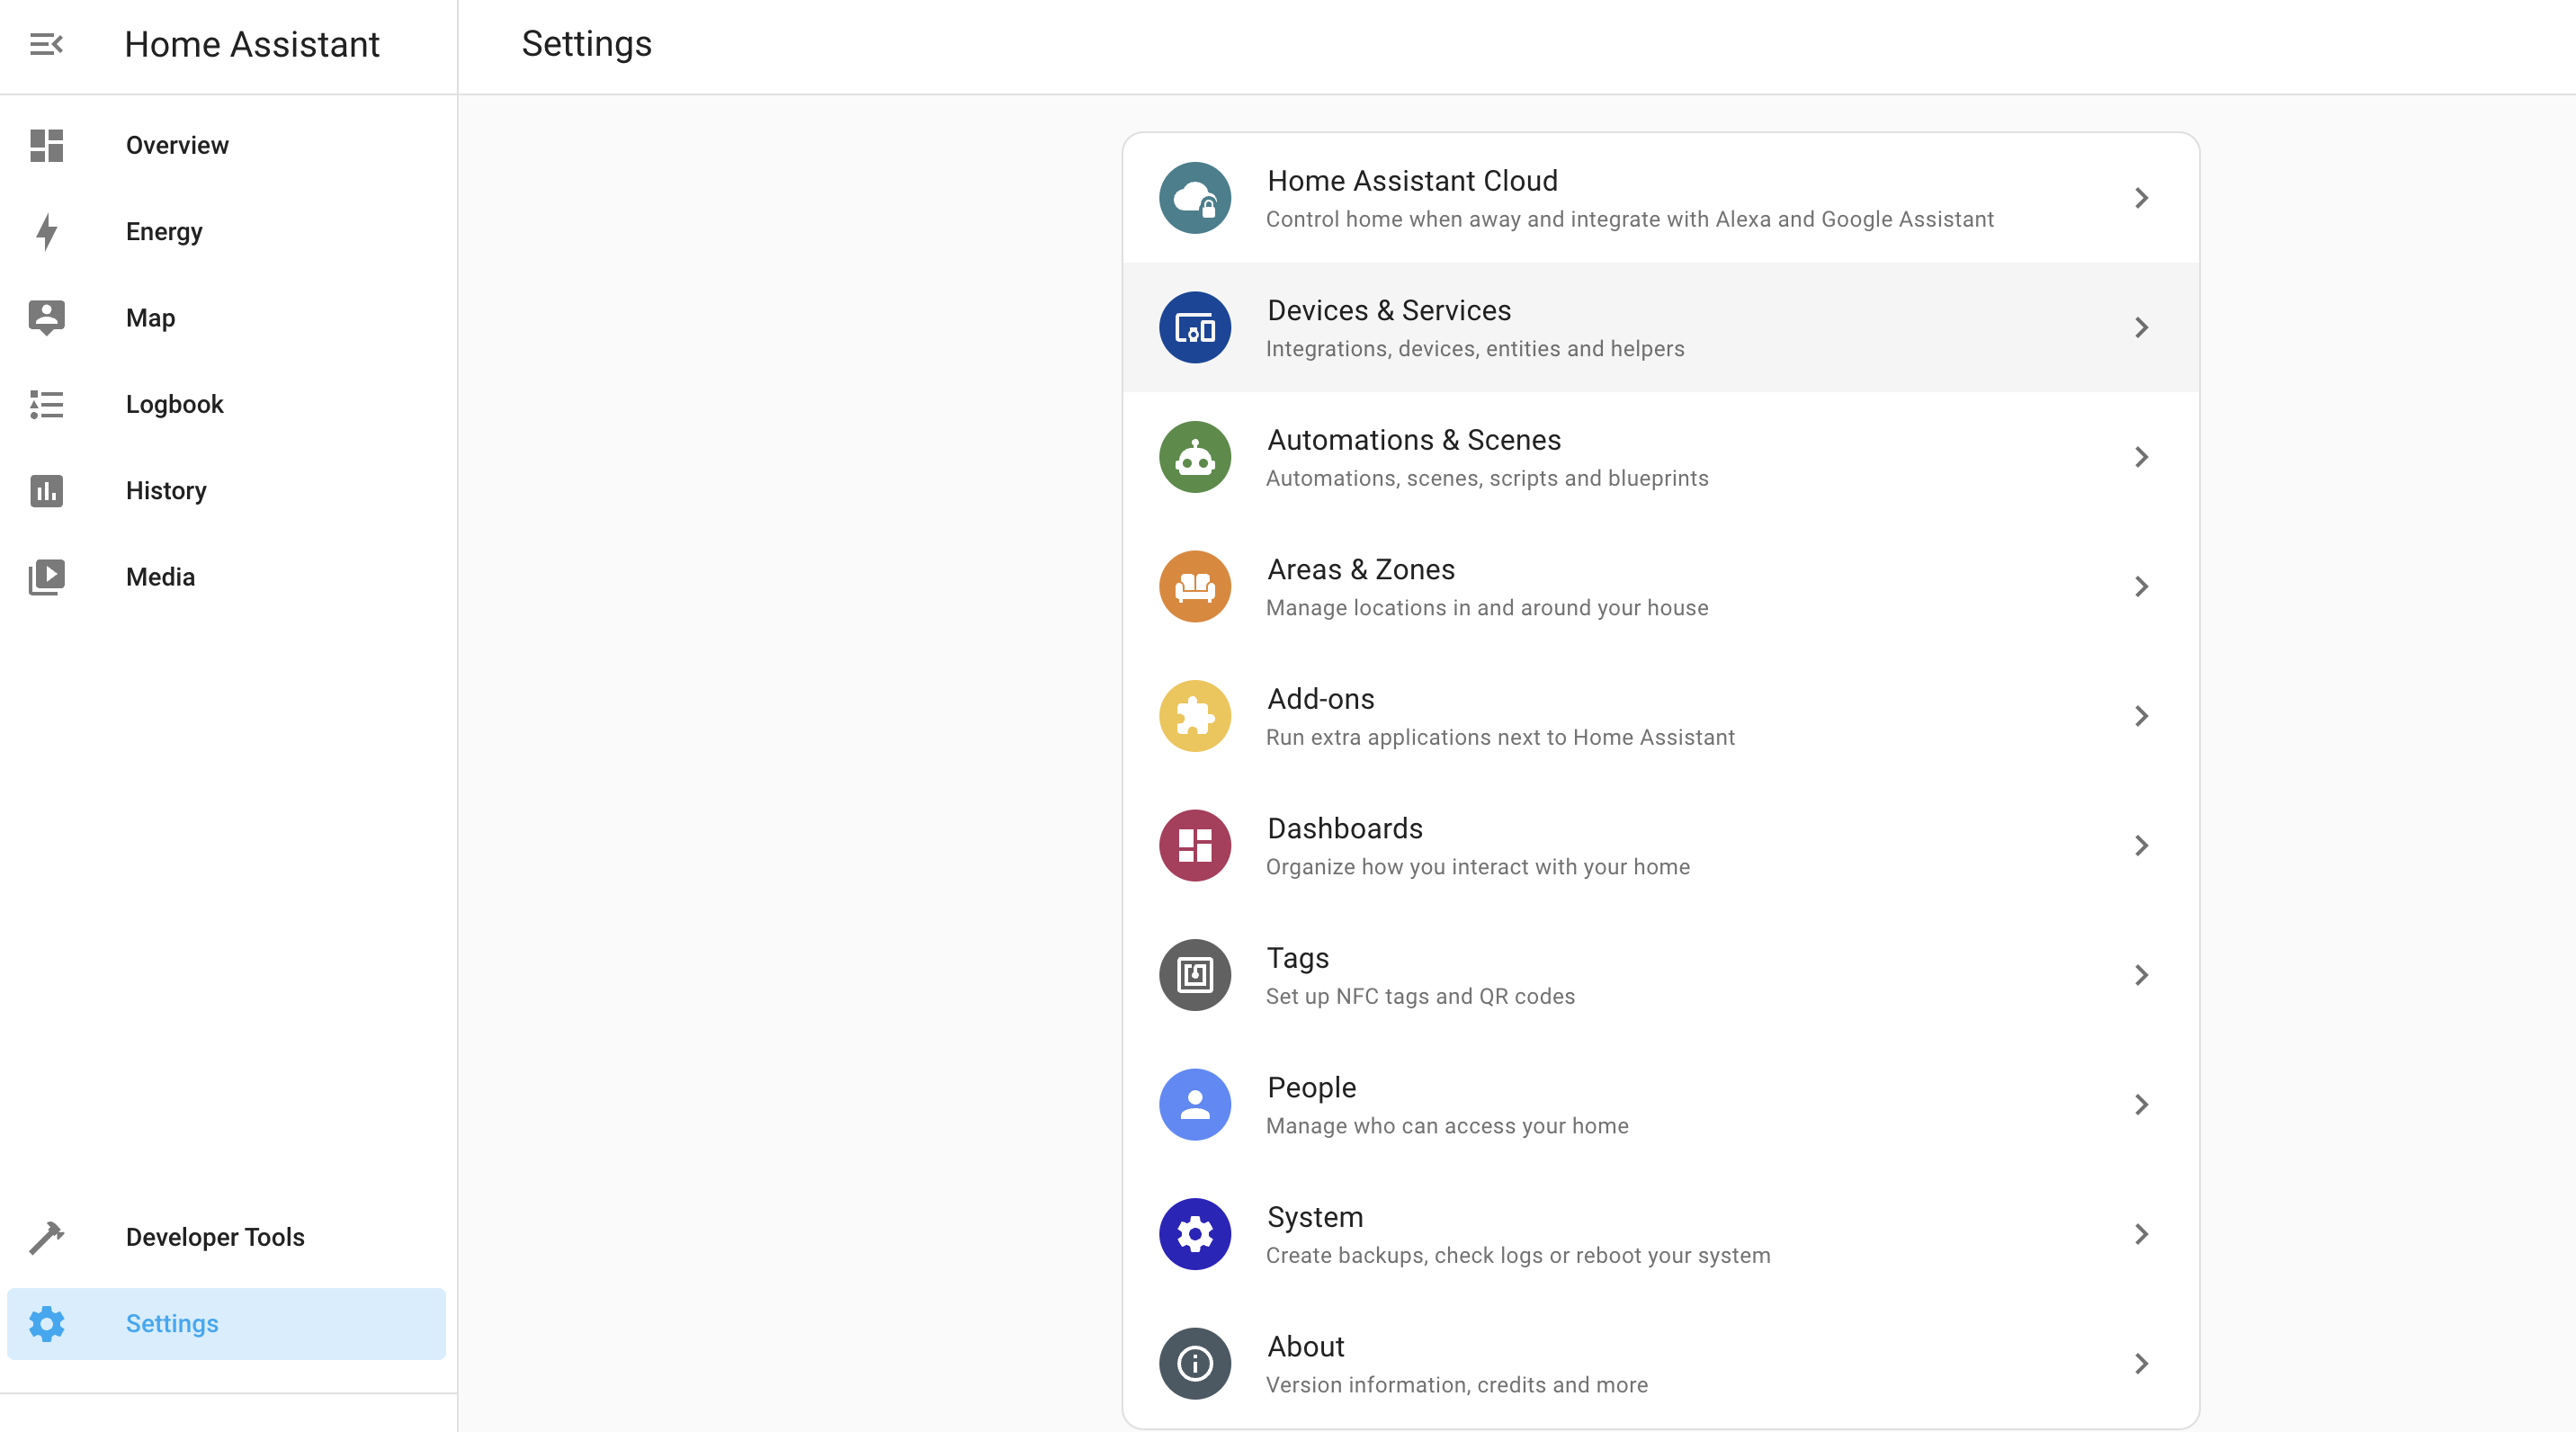
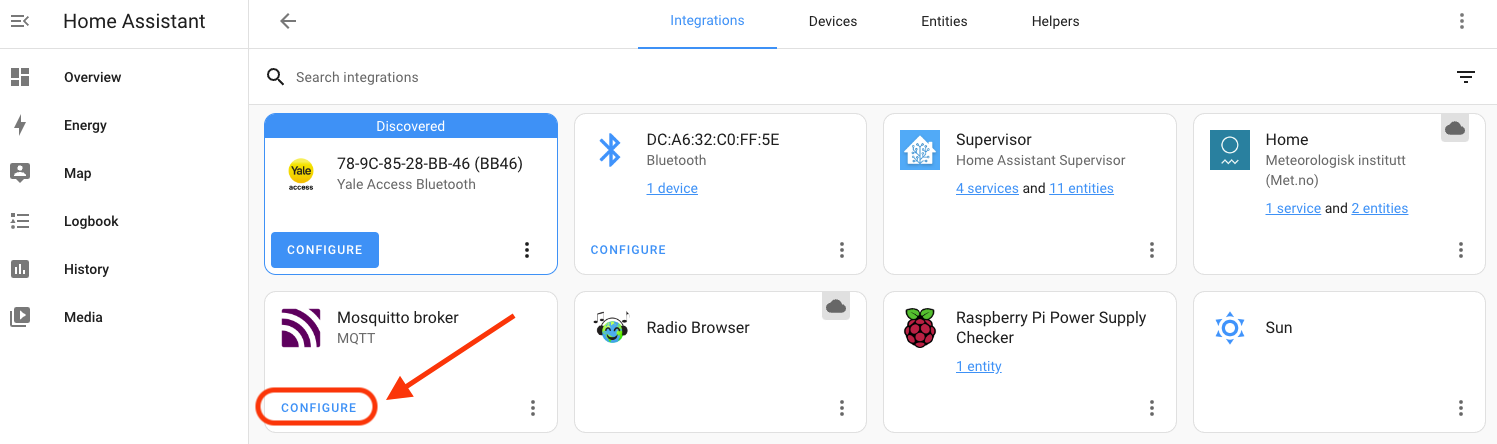
Kk, back in Home Assistant (HA, remember?) we’re going to set up the sensor that’s “binary” (one of two things, i.e. Open or Close). Let’s go into Home Assistant –> Settings –> Devices & Services –> Integrations.
You should see the MQTT Integration already, just waiting to be configured. Hit that Configure button and let’s dive in. It may ask you if you want to configure Home Assistant to connect to the MQTT broker. You do. 😉
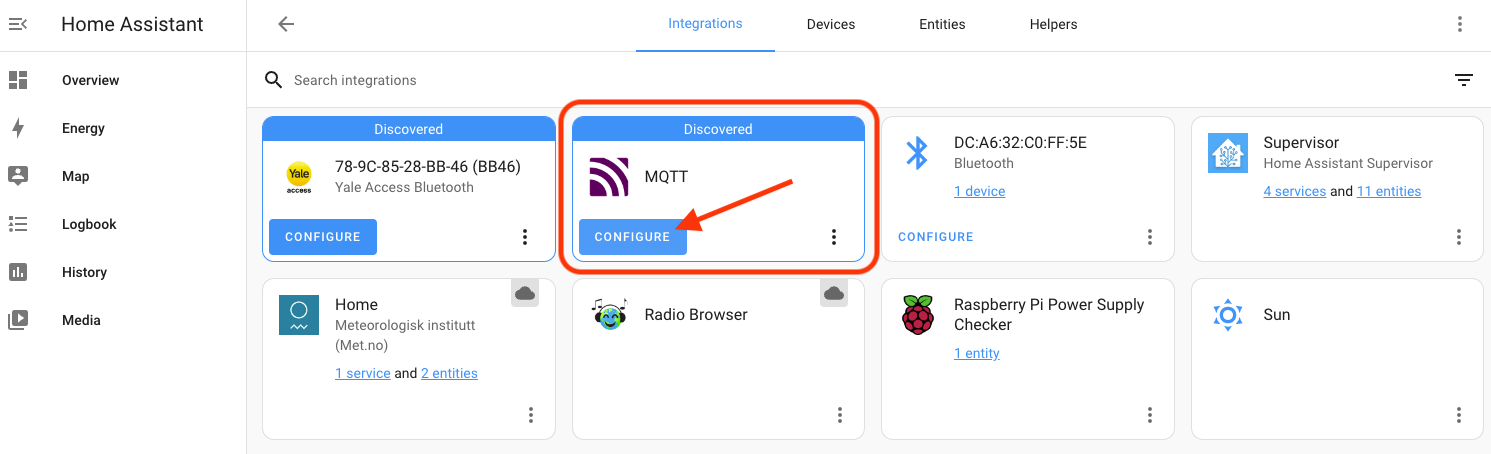
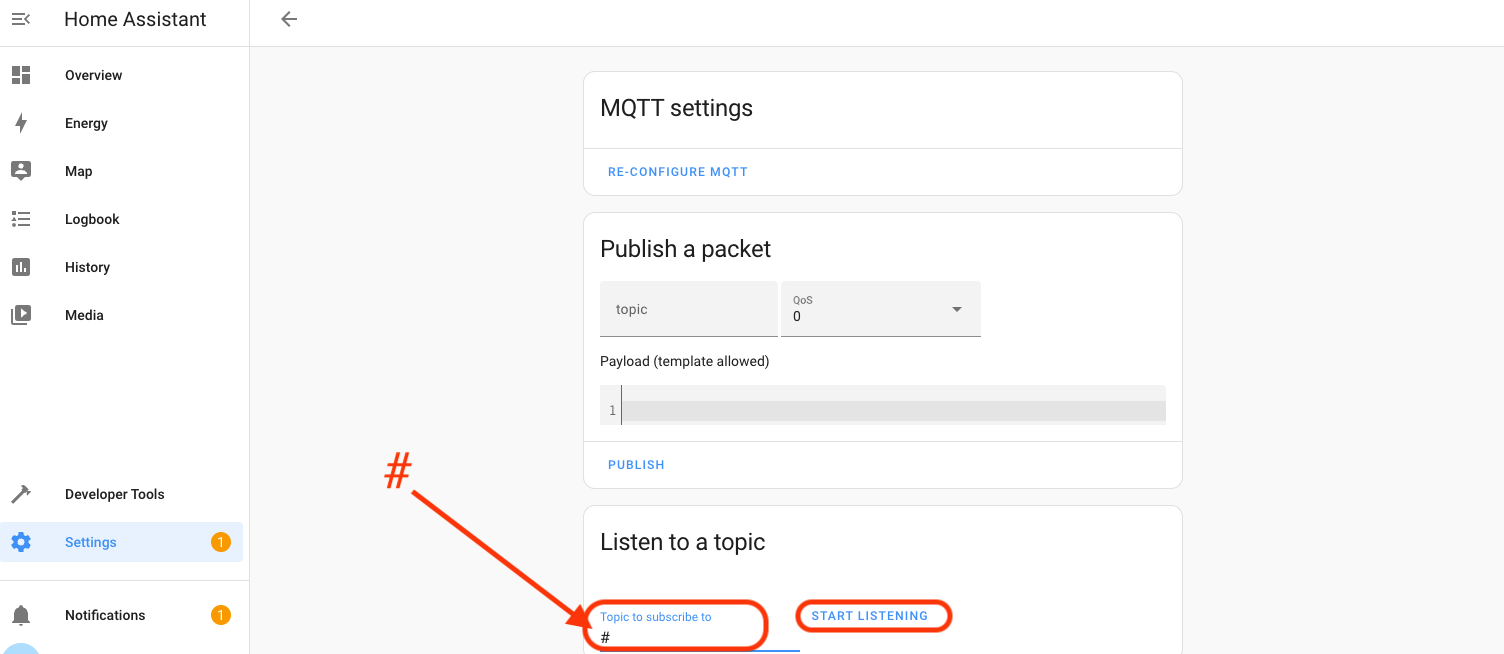
Once you’ve added it via the (confusingly labeled) blue Configure button, you’ll have to actually configure it by hitting the blue Configure text.
That will open up the MQTT settings window. At the bottom of that, look for “Listen to a topic”, enter the pound sign (#), and hit “Start Listening”.
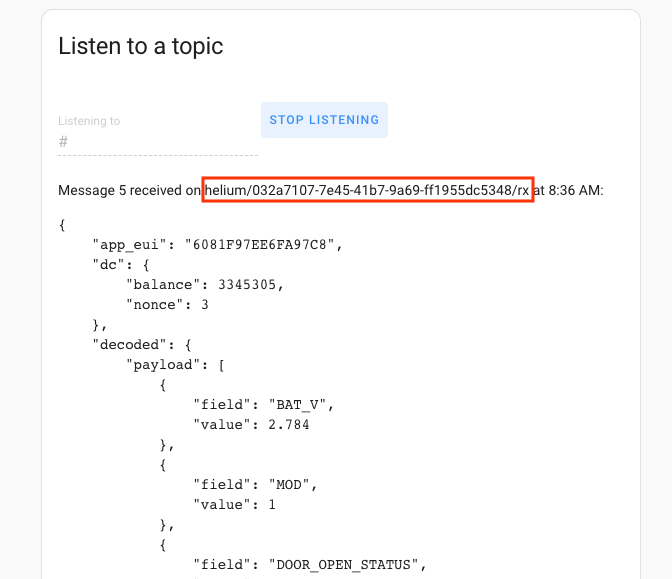
Open and close the door sensor a couple of times and you should see messages start coming in beneath the Stop Listening line. Now, you’ll have to copy the Message Topic Name, which is the text after “Message x received on”, starting with “helium”. In my case, it’s helium/032a7107-7e45-41b7-9a69-ff1955dc5348/rx
I pasted mine into a Sublime Text Editor file, but you can use Notepad or whatever you’d like.
Now we’re going to set up a place in Home Assistant to paste that info.
Installing File Editor Addon
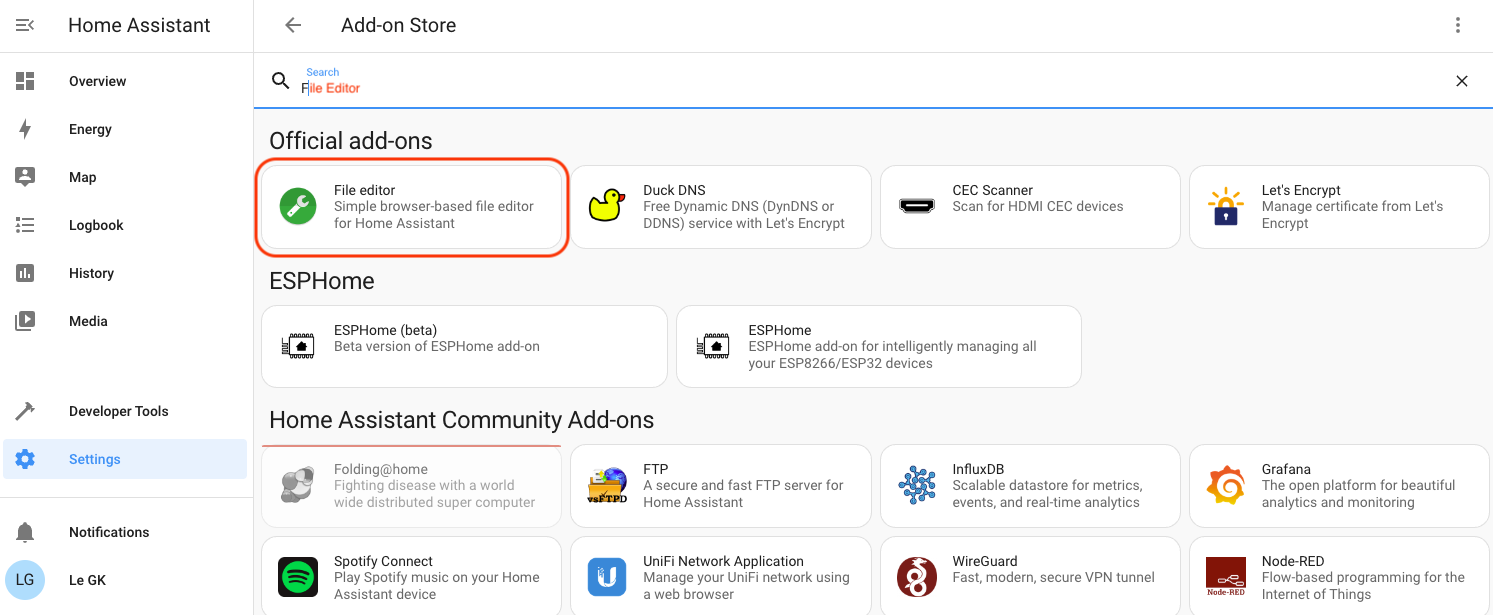
In Home Assistant, go to Settings–>Addons–>Addon Store–>File Editor.

Type the first few letters of File to make it easy to find, then hit that sucker.
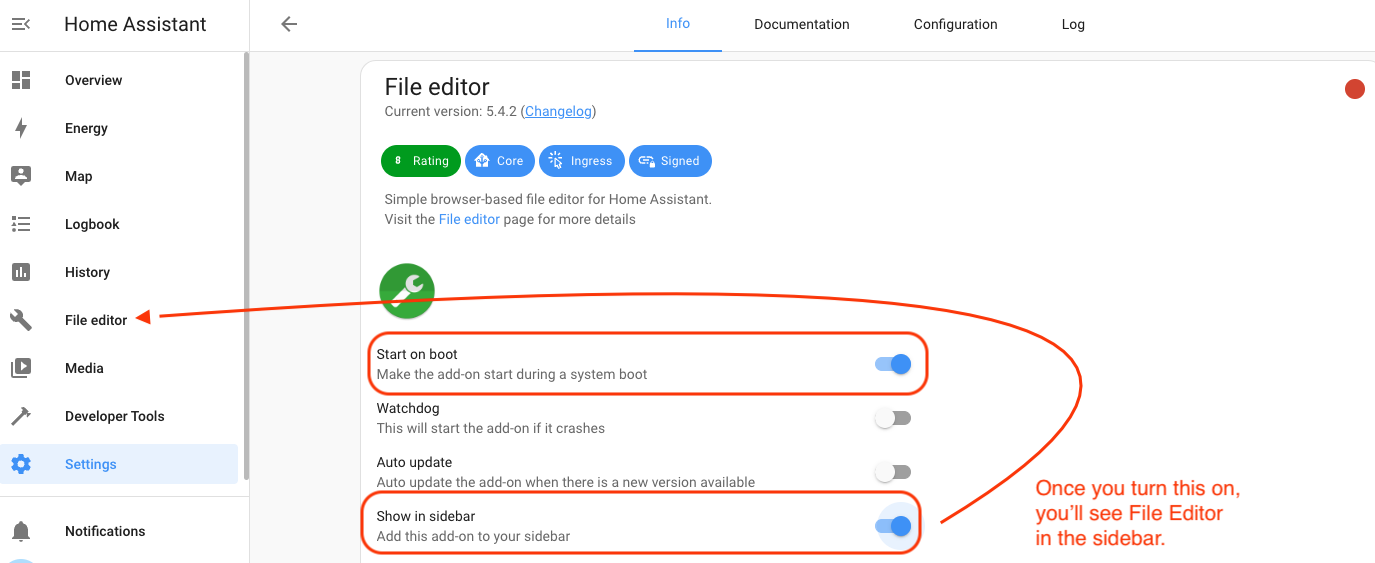
Once you’ve got it installed, turn on “Start on boot” and “Show in sidebar”.
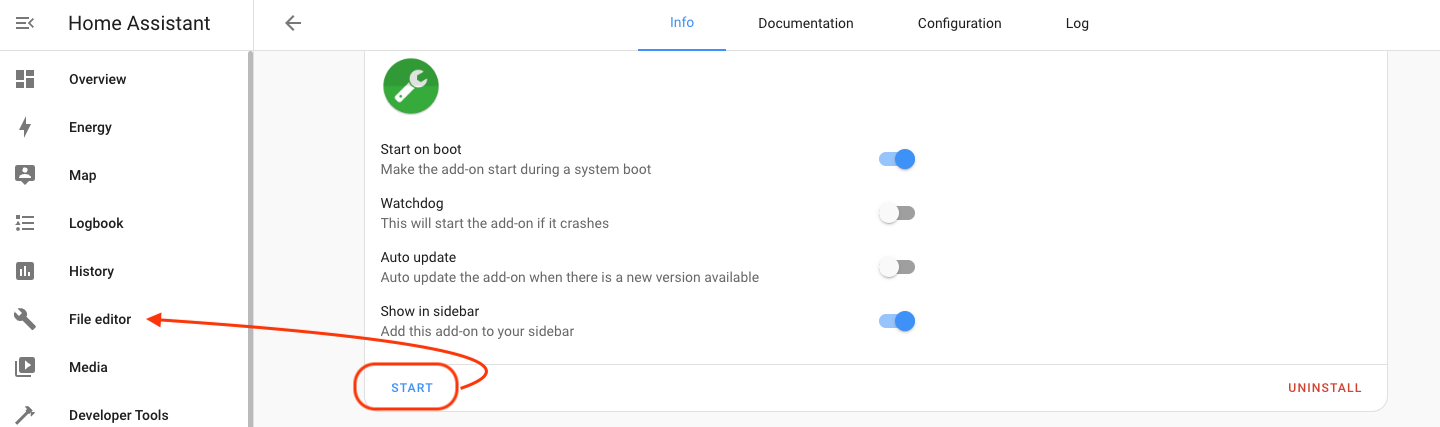
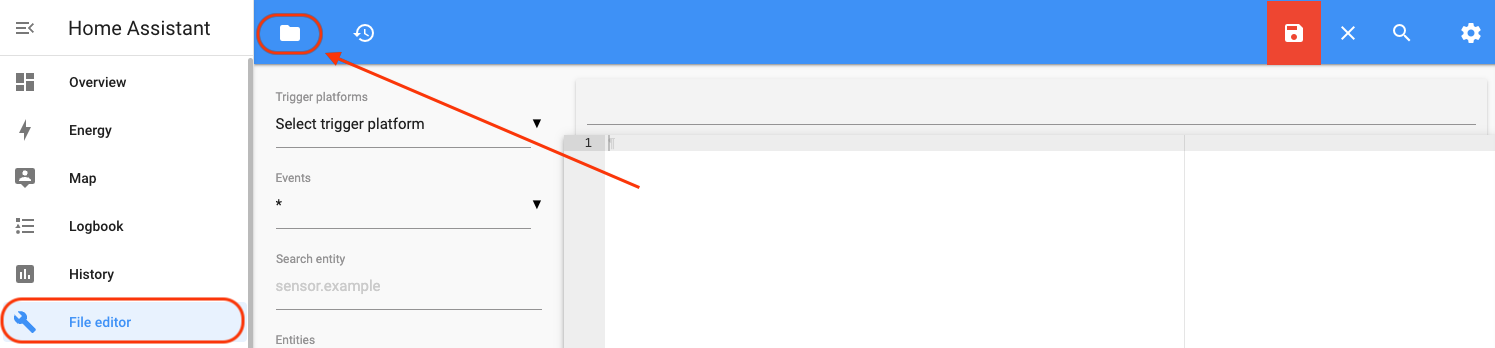
Once all that’s done, hit the blue Start button, then go to File Editor in the sidebar. As my paragliding adventure buddy Robert says, “Now we’re cooking with Crisco!” I think he means we’re making progress.
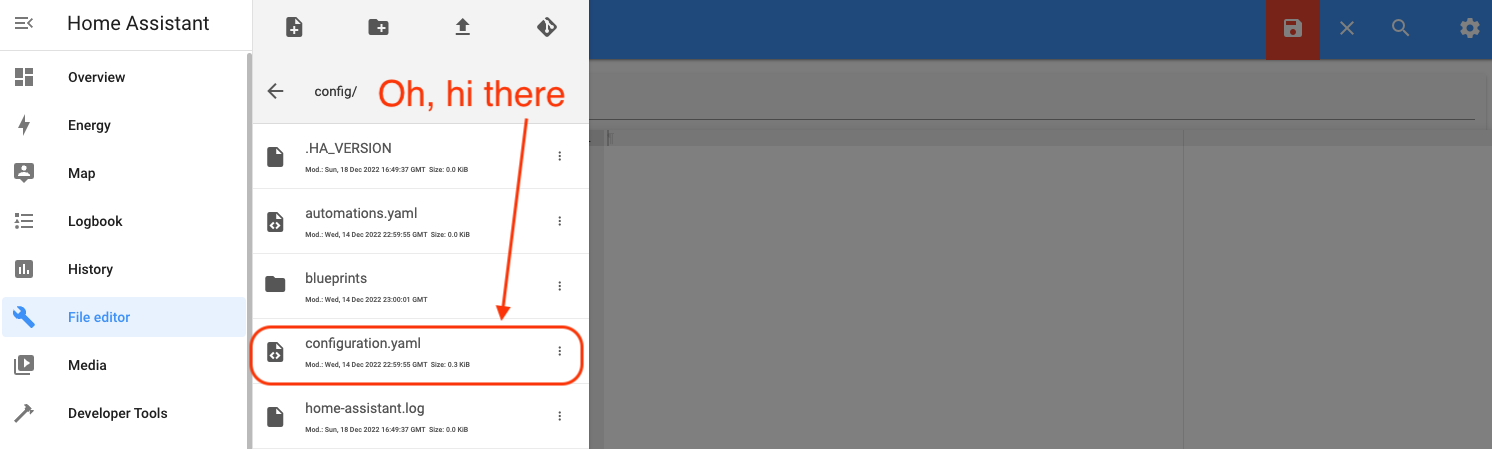
Now that you’re in File Editor you have to find the “configuration.yaml” file. Sounds complicated, right? It’s not. You got this. Go up to the folder at the top left of the screen:
Then look for it in the menu that pops up.
Once you’ve selected it and opened it up, we’re going to add the following at the bottom of that file. Remember to change the last line to YOUR “state_topic” will be the one you copied earlier.
mqtt:
binary_sensor:
- name: "Gate Sensor"
device_class: opening
payload_on: "1"
payload_off: "0"
payload_not_available: ""
value_template: "{{ value_json.decoded.payload.DOOR_OPEN_STATUS }}"
state_topic: "helium/032a7107-7e45-41b7-9a69-ff1955dc5348/rx"
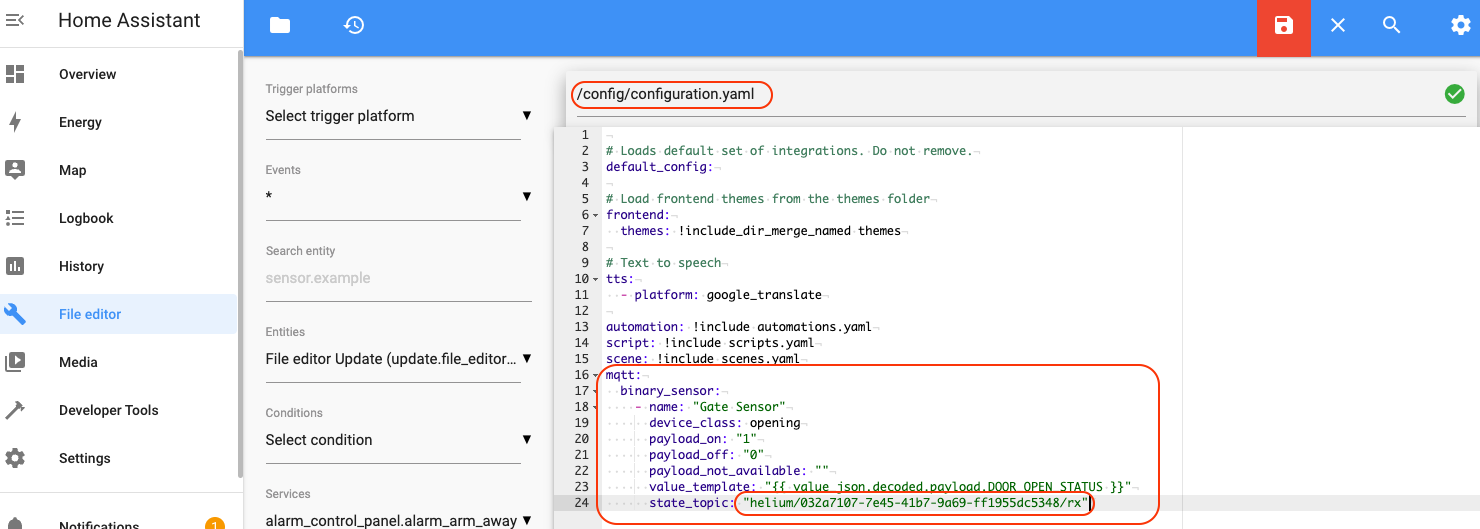
Hey, two quick things to note. First, in the obscure world of yaml code, the rules are strict. The exact indentation shown above is required. Each level is indented two spaces from the previous one. Second, the “value_template” in the yaml code specifies the hierarchy and names in the Helium sensor message (decoded ?payload?DOOR_OPEN_STATUS in this case). If you used a different door sensor or Helium decoder Function than we did, you will probably need to modify this text to match your sensor message.

Once you’ve pasted in your fancy mqtt code from above, save the file with the red folder icon.

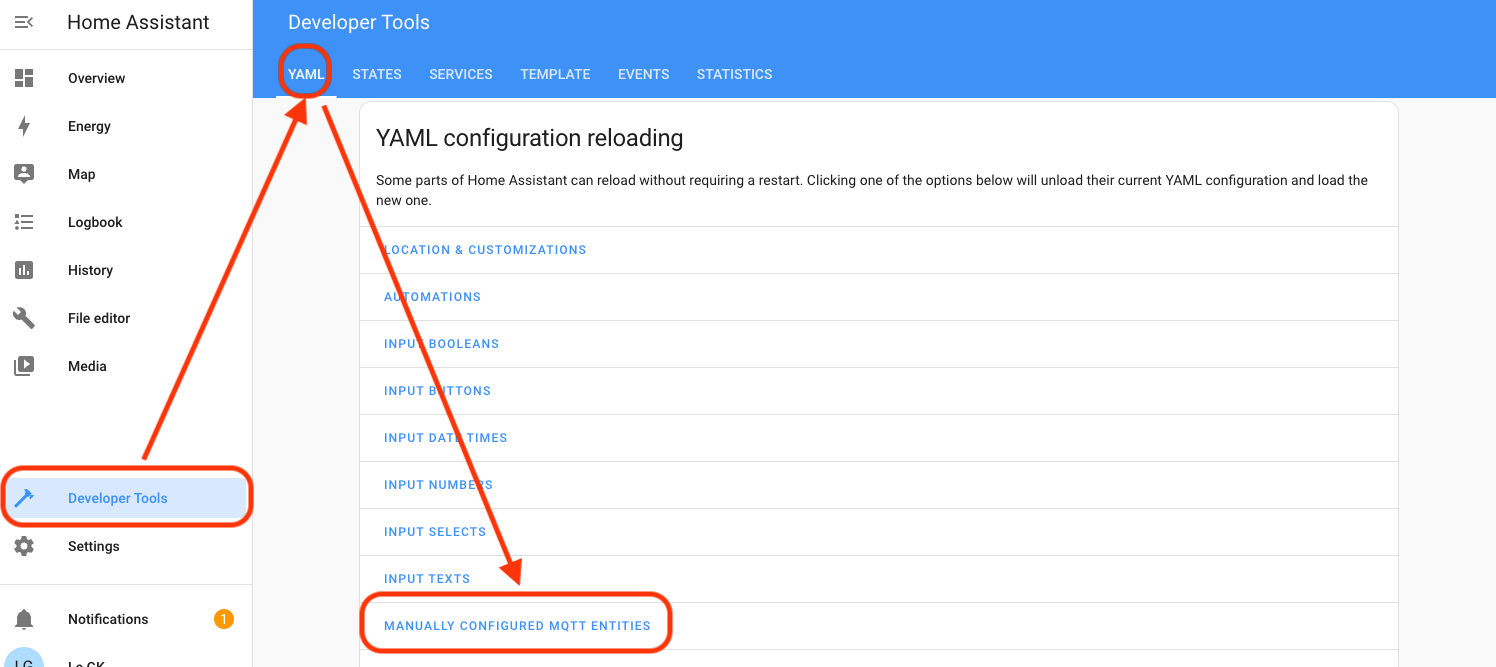
Now, reload the configuration by going to Developer Tools ? YAML configuration reloading ? MANUALLY CONFIGURED MQTT ENTITIES. Hit that, it’ll turn green for a second, then back to normal.
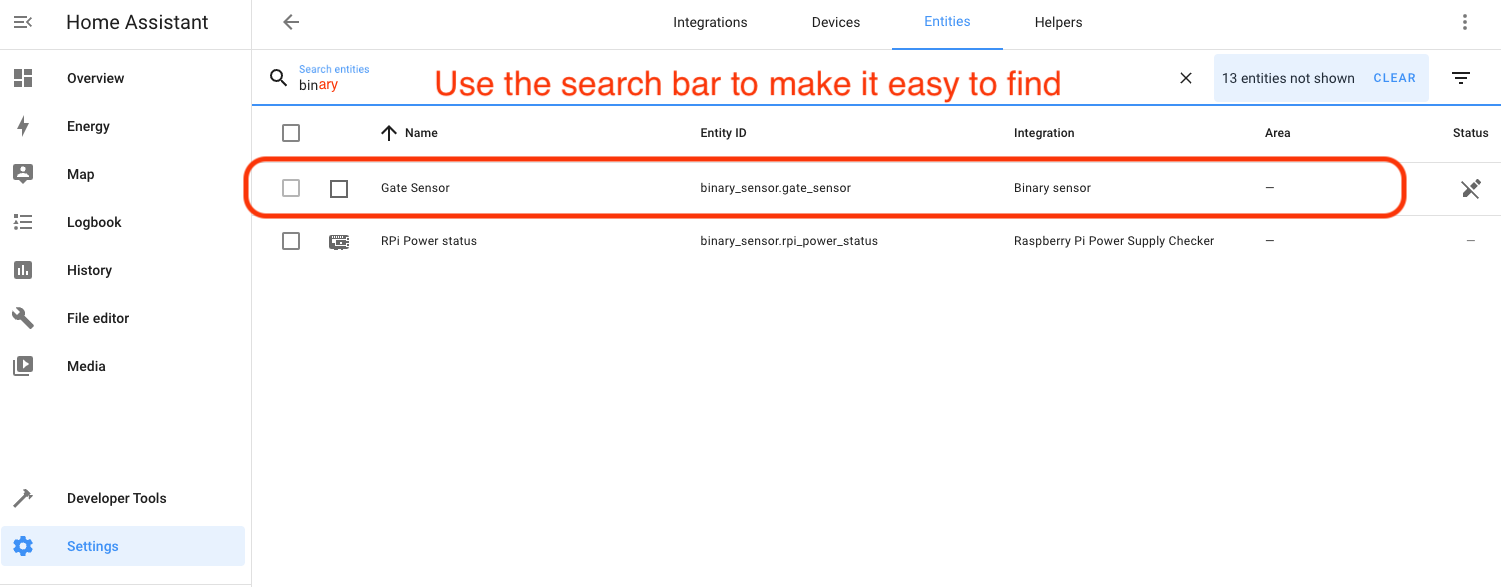
Check your work back in Settings–>Devices & Services–>Entities. You should find an entry like this.
Oh. My. G. We’re coming into the home stretch here. The next (and pretty much last) thing we’ll do is set up a smart switch on Home Assistant and switch it based on the door sensor state changes. I’m going to use a Kasa Smart Wifi switch.

Now, I’m going to skip pictures and hand-holding for the Kasa Switch setup; that should be pretty straightforward. Buy the switch, put the Kasa app on your phone, add the switch to your phone.
Setting Up The Smart Switch in Home Assistant
With the switch installed on your local WiFi network, let’s head over to Home Assistant, where we’ll add a Kasa Smart integration. Go to Settings–>Devices & Services–>Integrations–>Add Integration. I skipped the picture for Devices & Services. You got this.
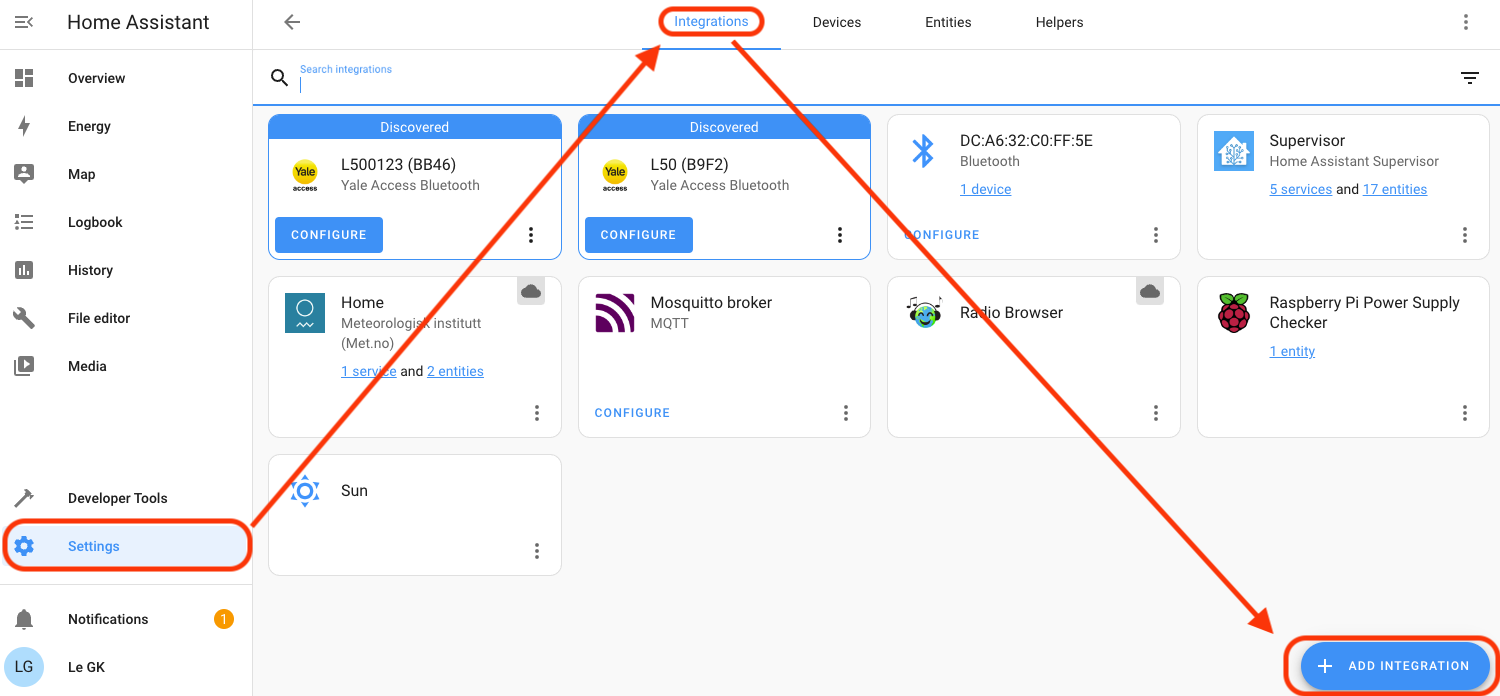
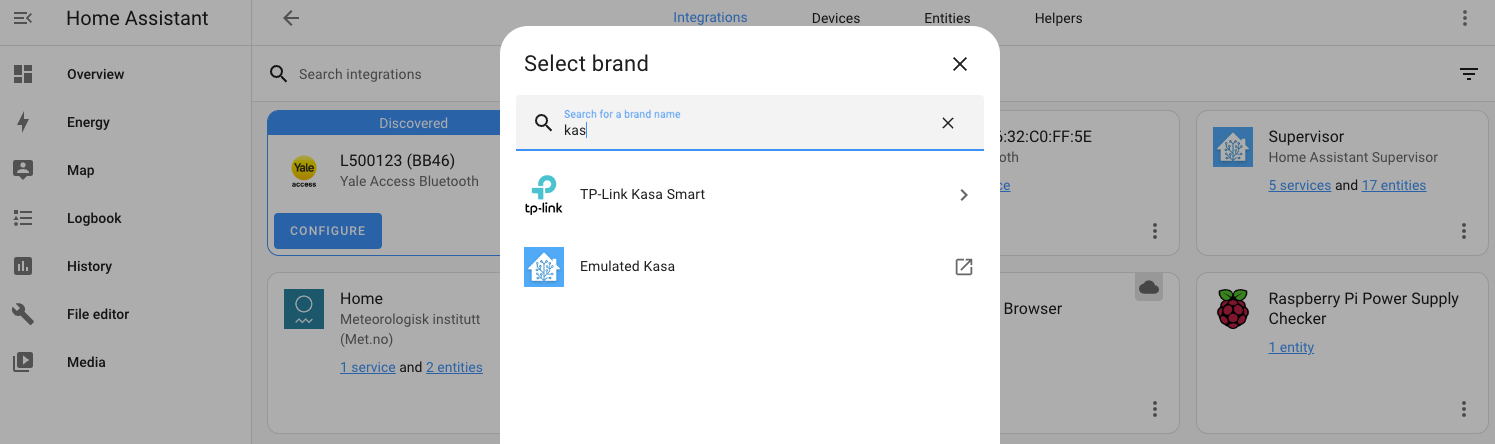
Use the Search field to narrow it down, then select TP-Link Kasa Smart. Leave the “host” field empty, it’ll find your devices.
If you’re running multiple WiFi networks in your home to separate out your personal devices (like phones, computers) from those scum-sucking IoT devices, you’ll need to get a little geeky on your own with allowing Home Assistant to access your networks. I had to Google on this, but because it’s a router/modem related issue, there’s not a great way for my experience to translate to yours. GIYF here. Google Is Your Friend.
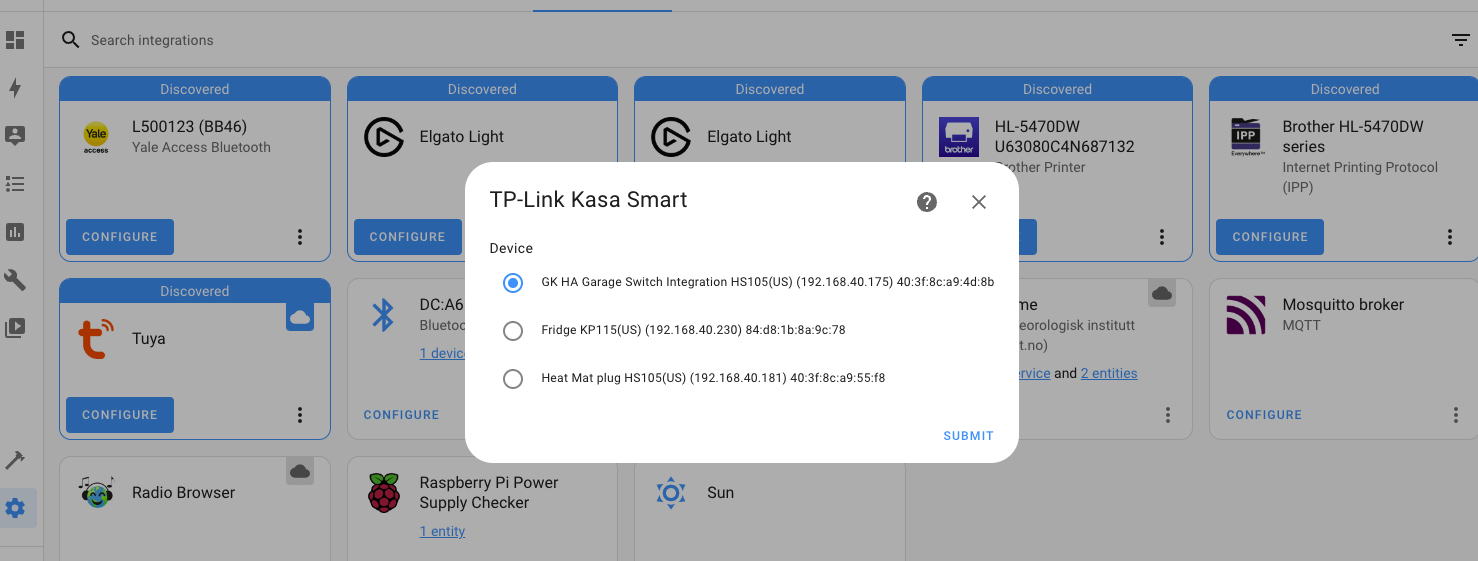
When you get it all right, you’ll see the Kasa devices you have on your network. Heated mat for the win in the San Diego winter. For now, we’re going with the one labeled GK HA Garage Switch Integration. Fun note: I renamed this to just be GK Garage Switch, as the addition of Integration at the end confused me when I was trouble shooting later.
When you’re done with adding it in, our final steps will be to add an Automation in HA that turns on the switch when the door sensor fires. Restart Home Automation to lock in your changes (HA Settings–>System–>Restart (top right) and prepare for the final push. We’re close now!
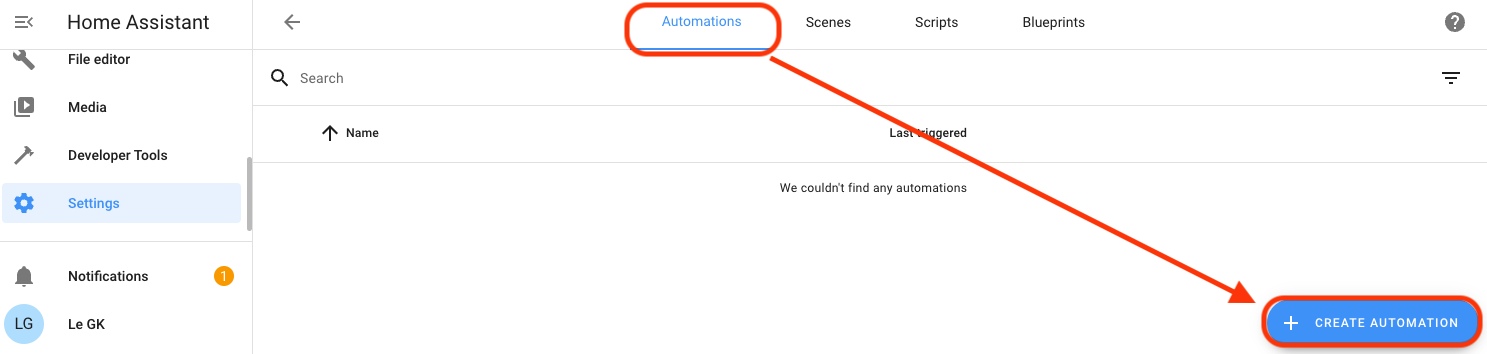
In Home Assistant, go to Settings–>Automation & Scenes.

Then look in the bottom right for “Create Automation”.
Start with an empty Automation (don’t get suckered into the pre-filled ones yet!)
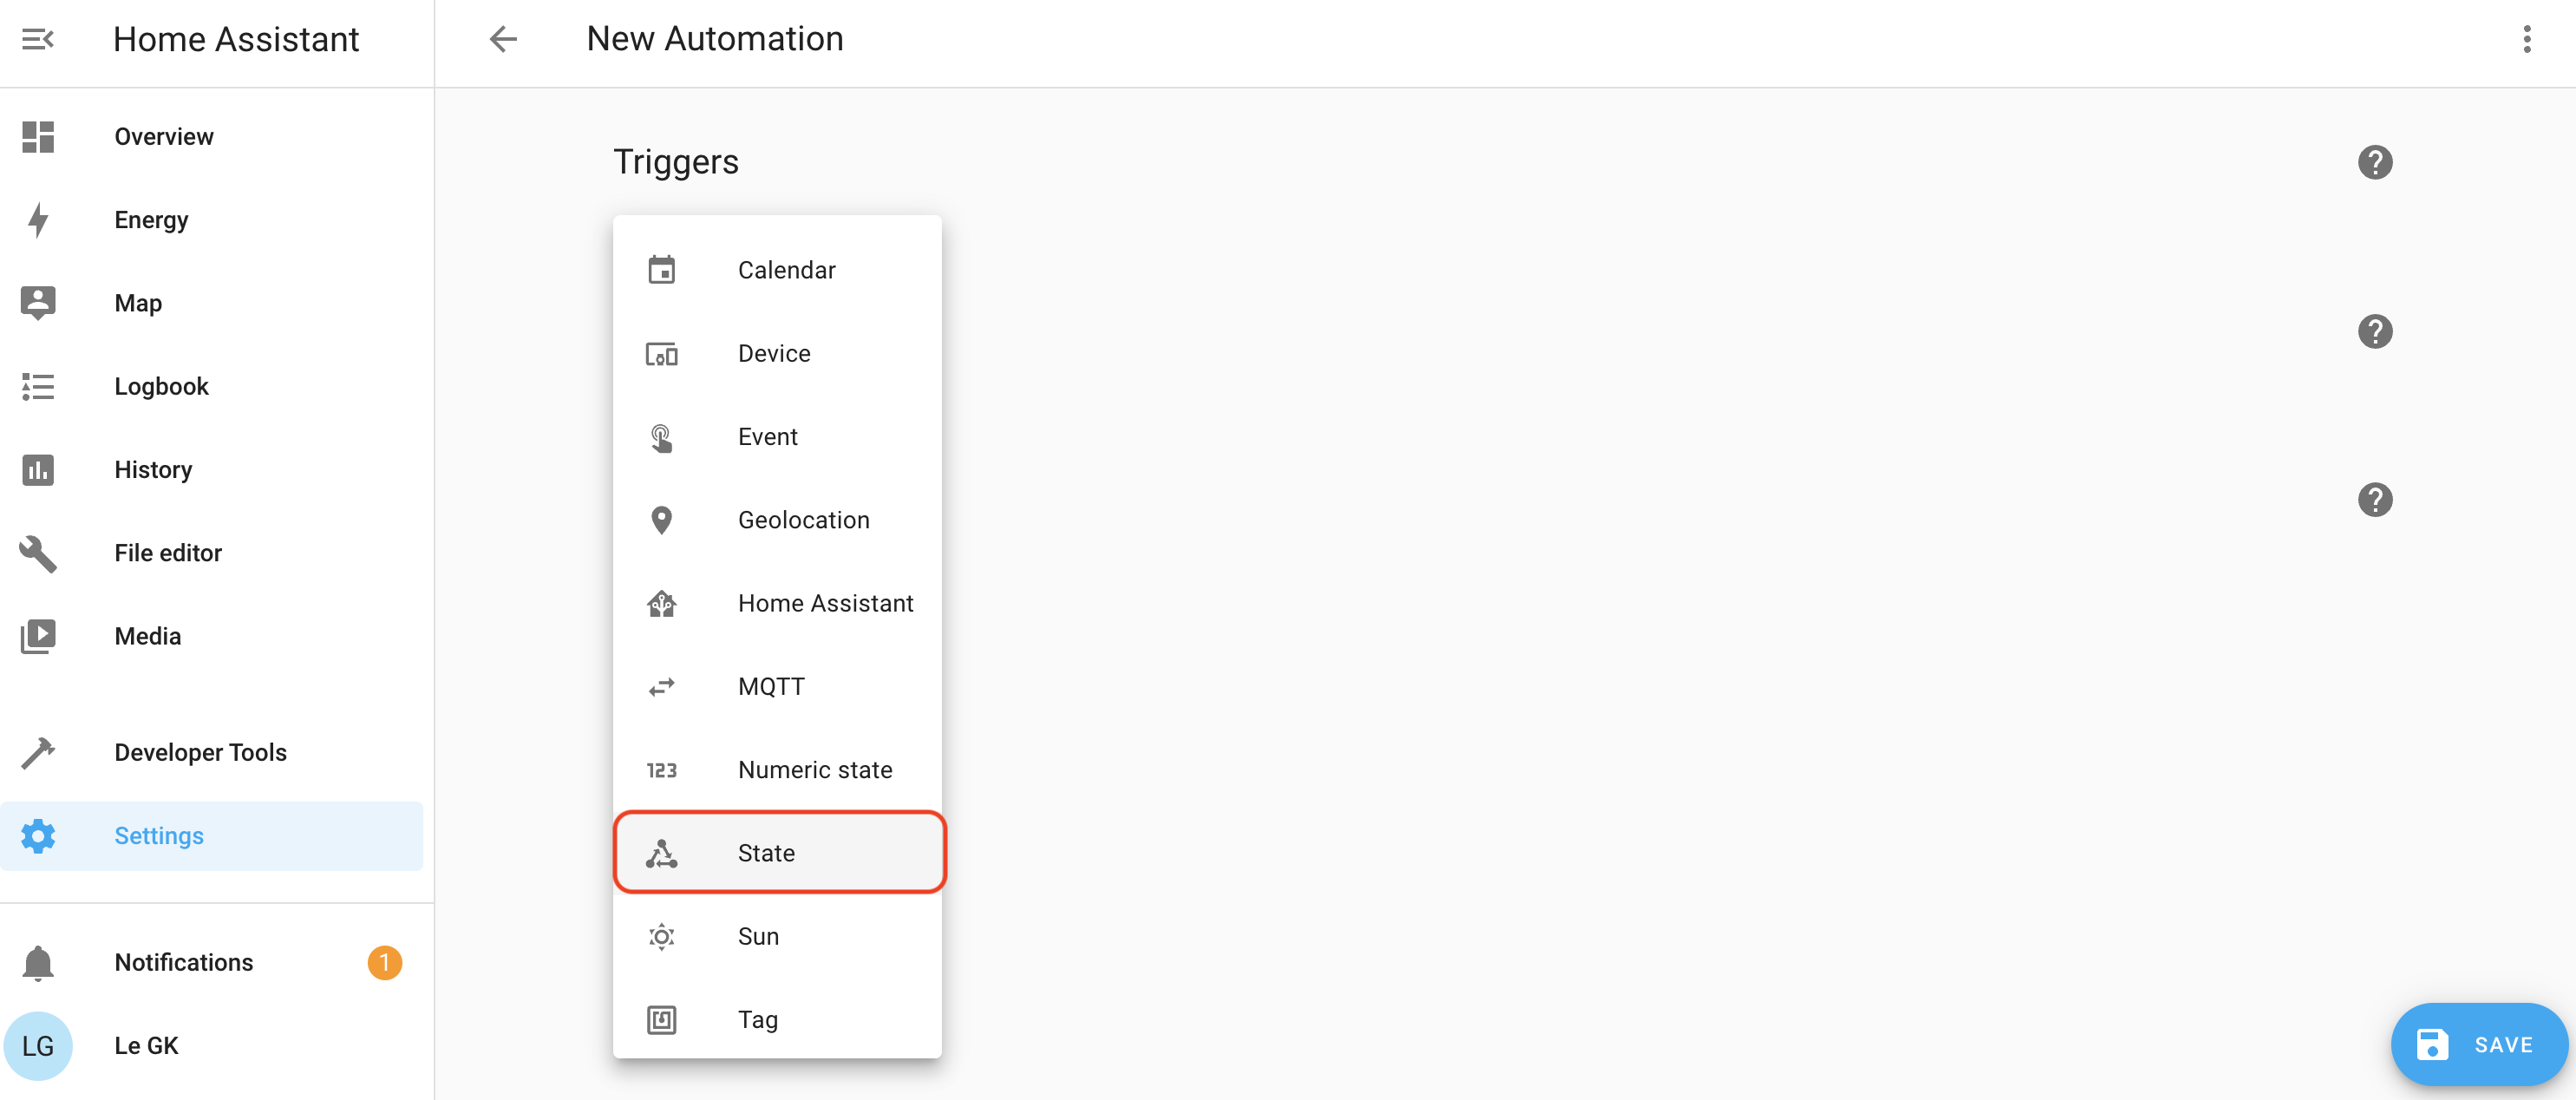
You’ll see a window where the “flow” should make sense. We’re going to add a Trigger, a Condition, and an Action.
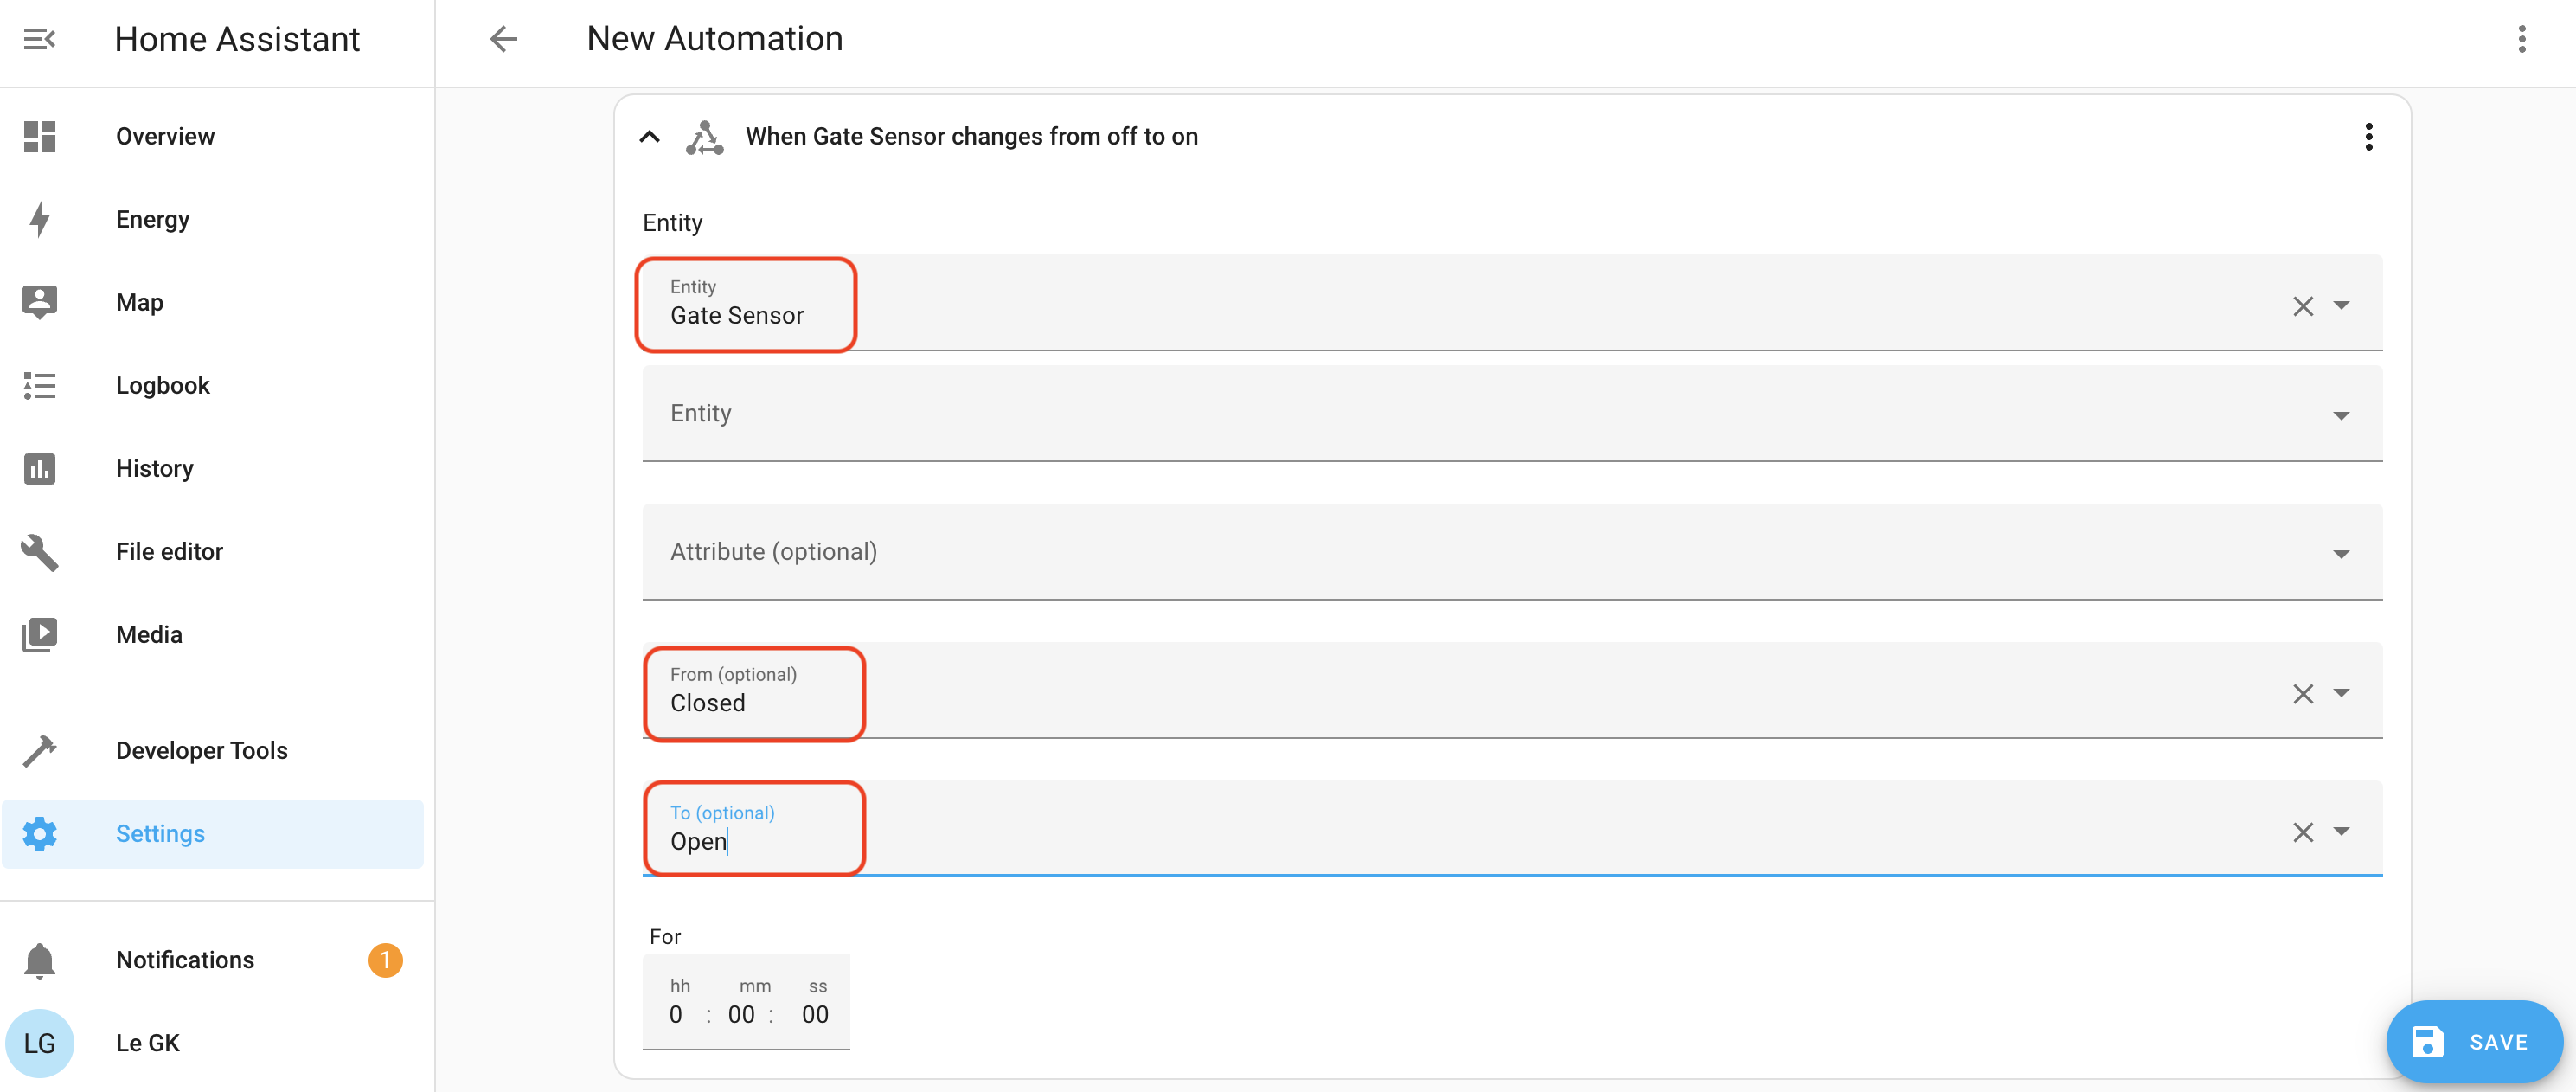
Start by adding (“+”) a Trigger, which will be a “State” change.
- Trigger name: When Gate Sensor changes from off to on.
- Entity: Gate Sensor
- From: Off
- To: On
- For: 0:00:00
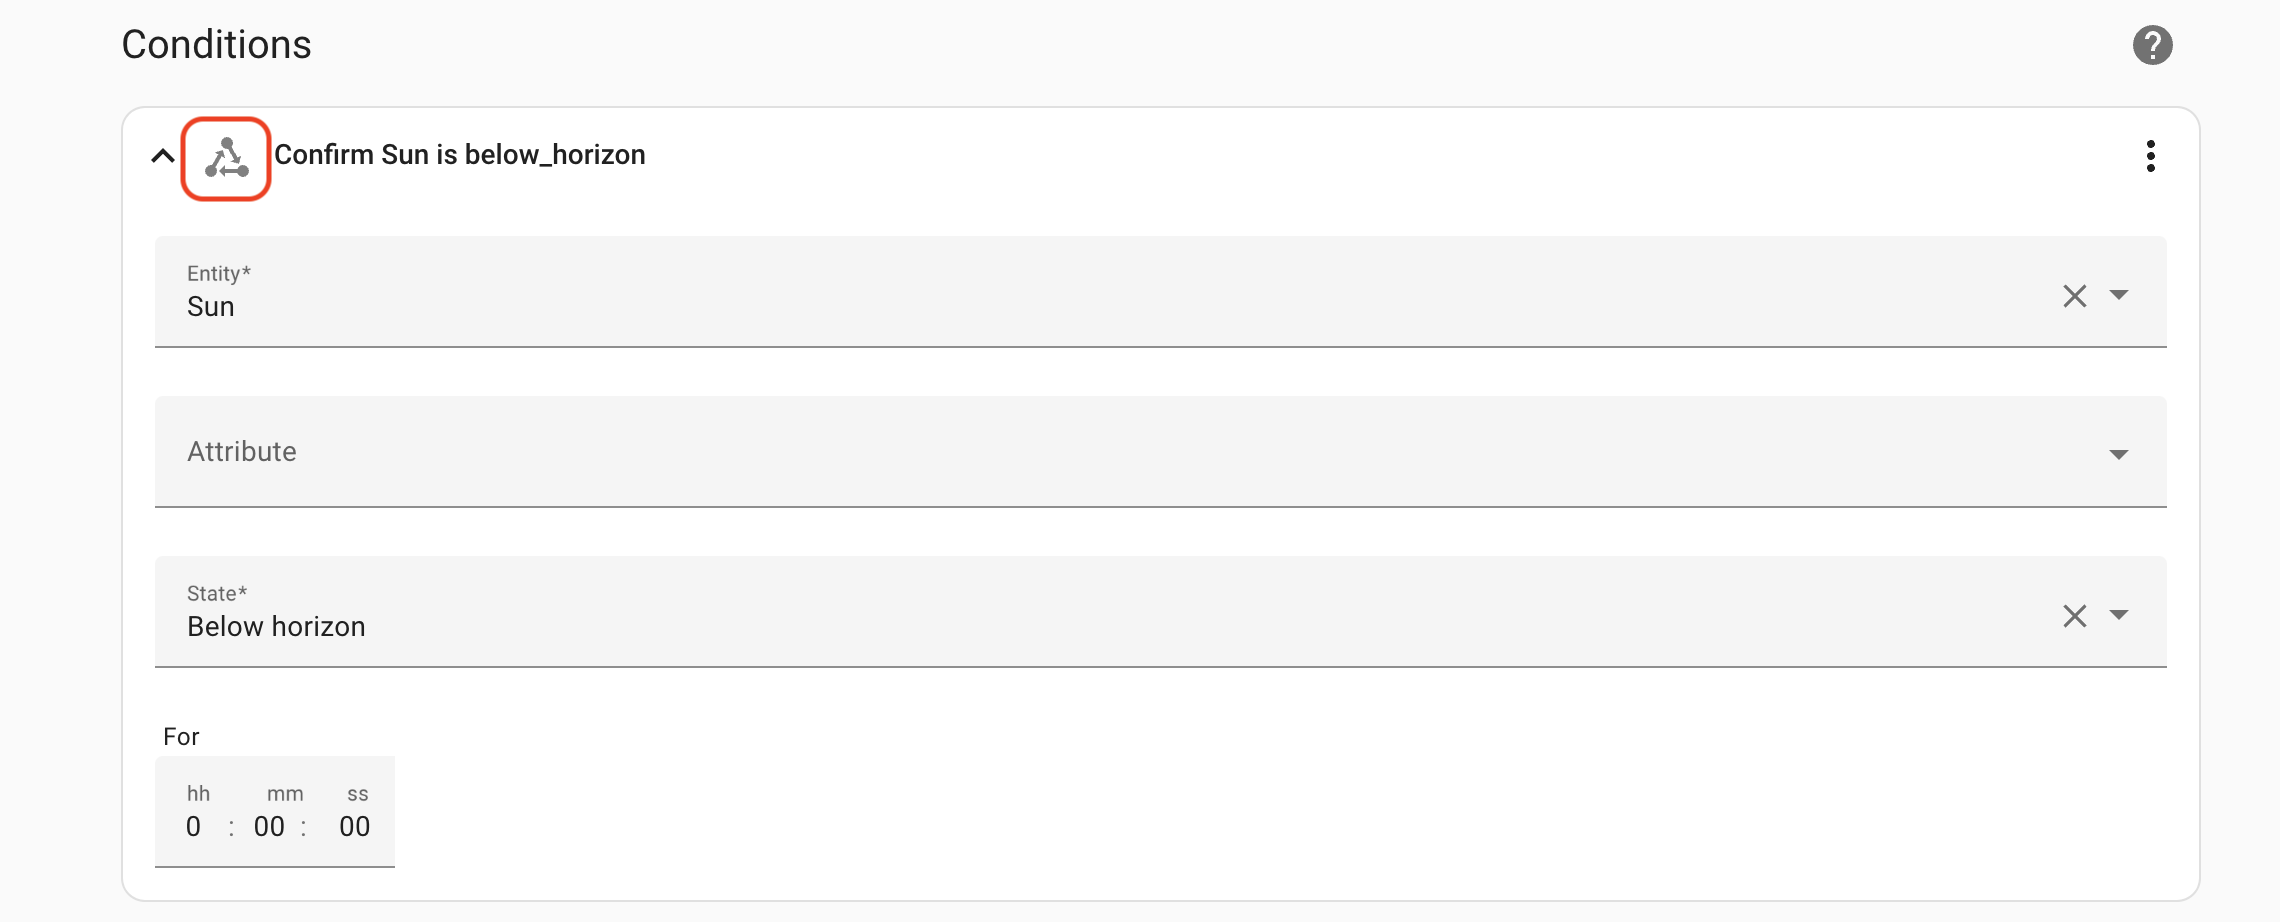
Now we’ll set a Condition for the State of the sun so that this only fires when the sun ain’t out. You may rush, as I did, into using the Condition of Sun, instead of a State. It probably doesn’t matter, but for my Automation, which is tested and works, I used the State, which is indicated by that little triangle of arrows.
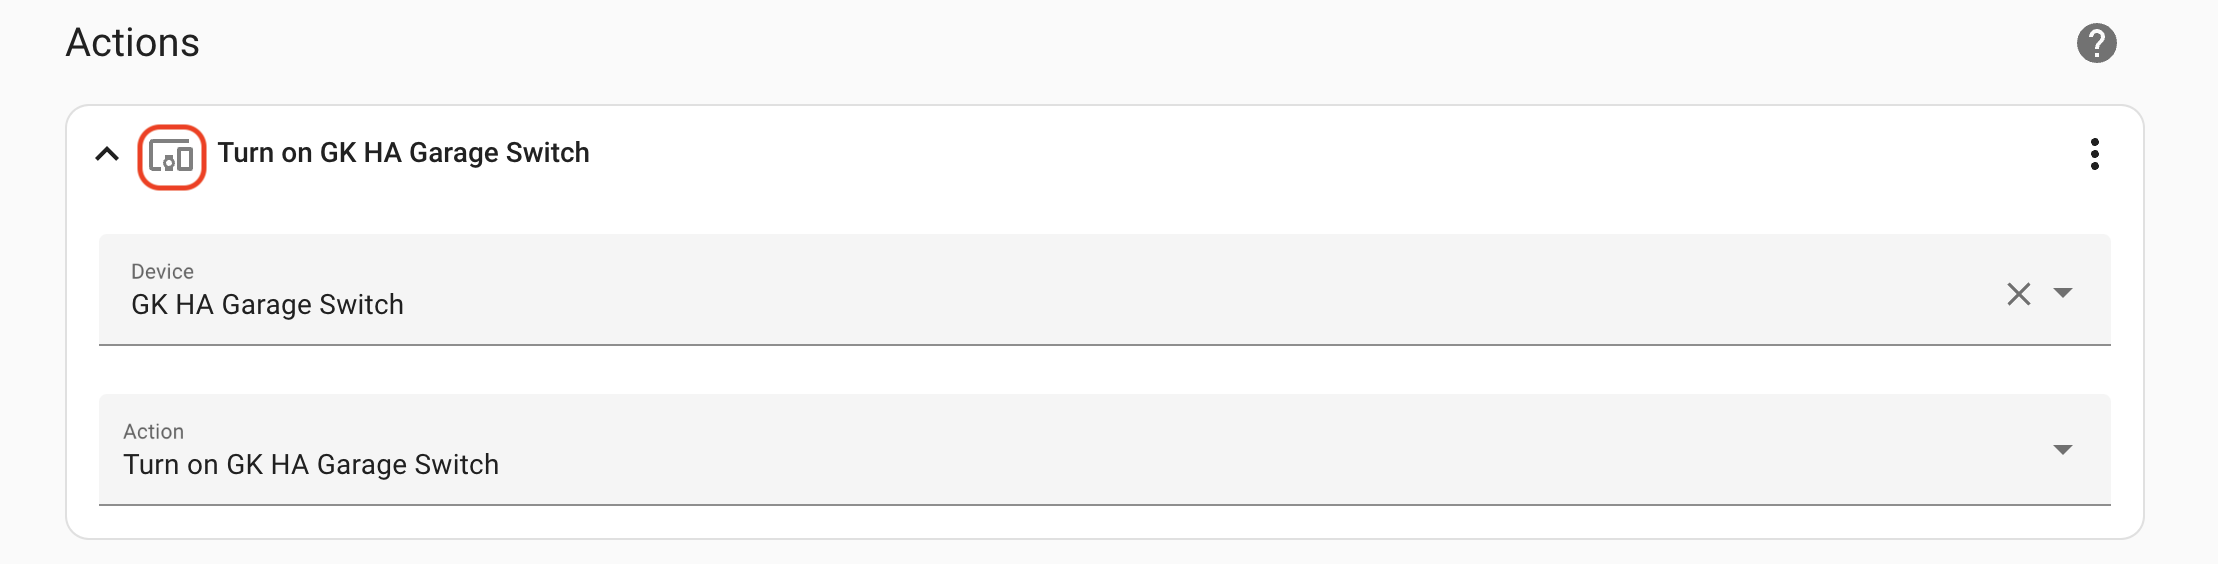
Finally, we’ll set the Action, which will be a Device action, as indicated by the little Device symbol outlined in red, below.
You done, dawg. Open and close the sensor a few times to make sure the light switches. It should. If it doesn’t, go back and carefully check you followed the instructions. One little thing, like the wrong decoder, or choosing the wrong thing from a dropdown, or whatever, will stop the flow of operations needed to make the magic work.
A quick and geeky note: Home Assistant won’t know the state of your sensor until the sensor sends a message. That happens the first fimte you open or close the sensor. This is because sensors in the world of IoT typically don’t constantly broadcast their state. That would be a waste of energy. The gate sensor only needs to broadcast one message, as it happens. “I opened.” Or, “I closed”. That’s it. It doesn’t need to say “I’m open I’m open I’m open I’m open etc” until it runs out of juice. This is why in the Trigger in HA has to be “Gate sensor changes from off to on”, not “Gate sensor is on”.
With that…
El FIN. Congrats! You are now a stone cold HA MQTT sensor integration killer. Now get out there and dream up some rad new automations for Home Assistant, and please, make sure you share your best one with the rest of us over on the GK Discord.
A GIANT THANK YOU to Dirk Beer (dirkbeer#3592 on Discord) for walking me through this thing soup to nuts and making sure that us non-engineers have access to getting deep in the weeds with Helium. Rock on Dirk! Additionally, the secretive group known only as the “AF” were instrumental in making sure I got through several hurdles in the realm of MQTT and home networking. AFF!
Leave a Reply