Diving deeper over at Meteo Scientific on this plant nursery project, we wanted to blast out of the gate with something we thought would be incontrovertibly useful. For a nursery in the coastal desert environment of San Diego (albeit with local micrometeorological conditions), keeping track of soil moisture in all the pots seemed like a good start.
With that in mind, Dirk had found a cool soil moisture sensor over on MakerFabs that runs about $20. It’s the V3 version, which is All In One (AIO for you cool cats). That means it’s a sensor and a LoRa radio, not just a sensor which you’d have to connect to something like a Wisblock. BFGNeil explained that one to me. 😉
Steps
- Buy sensor. Geek level: N/A
- Add device (the sensor) to Helium Console. Geek level: Minor
- Add batteries (2 x AAA). Geek level: N/A
- Upload Arduino sketch to sensor (significant geekery involved, but I’ll walk you through it). Geek level: High
- Set up Home Assistant. Geek level: High, walk through of that over here.
- Add Soil Moisture sensor to Home Assistant (HA). Geek level: high
- Rejoice at success: Geek level: N/A
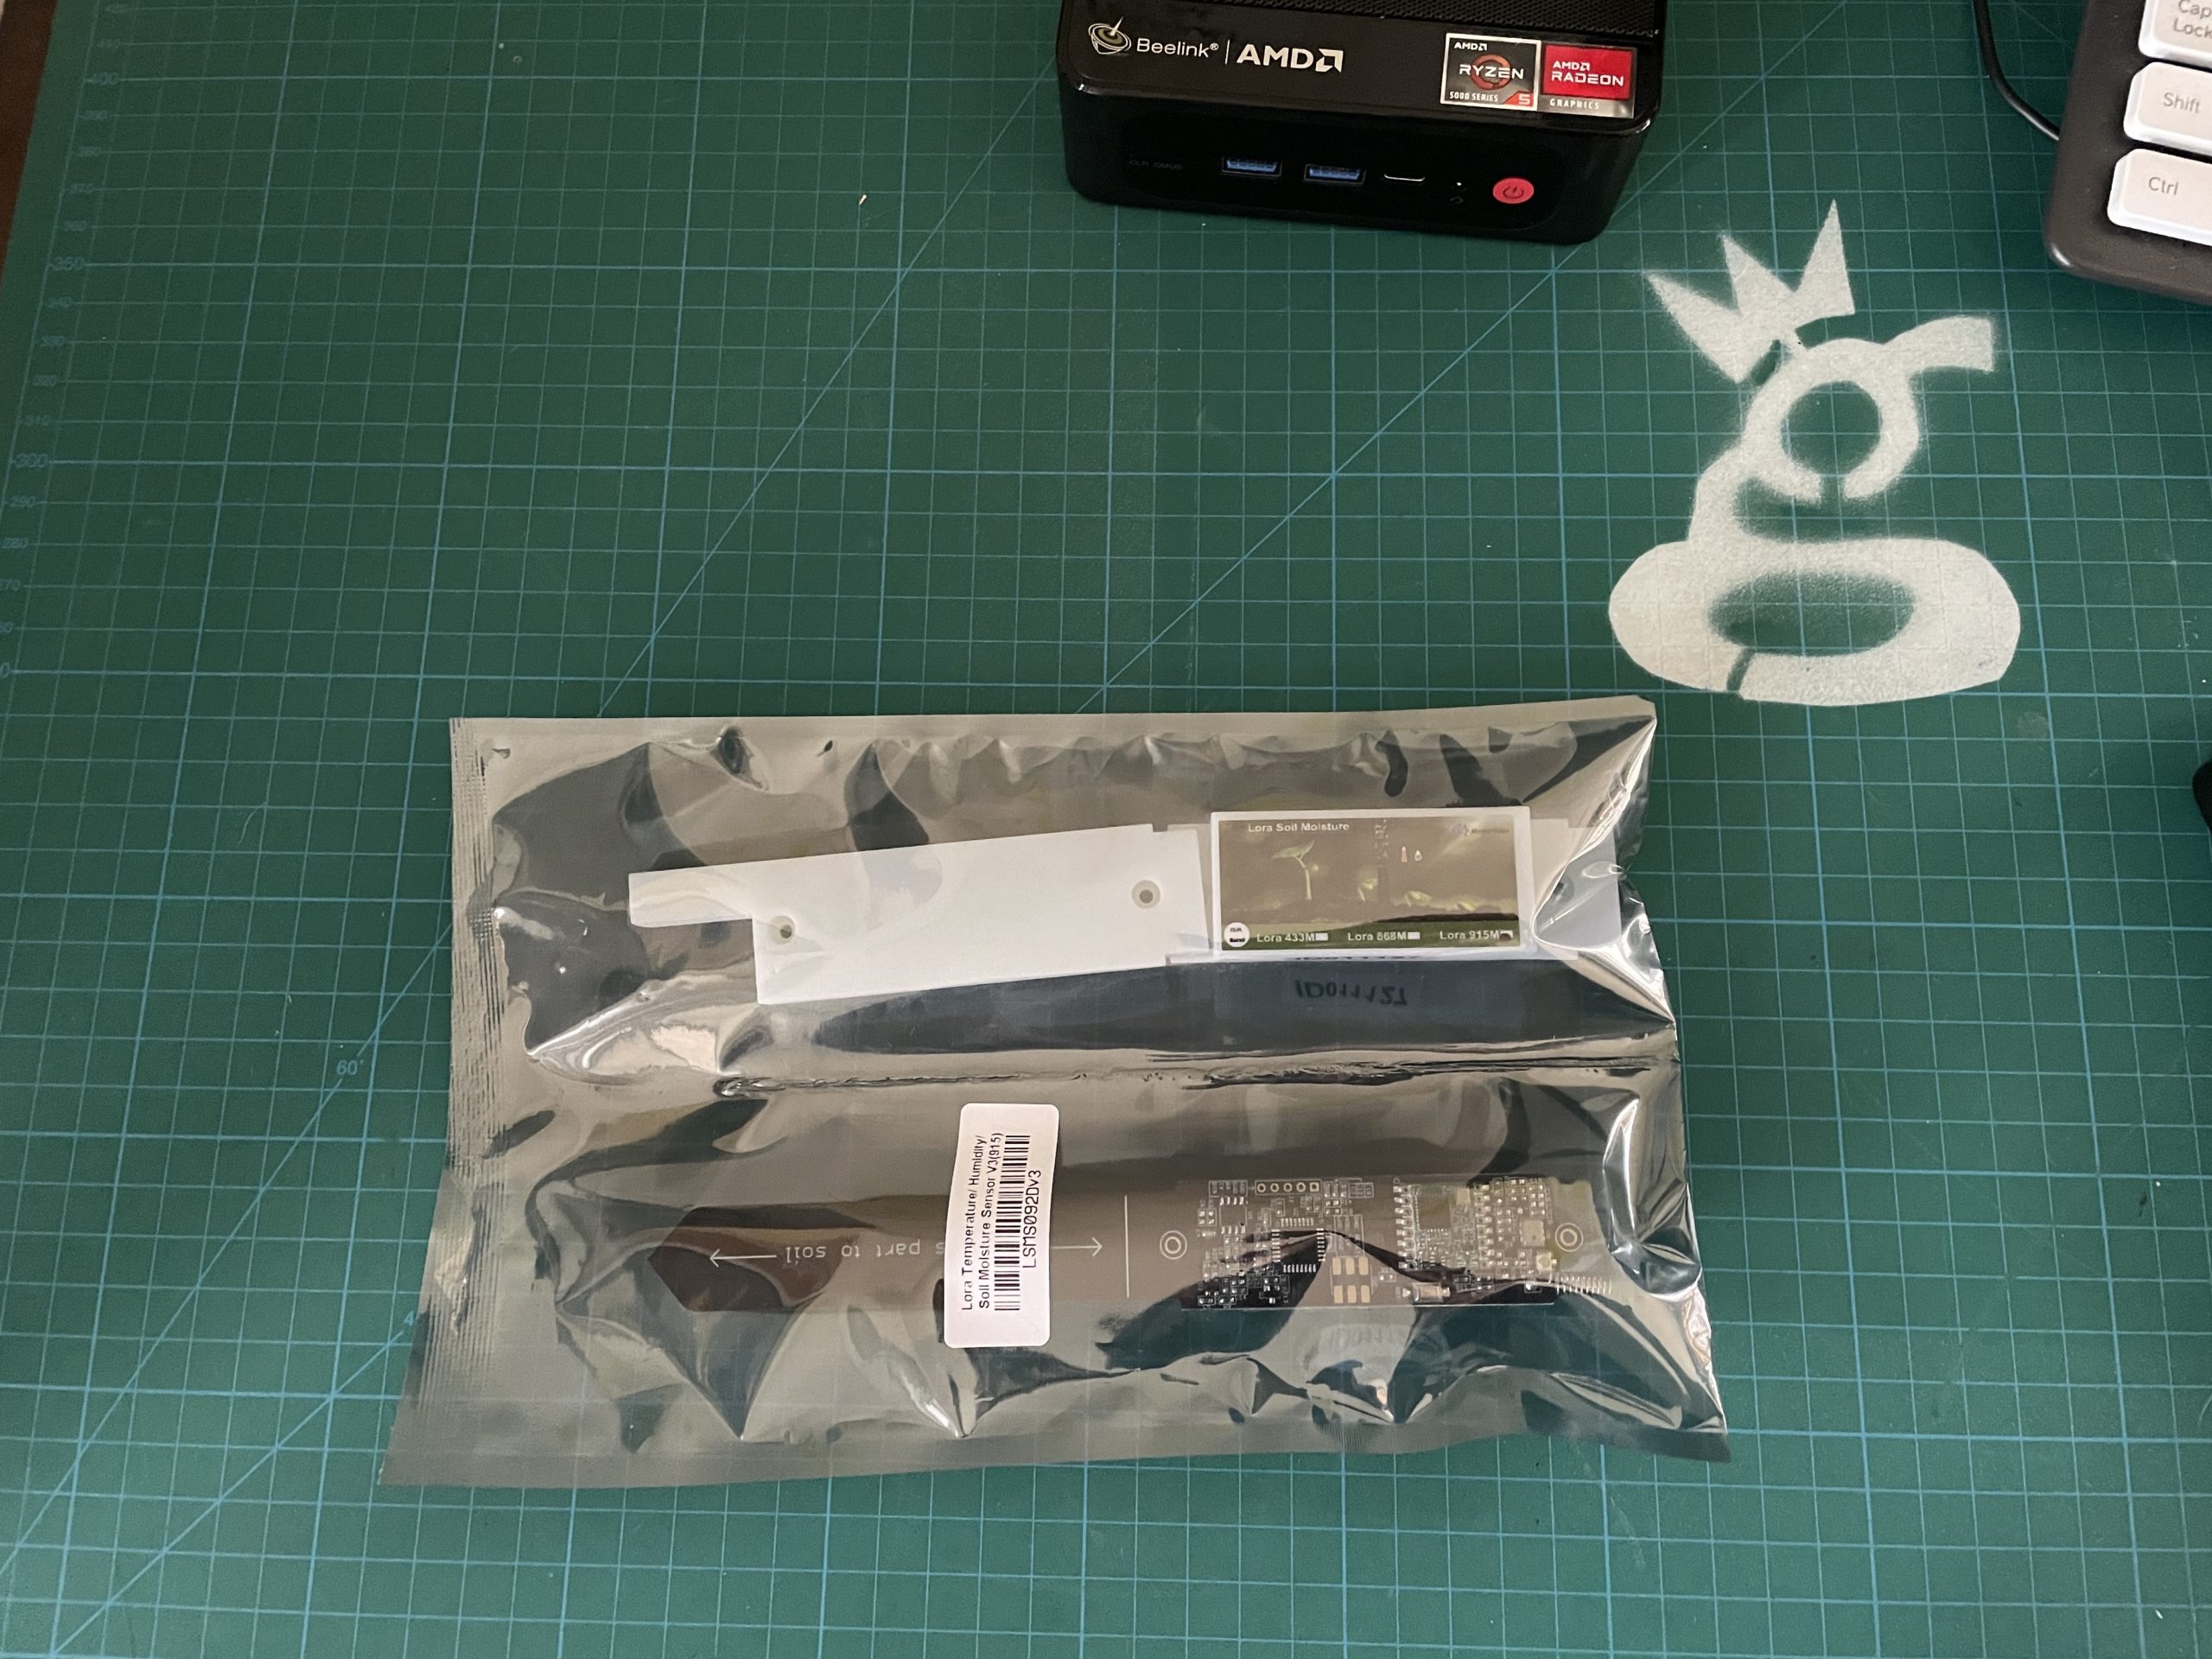
Ok, so here’s the thing in its package. Very fancy looking.
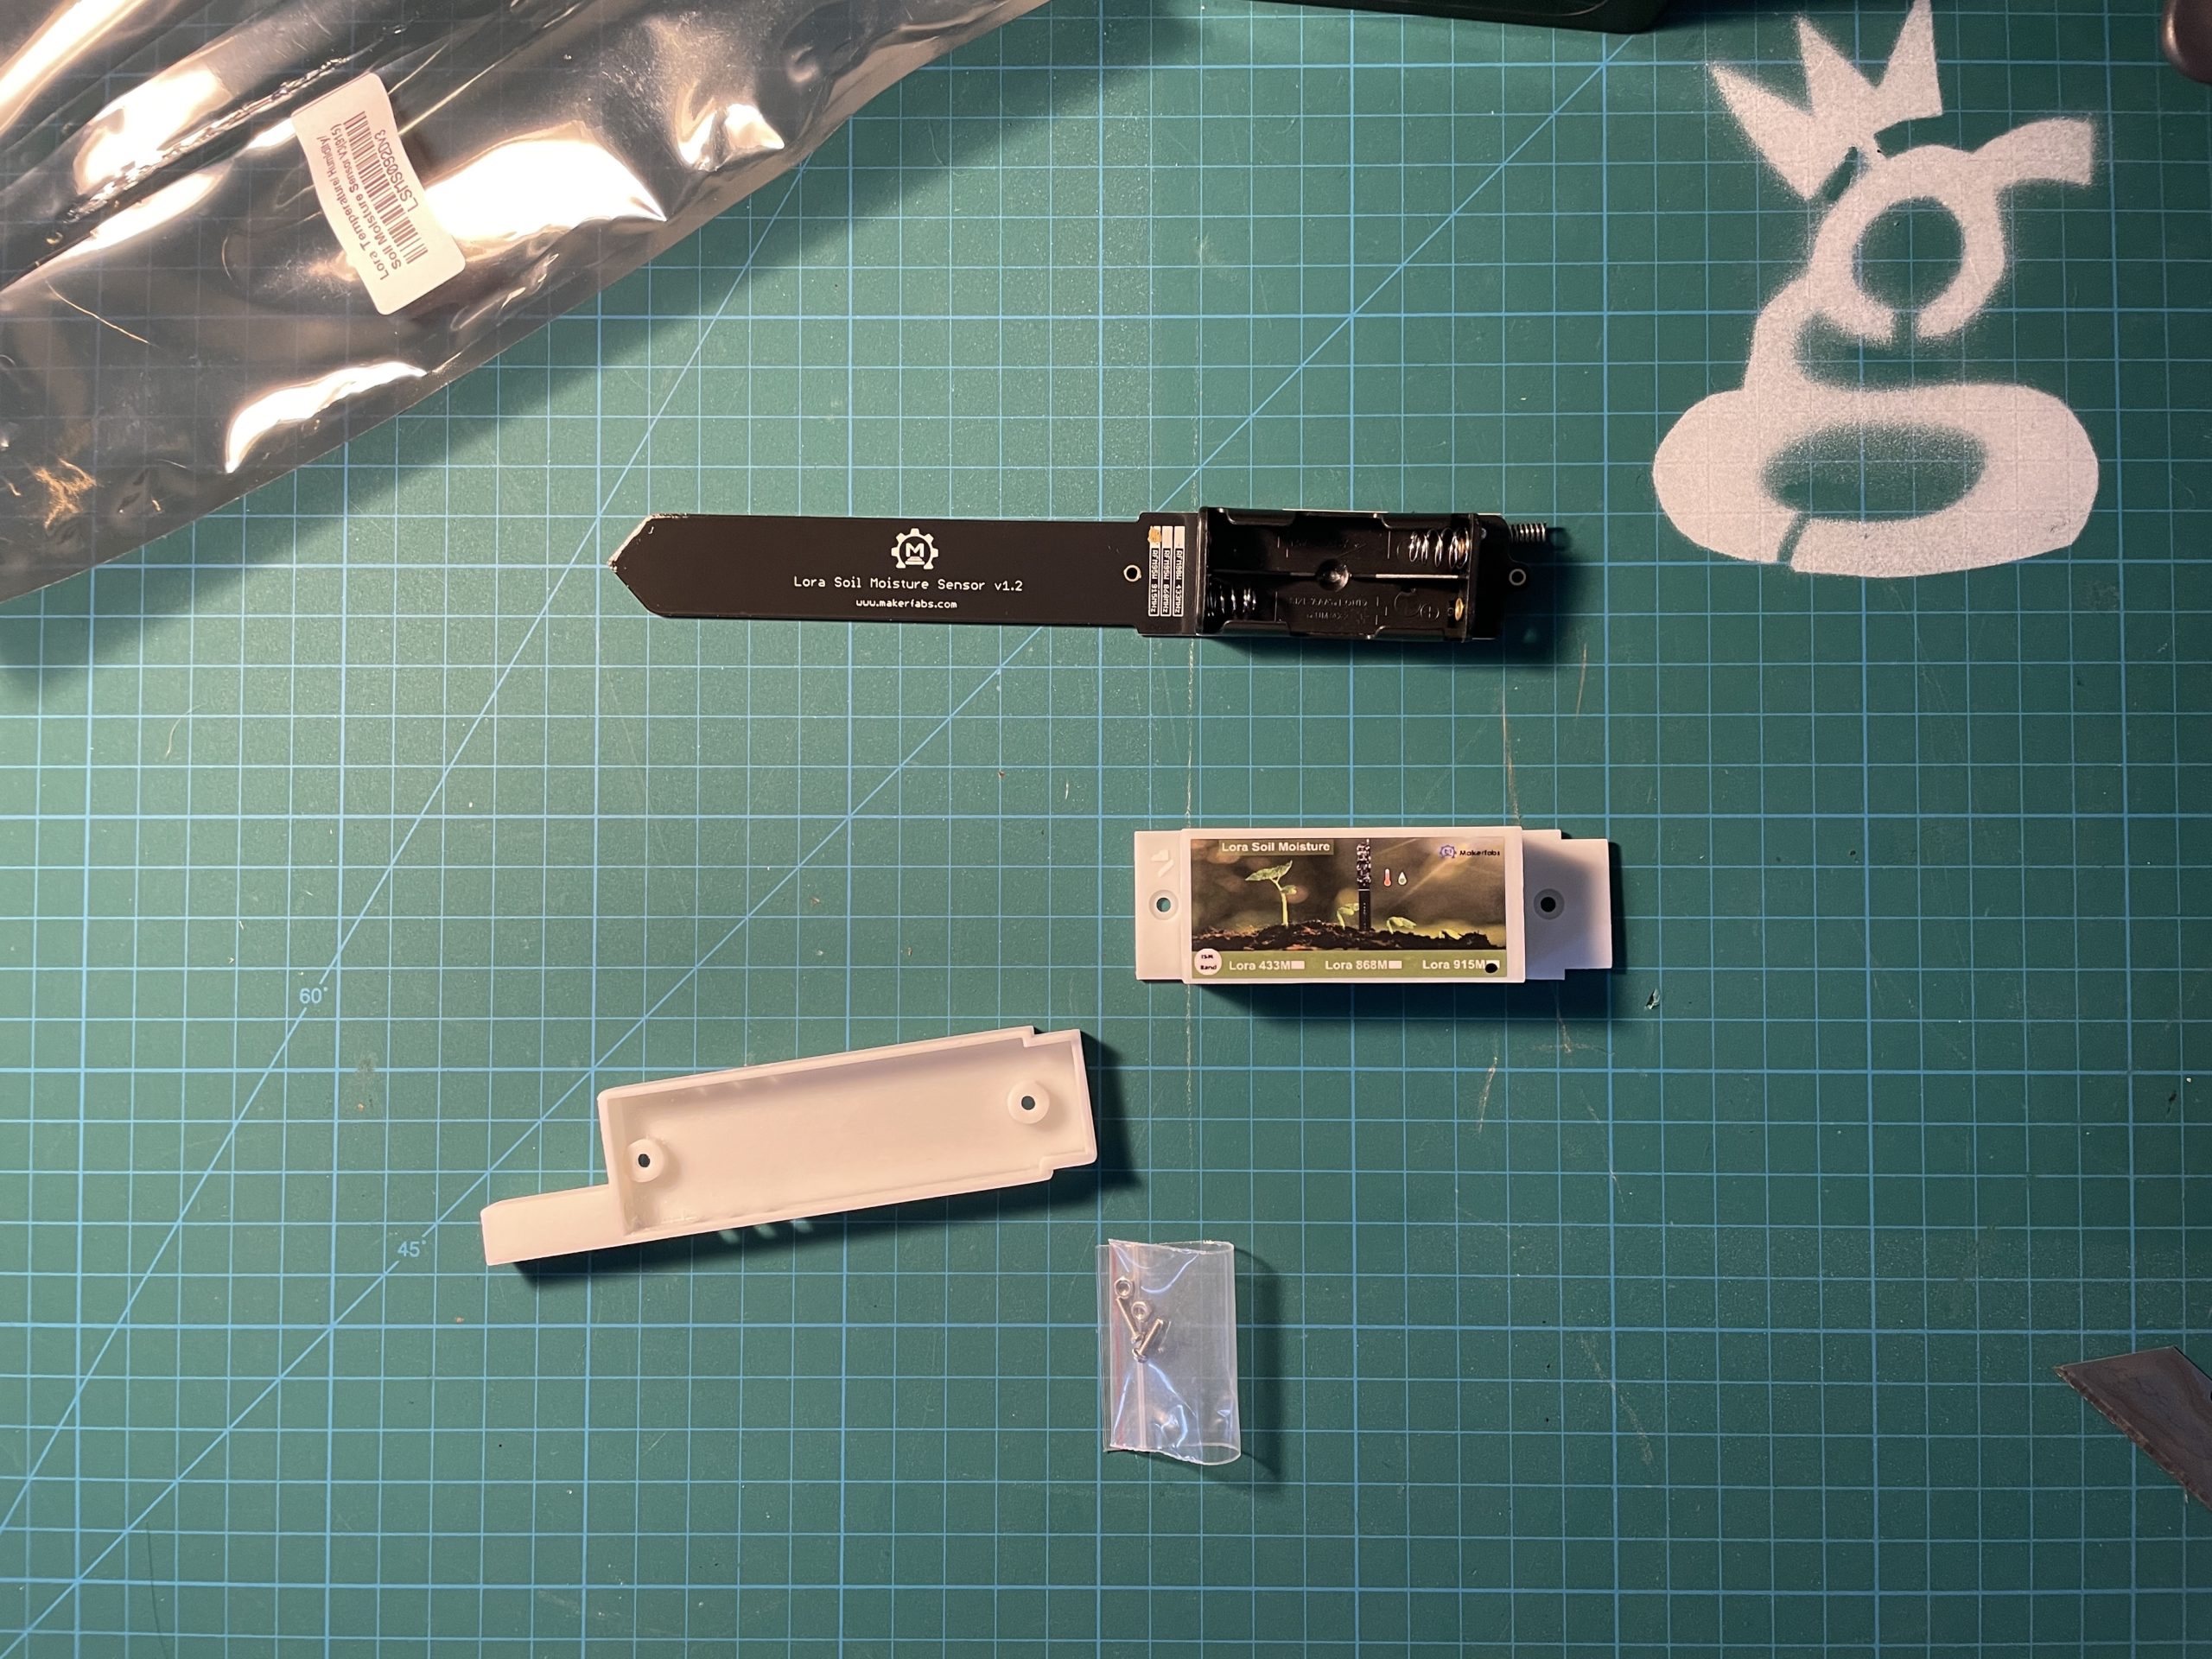
Once you get it out of the package, there are only 4 things in there; the device, 2 pieces of the protective cover, and a small bag of screws. It needs AAA batteries, so make sure you have some on hand!
Oh, while you’re prepping, remember to add the device to your Console before you really get started. By the time you’re done fiddling with the tiny bits it should have passed through the XOR filter and be ready to roll!
Beep beep: Arduino Time!
Now that you’ve done the easy stuff, let’s get stuck into the shitkicker of the geek world, Arduino. If you’ve never used Arduino before I’ma give you a heads up: There WILL be hiccups. This is not plug and play stuff. Professional geeks love things that only work when you know what you’re doing. I find it both frustrating and enticing, which is why I write these guides. I want to help trigger your inner geek without it being too frustrating.
Let’s go over the 30,000′ view of what we’re doing with Arduino and this sensor, then we’ll dive into the details.
In broad strokes, you’re loading a program onto this sensor that tells it what to do, what to send, where to send it, and how often to send it. That program uses “libraries” from the Arduino ecosystem. Those libraries are other programs that the program you’re going to load refers to. In order for this thing to work, you need every library that the program calls for installed on your computer.
This next part will gobsmack you: It is NOT common practice amongst Arduino programmers to let you know up front the full list of libraries you’ll need. The ones who are trying to be helpful will, but usually you’ll get a list of the special ones they used, not all libraries necessary. Typically, the way enthusiasts find out what libraries they’re missing is to run the code and see what error messages come up.
Once you load a library on your system, it’s there, so you don’t need to load it again. That feature makes it easy for someone who’s been working in Arduino for a while and already has a bunch of libraries loaded. It makes it really difficult when you’re first starting; you’re constantly finding that you need another library. It’s kind of a treasure hunt, which is probably why the geeks like it; it’s pure problem solving.
This whole “treasure hunt” style of getting things done is super common in this world. You take a few steps forward, you hit a wall, you look around, you go back and look at the map, in the bottom right corner you see the clue that’s upside down and spelled backwards that gets you over the wall, and you repeat that until you get to where you want to go. So, with that as the background, and my promise to you that I’ve found almost all of those clues and removed as much friction as I can, let’s get started!
You’ll need to download the Arduino IDE, or Integrated Development Environment.
Let’s start with setting up your IDE correctly. We’re going to tell it what kind of board you’re using. In this case the soil moisture devices uses an Arduino Pro or Pro Mini. You can follow along over on the MakerFabs page for this sensor, which is where some of this info comes from. This is what it may look like if you’re on a Mac.
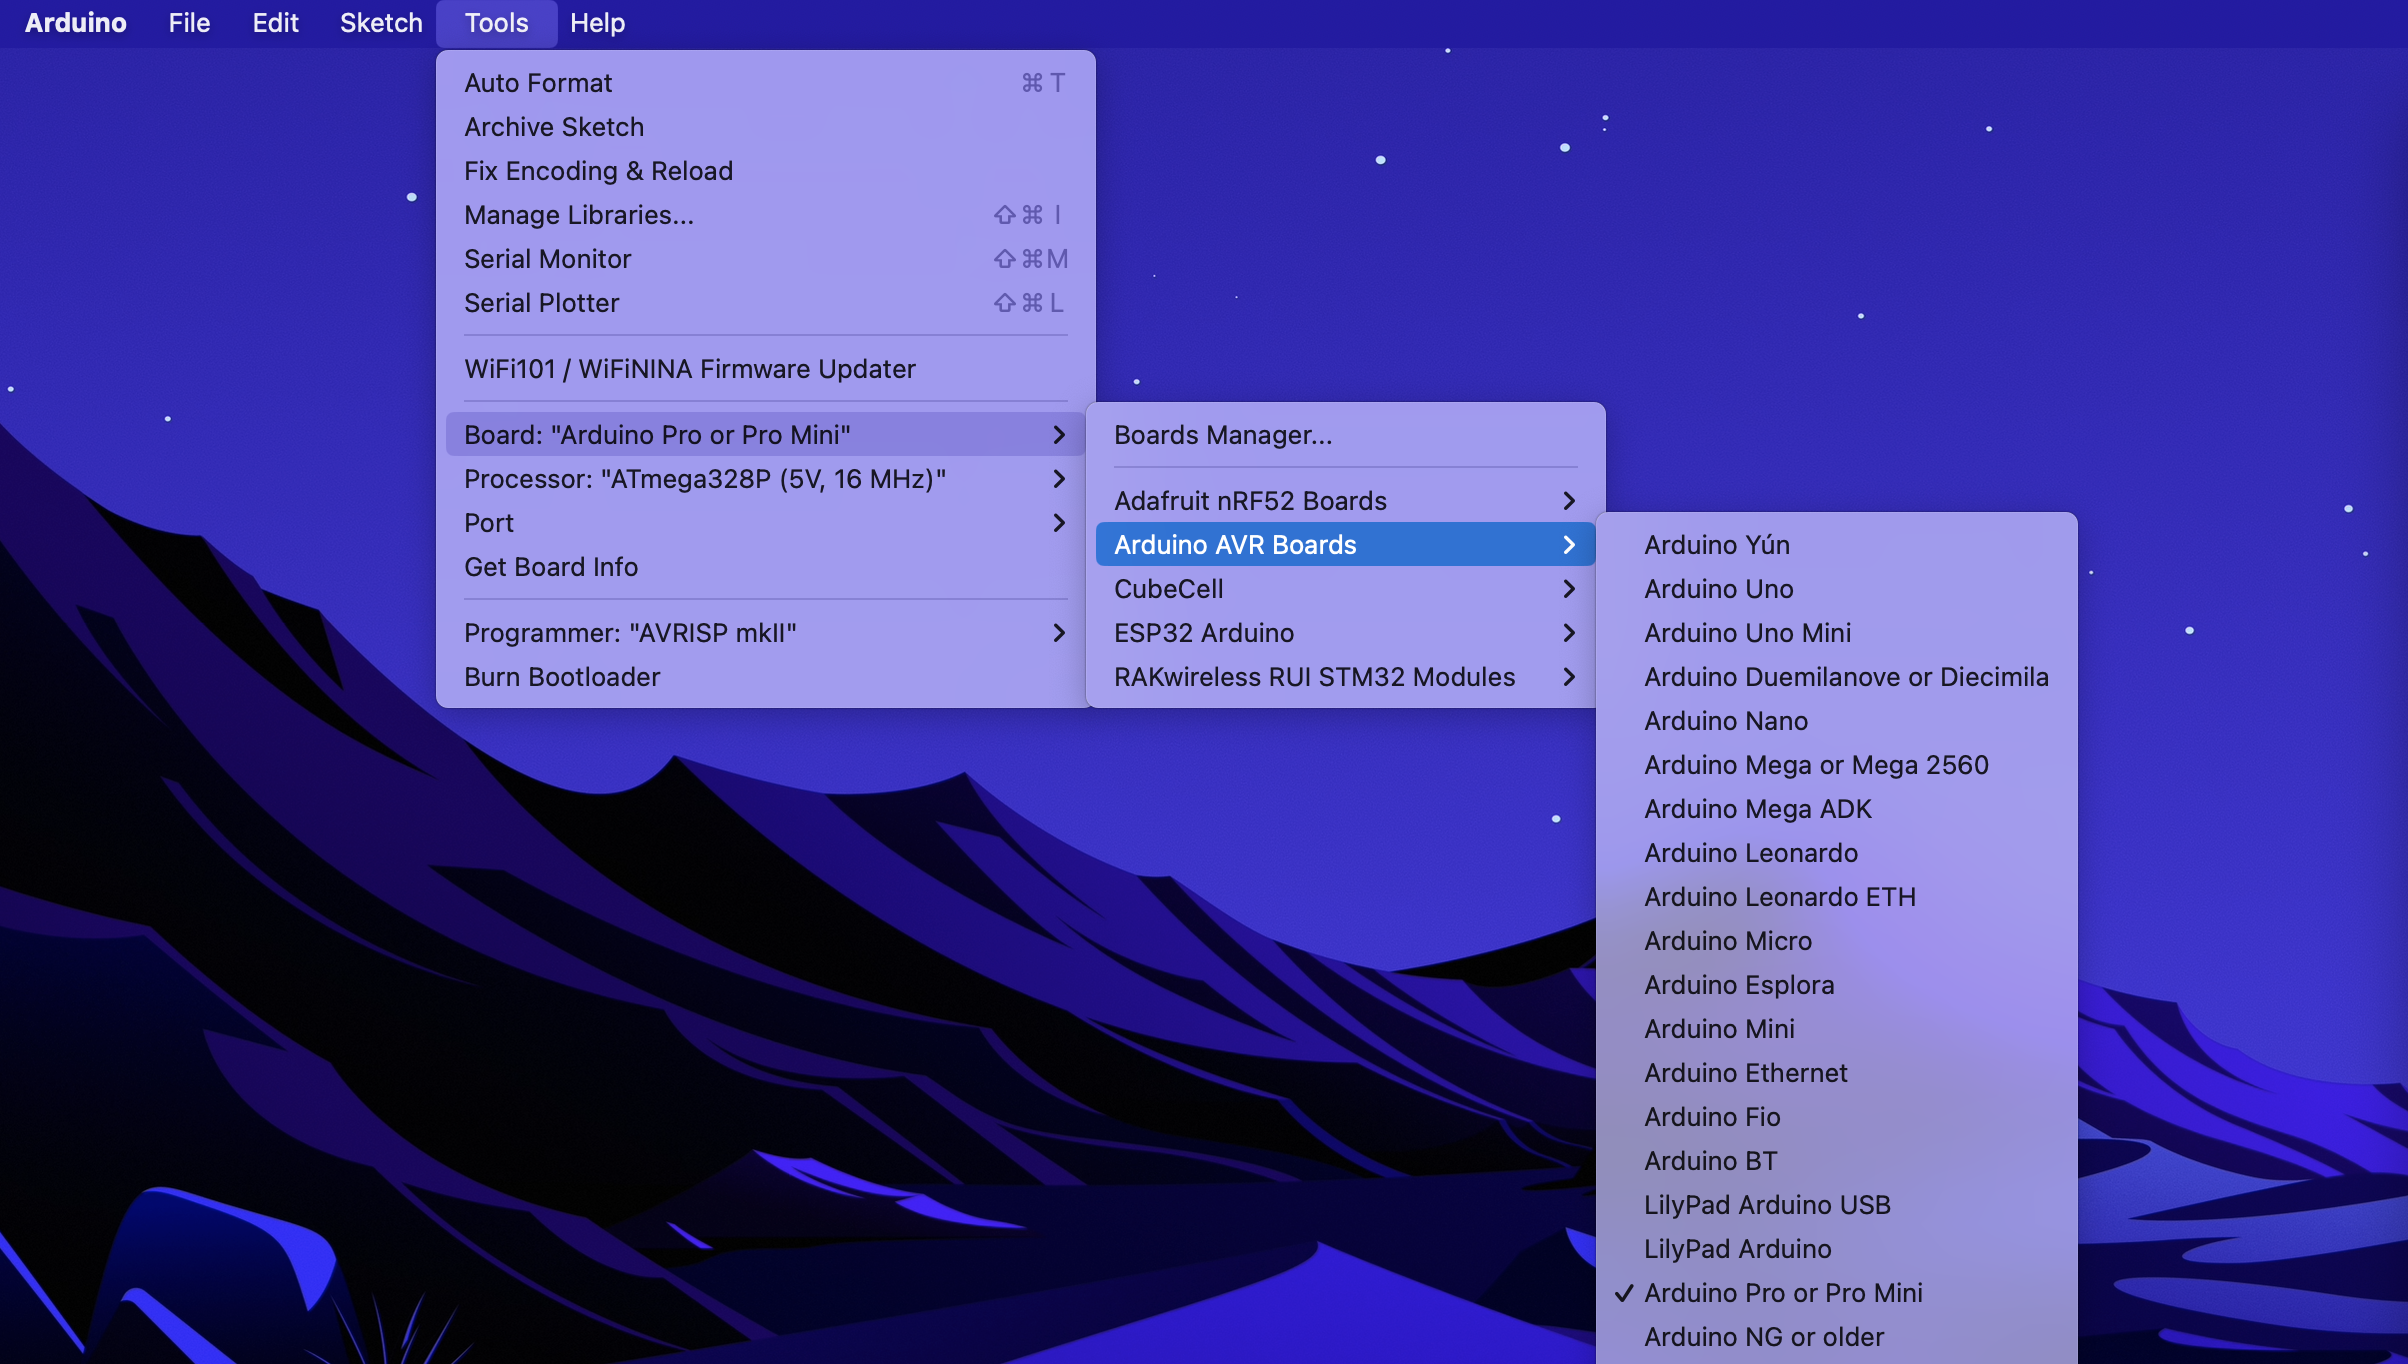
If you don’t have that already set up, you’ll need to add the “Arduino Pro or Pro Mini” set to your app.
Next, let’s add the libraries you’ll need. In the Arduino app, go to Tools –> Manage Libraries, then type in the Library name you want to install. In the example, I’m using the MCCI LoRaWAN LMIC Library.
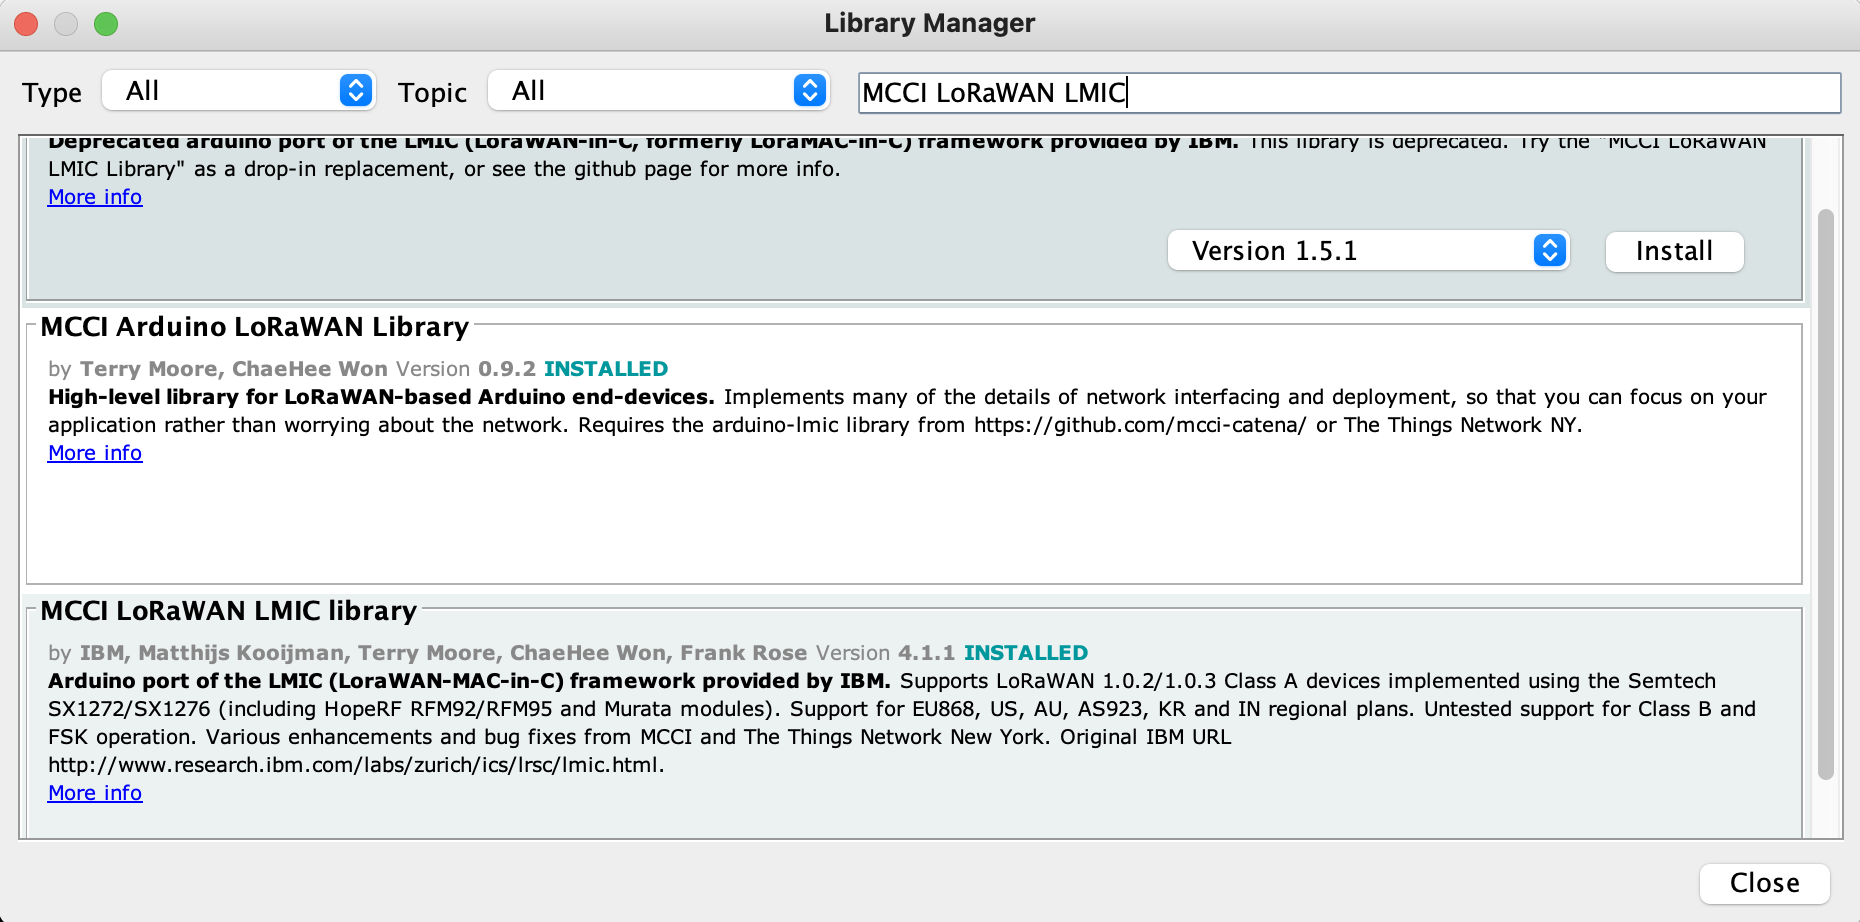
When I took the screenshot, I’d already installed it. If you don’t have it, hit the Install button and watch the magic happen. Here are the other ones you’ll need:
- MCCI LoRaWAN LMIC library https://github.com/mcci-catena/arduino-lmic
- Lightweight low power library for Arduino https://github.com/rocketscream/Low-Power
- AHTX0 library: https://github.com/Makerfabs/Lora-Soil-Moisture-Sensor
If you type in a Library and it doesn’t show up in the Library manager, you can always manually install it by going to the link above, looking for the green Code button, then using the dropdown to download the zip file.
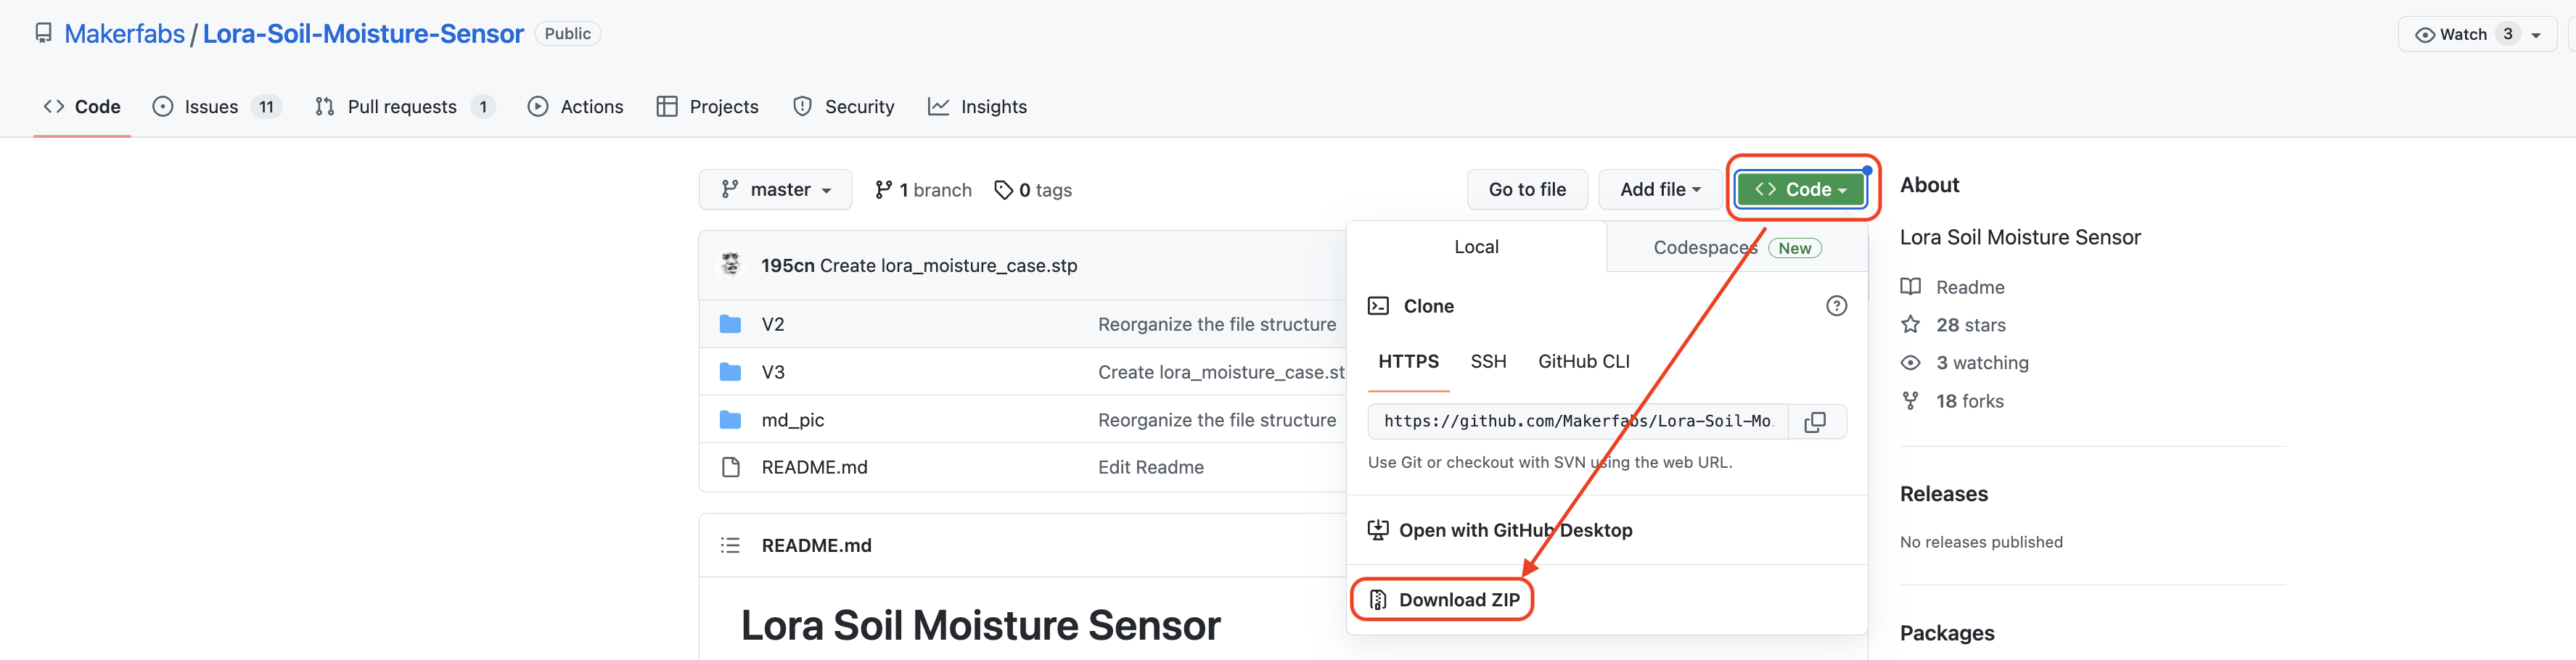
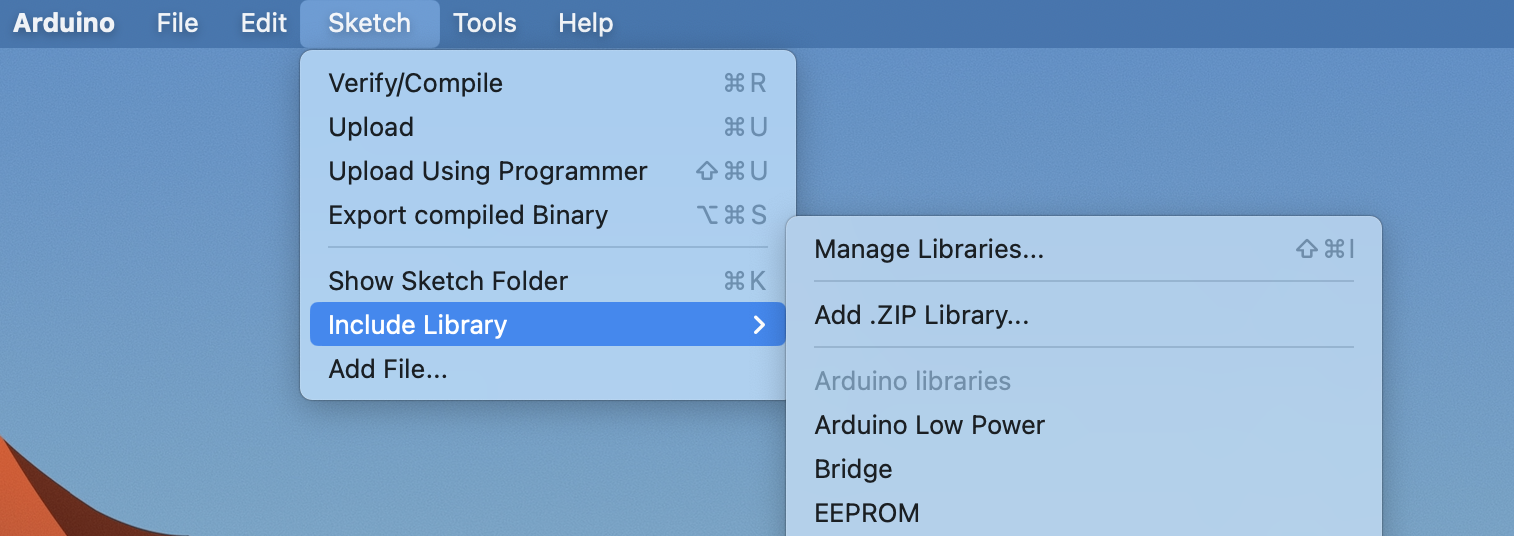
Once you have the zip file, in Arduino –> Sketch –> Include Library — Add .ZIP Library and follow the prompts.
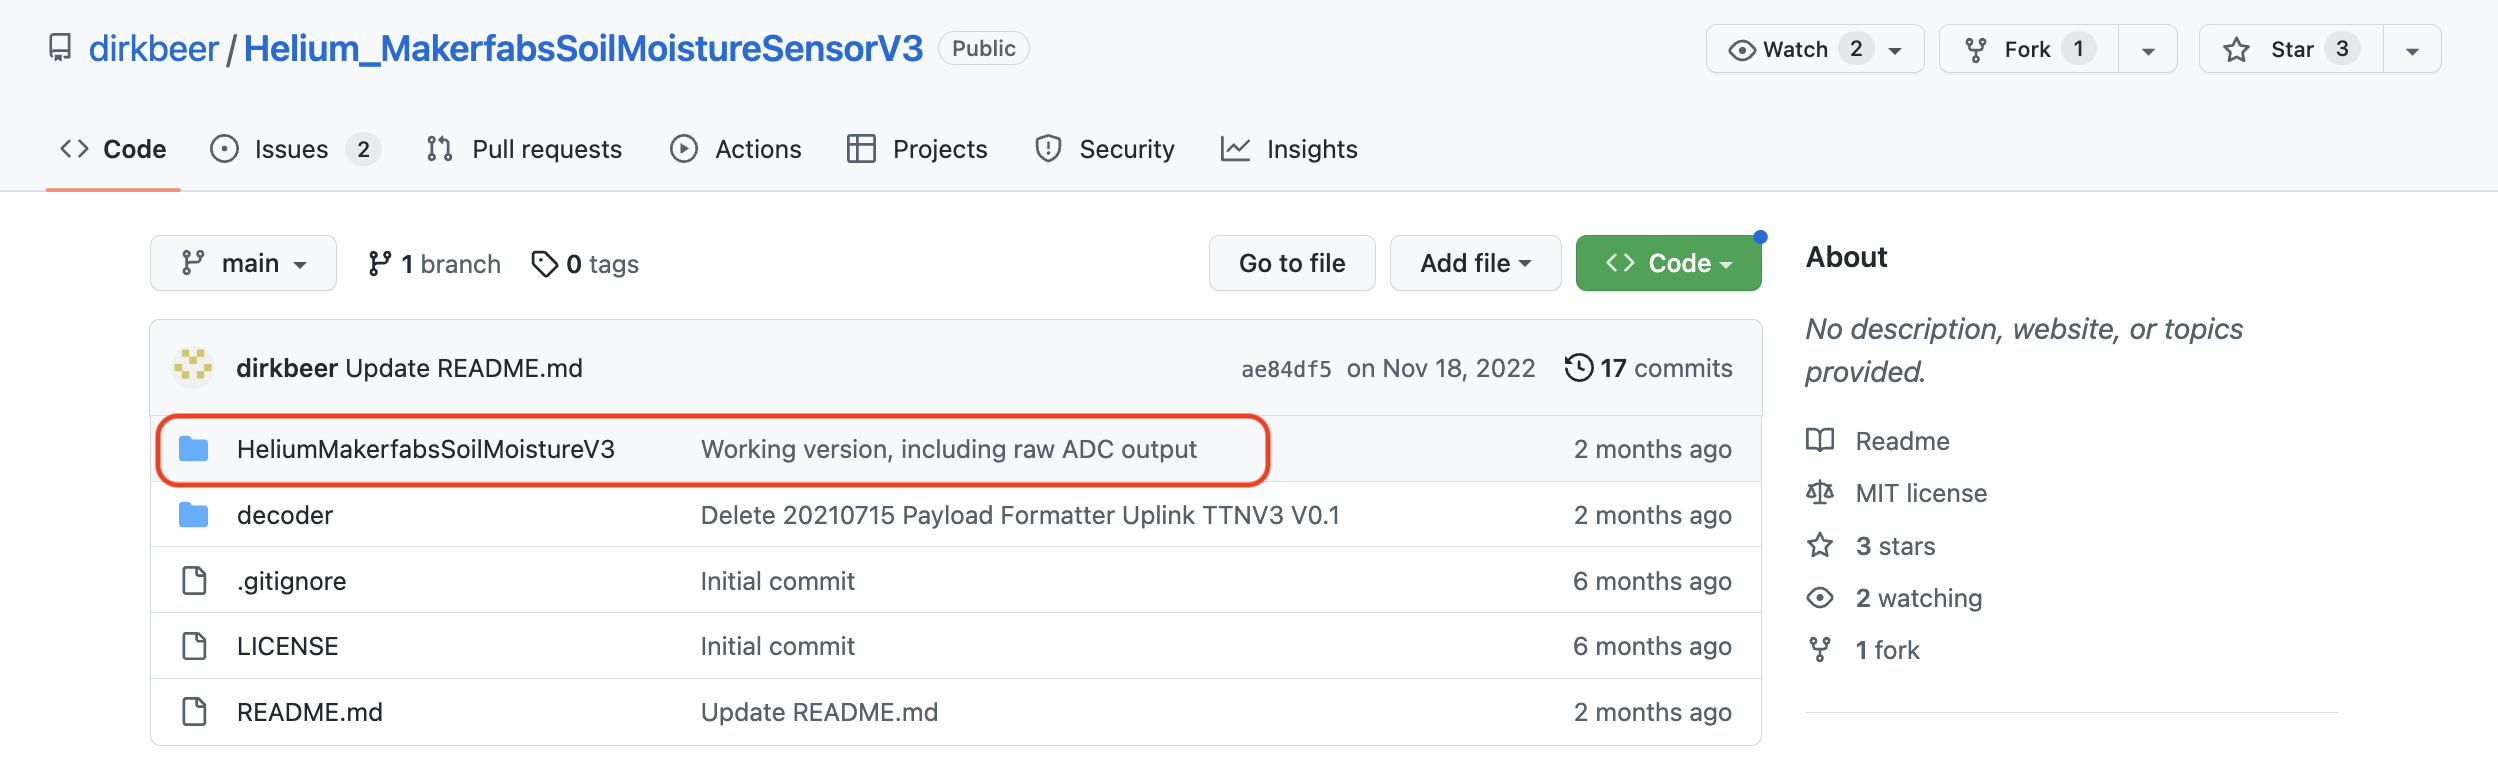
With the right libraries installed, go to Dirk’s Github repository (“repo” is what the cool kids say) and look for “HeliumMakerfabsSoilMoistureV3”. That’s the Arduino “sketch” you’re going to use.
Open it up, copy the code, then paste it into a code editor. I use Sublime Text for my code editor so I can change the DEVEUI, APPEUI, and APPKEY, and also so I have a working copy on my computer.
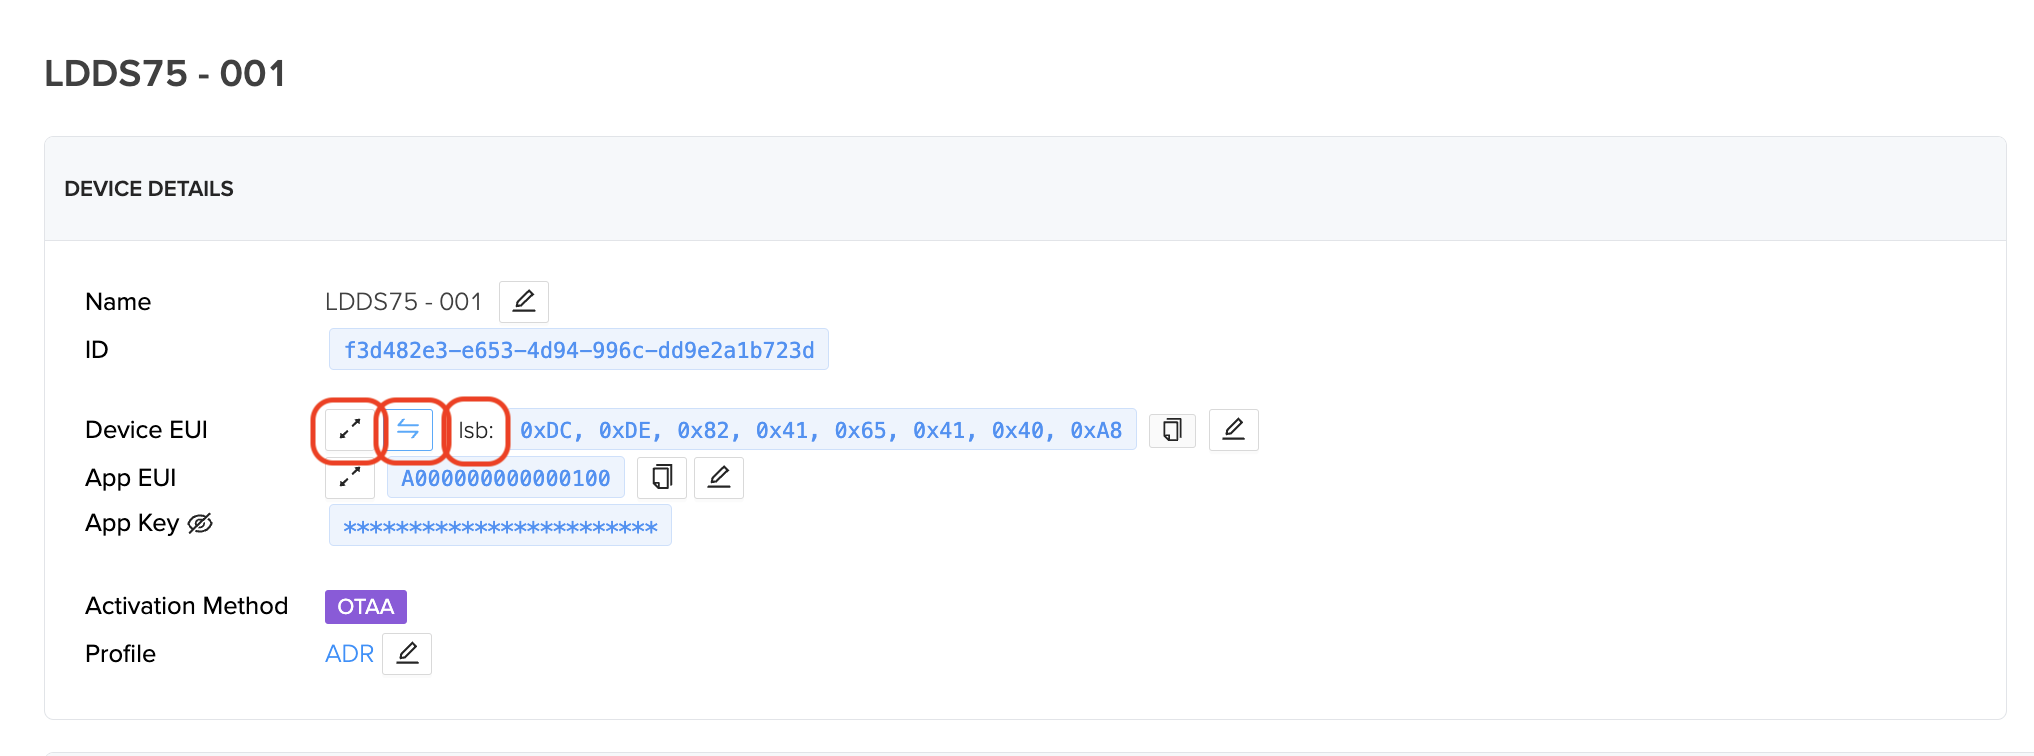
In the sketch code, starting at line 74, look for where you’ll replace the APPEUI, the DEVUI, and the APPKEY. Those are normally pretty straightforward, but in this case you’ll need to make one modification before you copy them from the Helium Console. You’ll need to change the format to “lsb”. To do that, go to the device in Console and, left to right, hit the boxes outlined in red below. Once you have the 0xDC 0xDE etc format, copy that and paste it into the sketch.
You want “lsb” for the DEVEUI and APPEUI, and “msb” for the APPKEY. Why? Because making shit complicated keeps the fluff off.
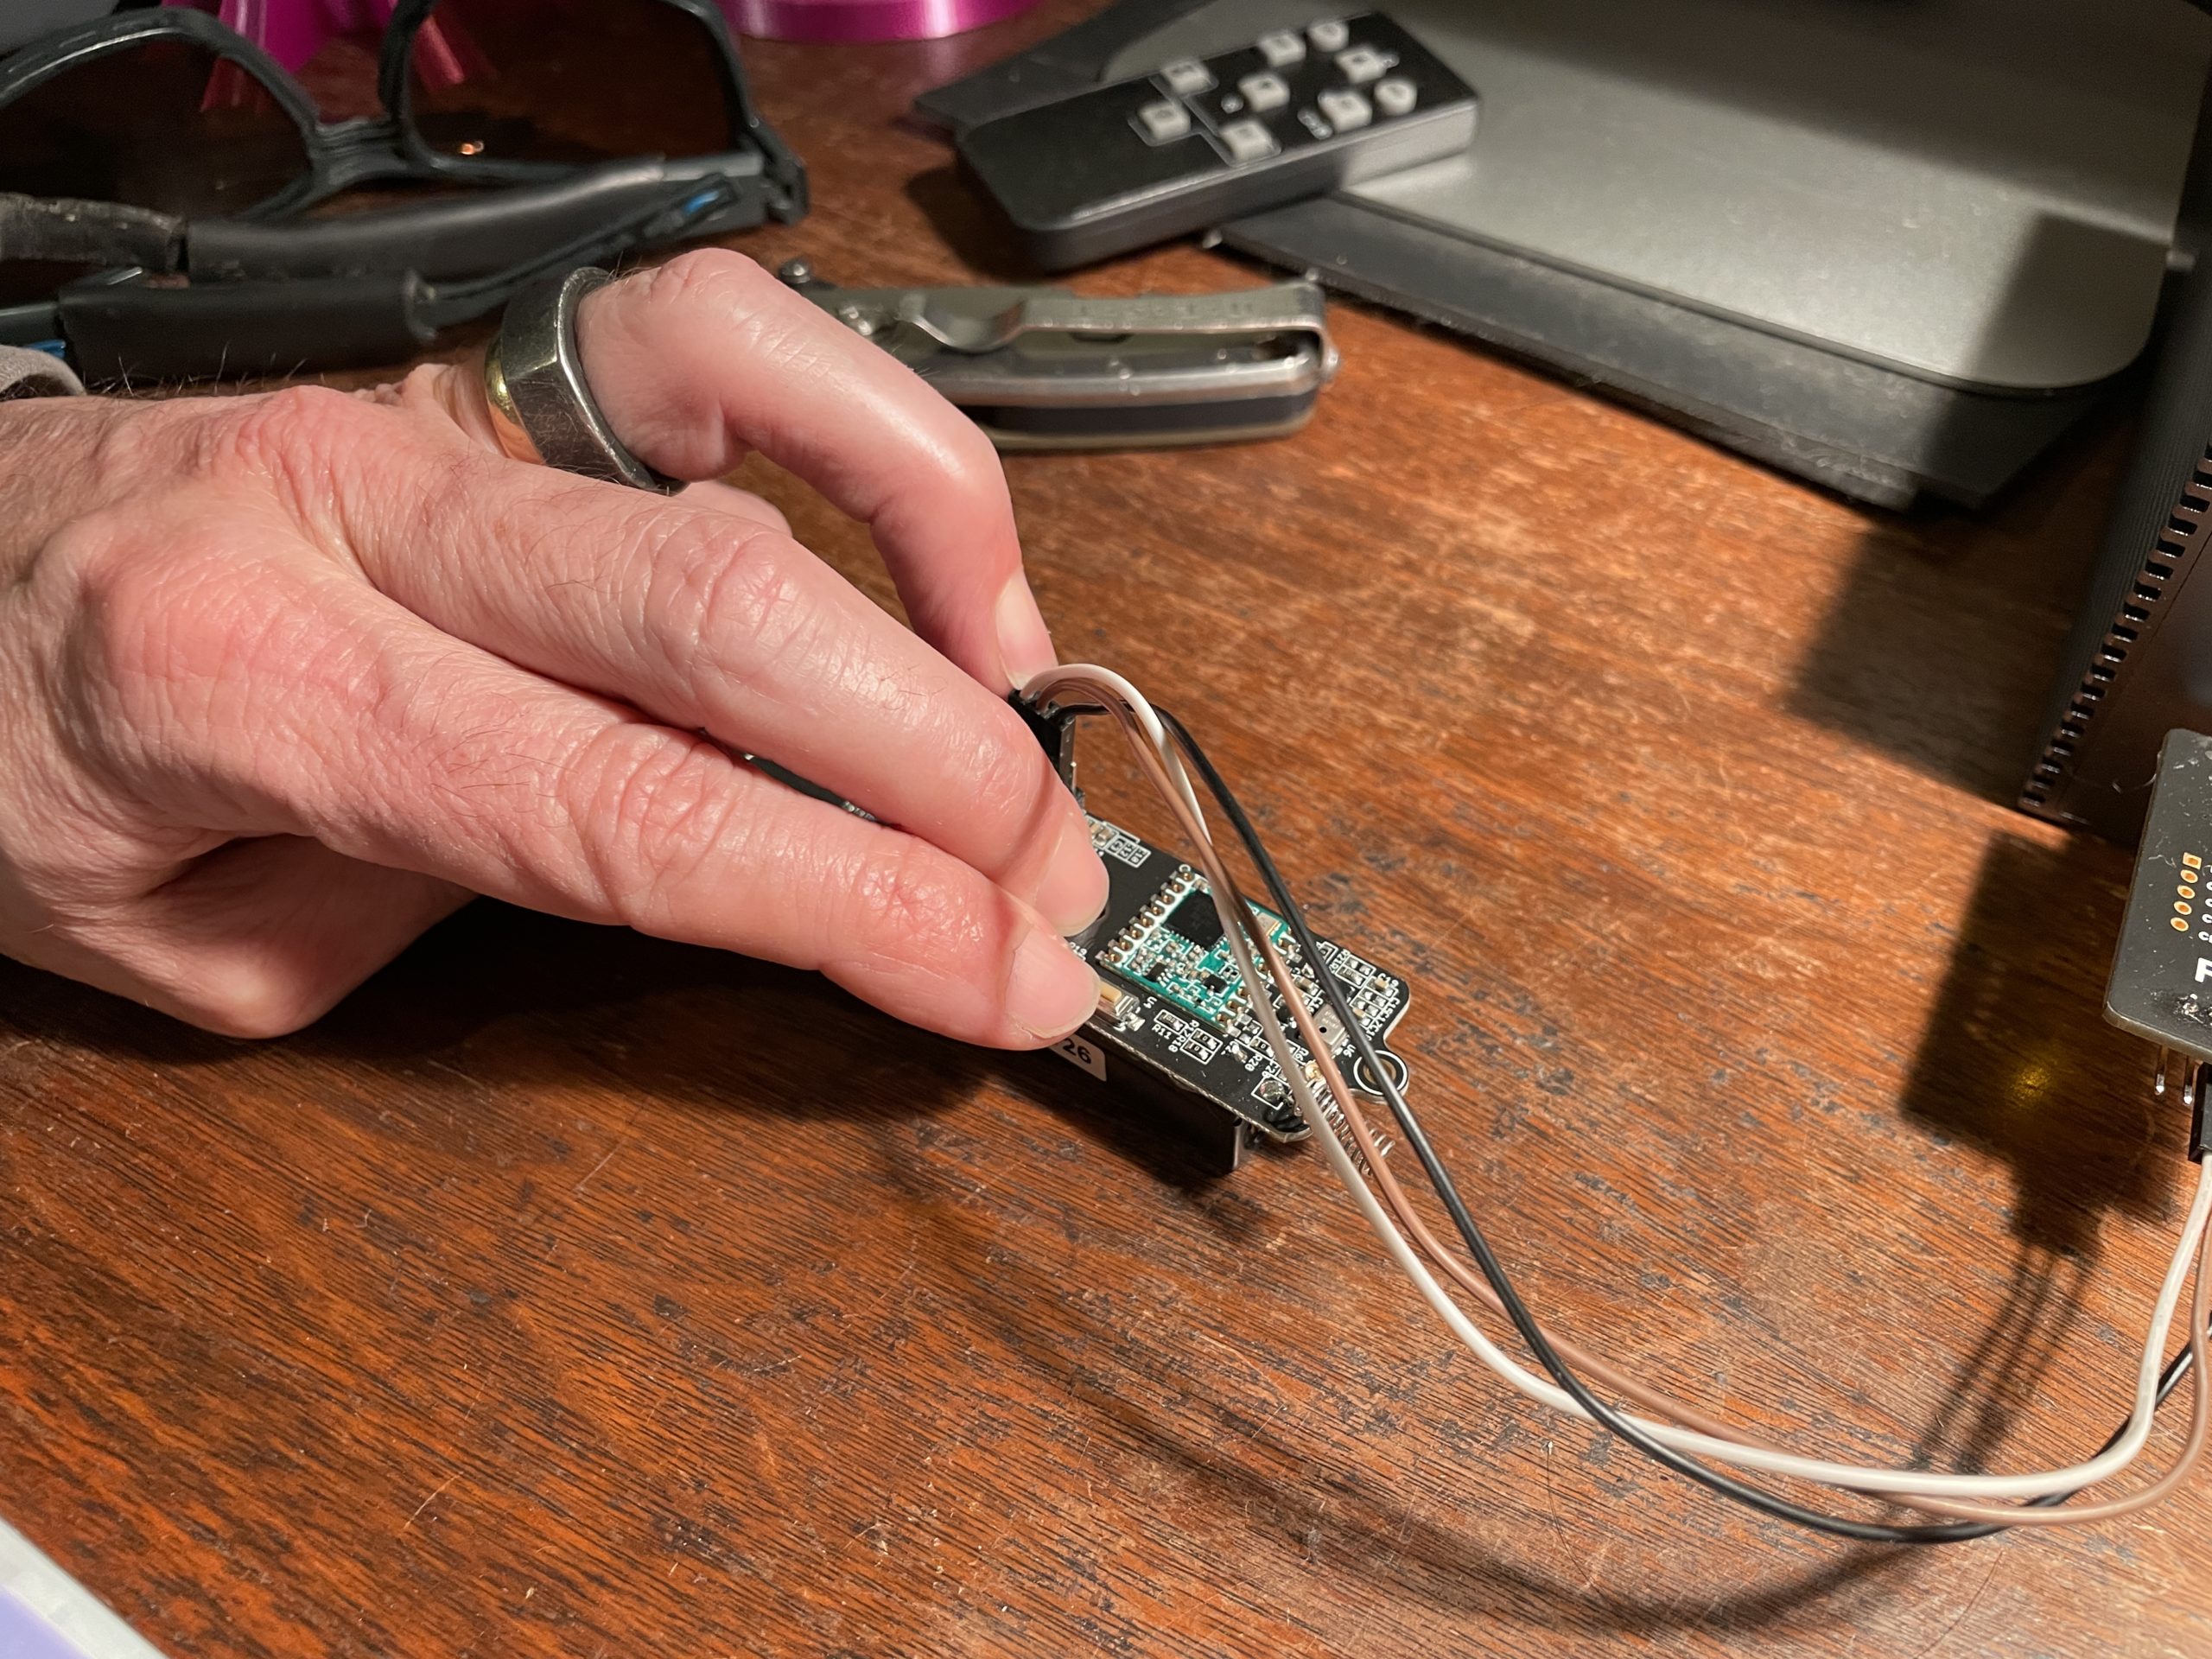
With a sketch made that’s customized for your device using your DEV/APP/KEY, now you have to load it. This is the least reliable part of the whole process; it takes me 2–20 times to get it right. Now, it’s possible that it’s much easier with the recommended USB to serial converter, but I used what I had on hand, which requires that you restart the device at exactly the right time while keeping the cables firmly connected.
You’ll need to hold down the RST (reset) button, press upload in Arduino IDE, wait until the status shows “uploading”, and with exquisite timing, immediately release the RST button. Not easy, but you can do it. Just keep trying.
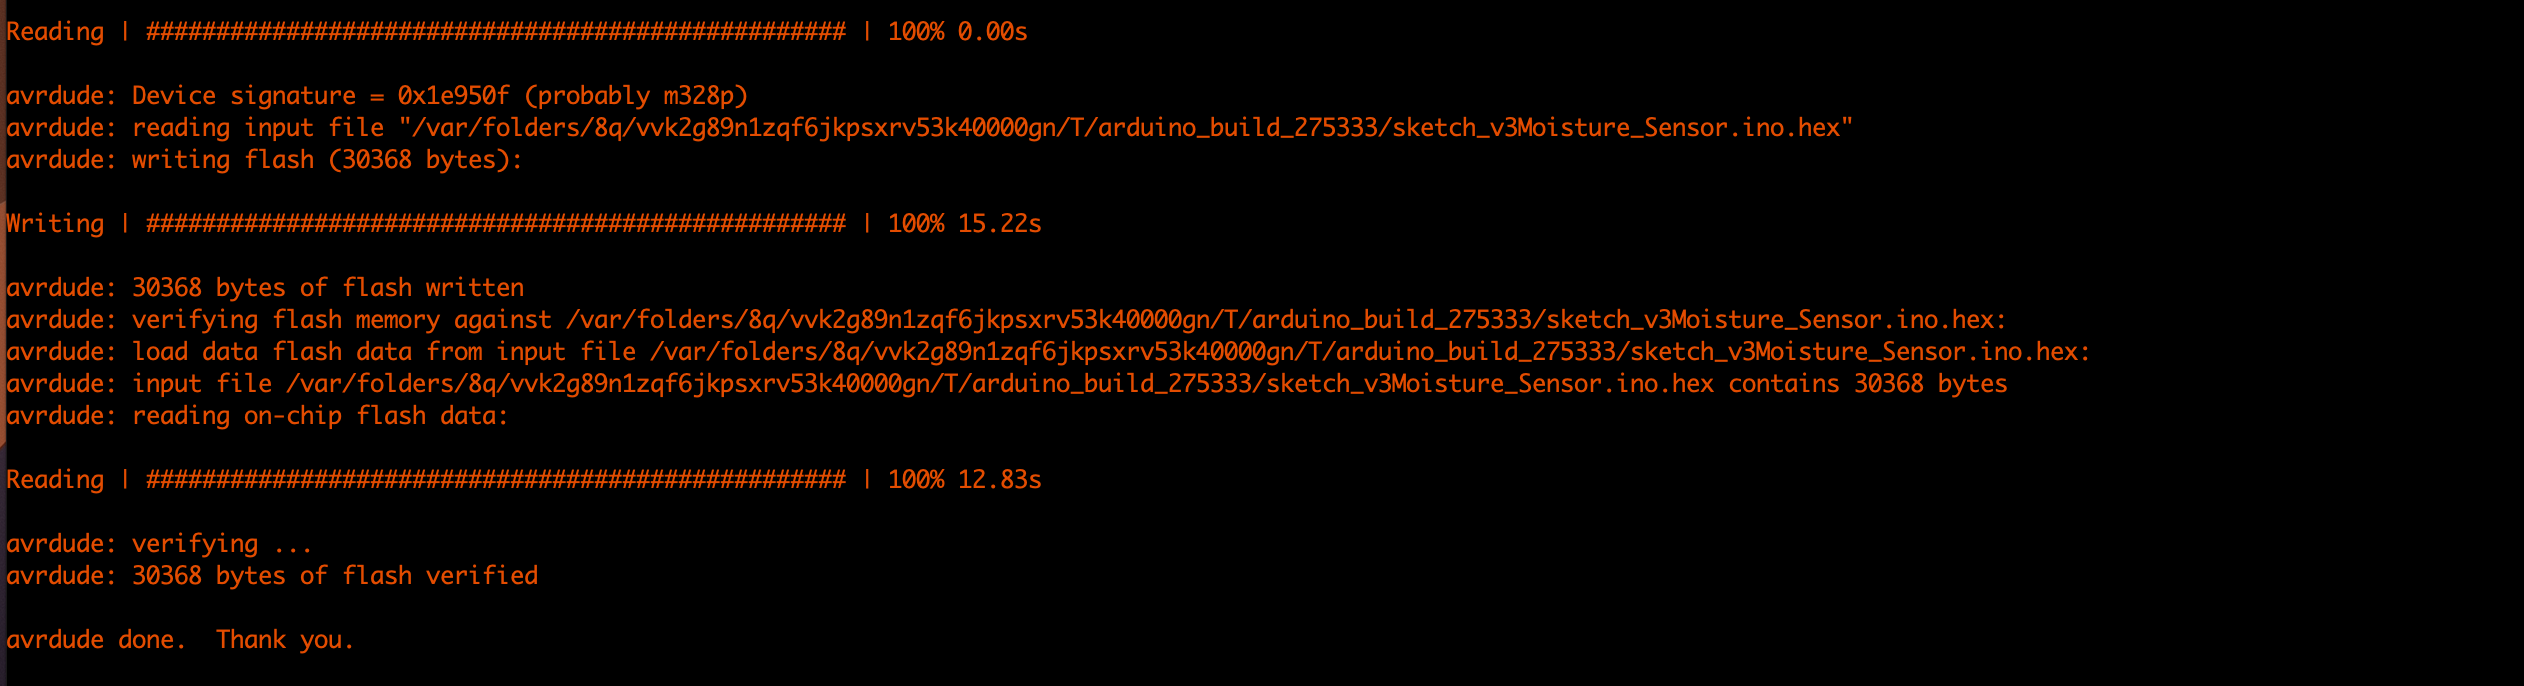
You’ll know your sketch is uploaded when you see the Writing, Reading, and avrdude done print out on the Arduino app, like this:
With your sketch uploaded, watch on Helium Console to make sure you’re getting a Join Accept/Request and a downlink. Once you see that, you know you’re connected. It may take anywhere from 2 to 50 attempts for that to go through. I found that hitting the reset button the sensor every time it didn’t go through sped up the process, but it wasn’t very reliable.
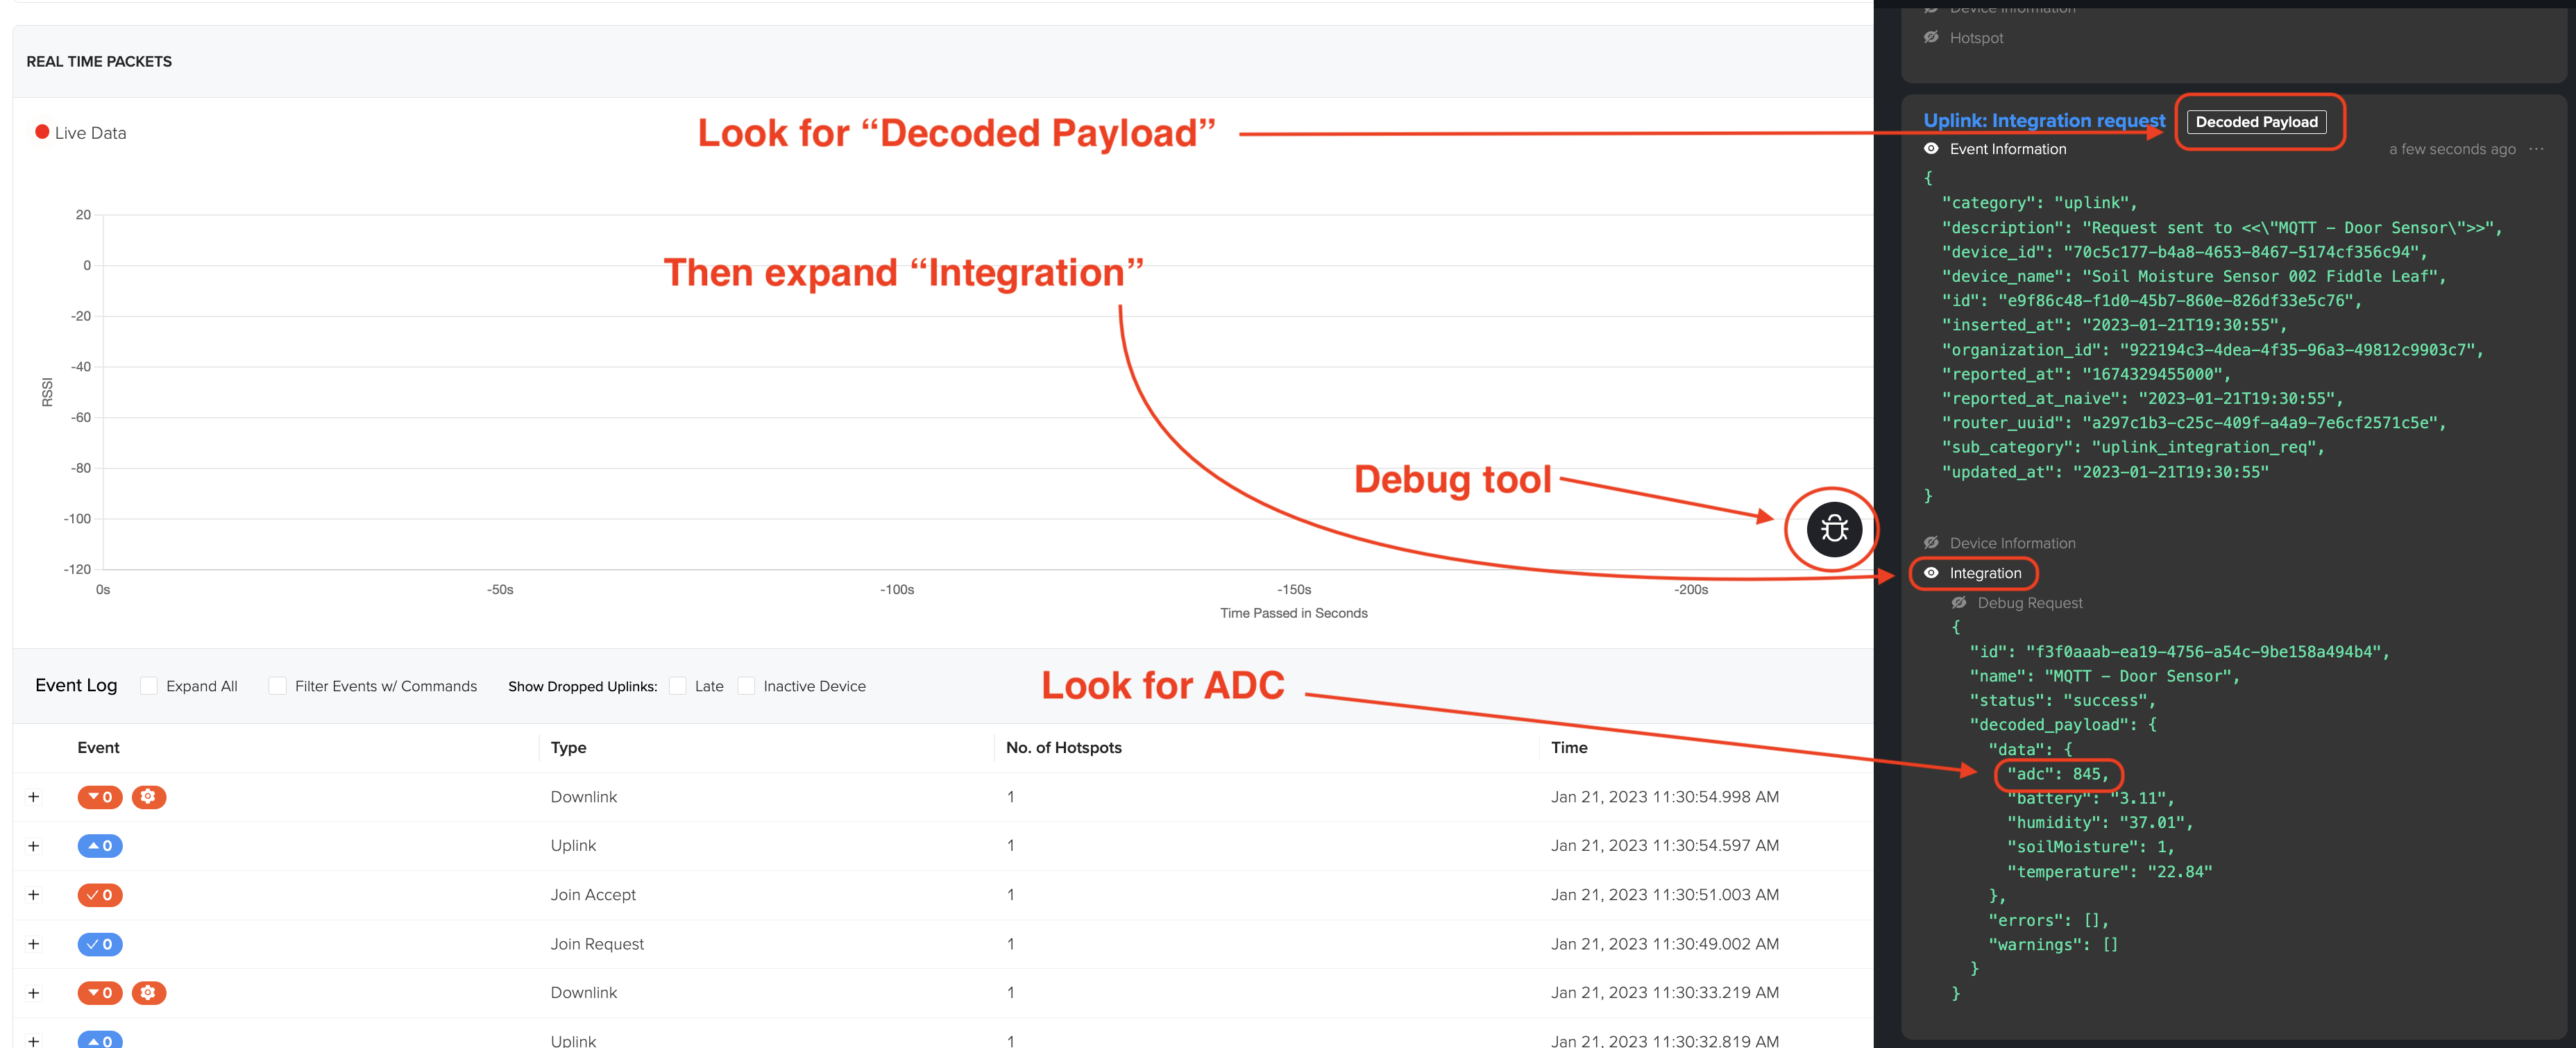
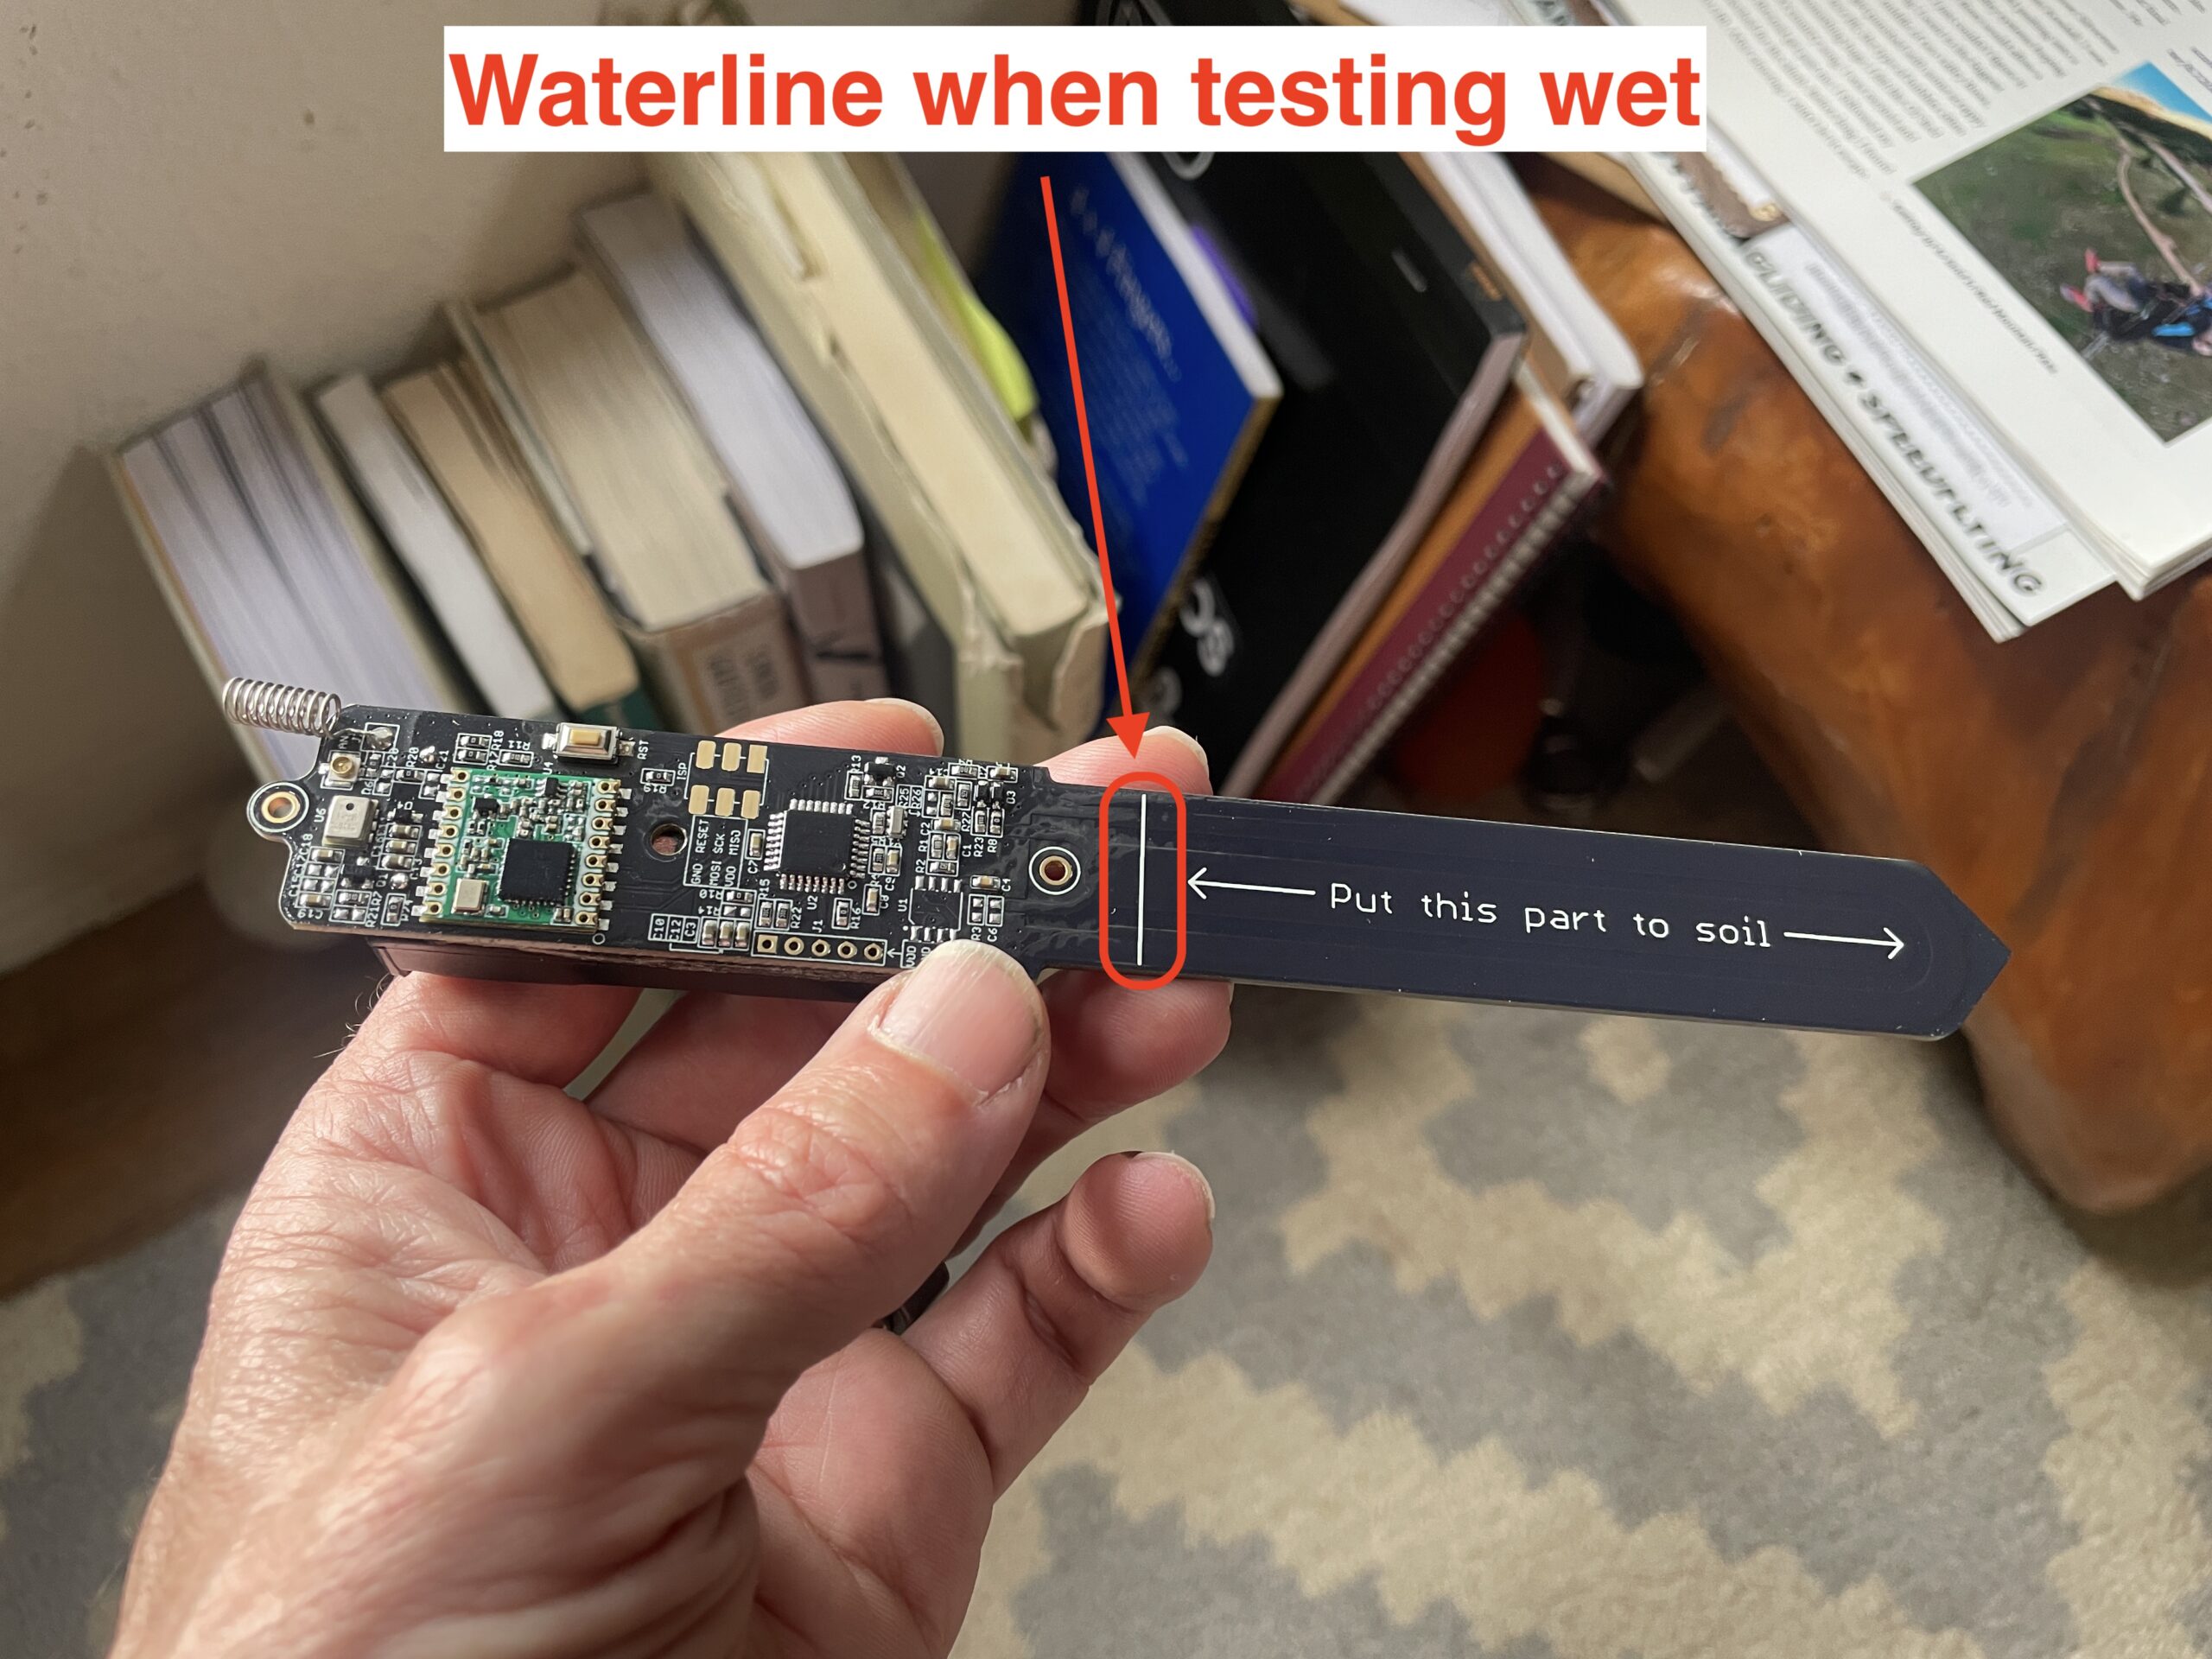
Now you’ll need to calibrate the device at the wet and dry points. To do this, use Helium Console’s debugging tool and the device’s reset button. Open up the Debug tool by hitting the little black bug button. With the unit totally dry or totally wet, hit the reset button. This’ll force through a reading that you can get a payload for. Reset the Debug tool each time, then hit the Reset button on the device and wait until you see a Decoded Payload, then expand Integration Message and look for ADC.
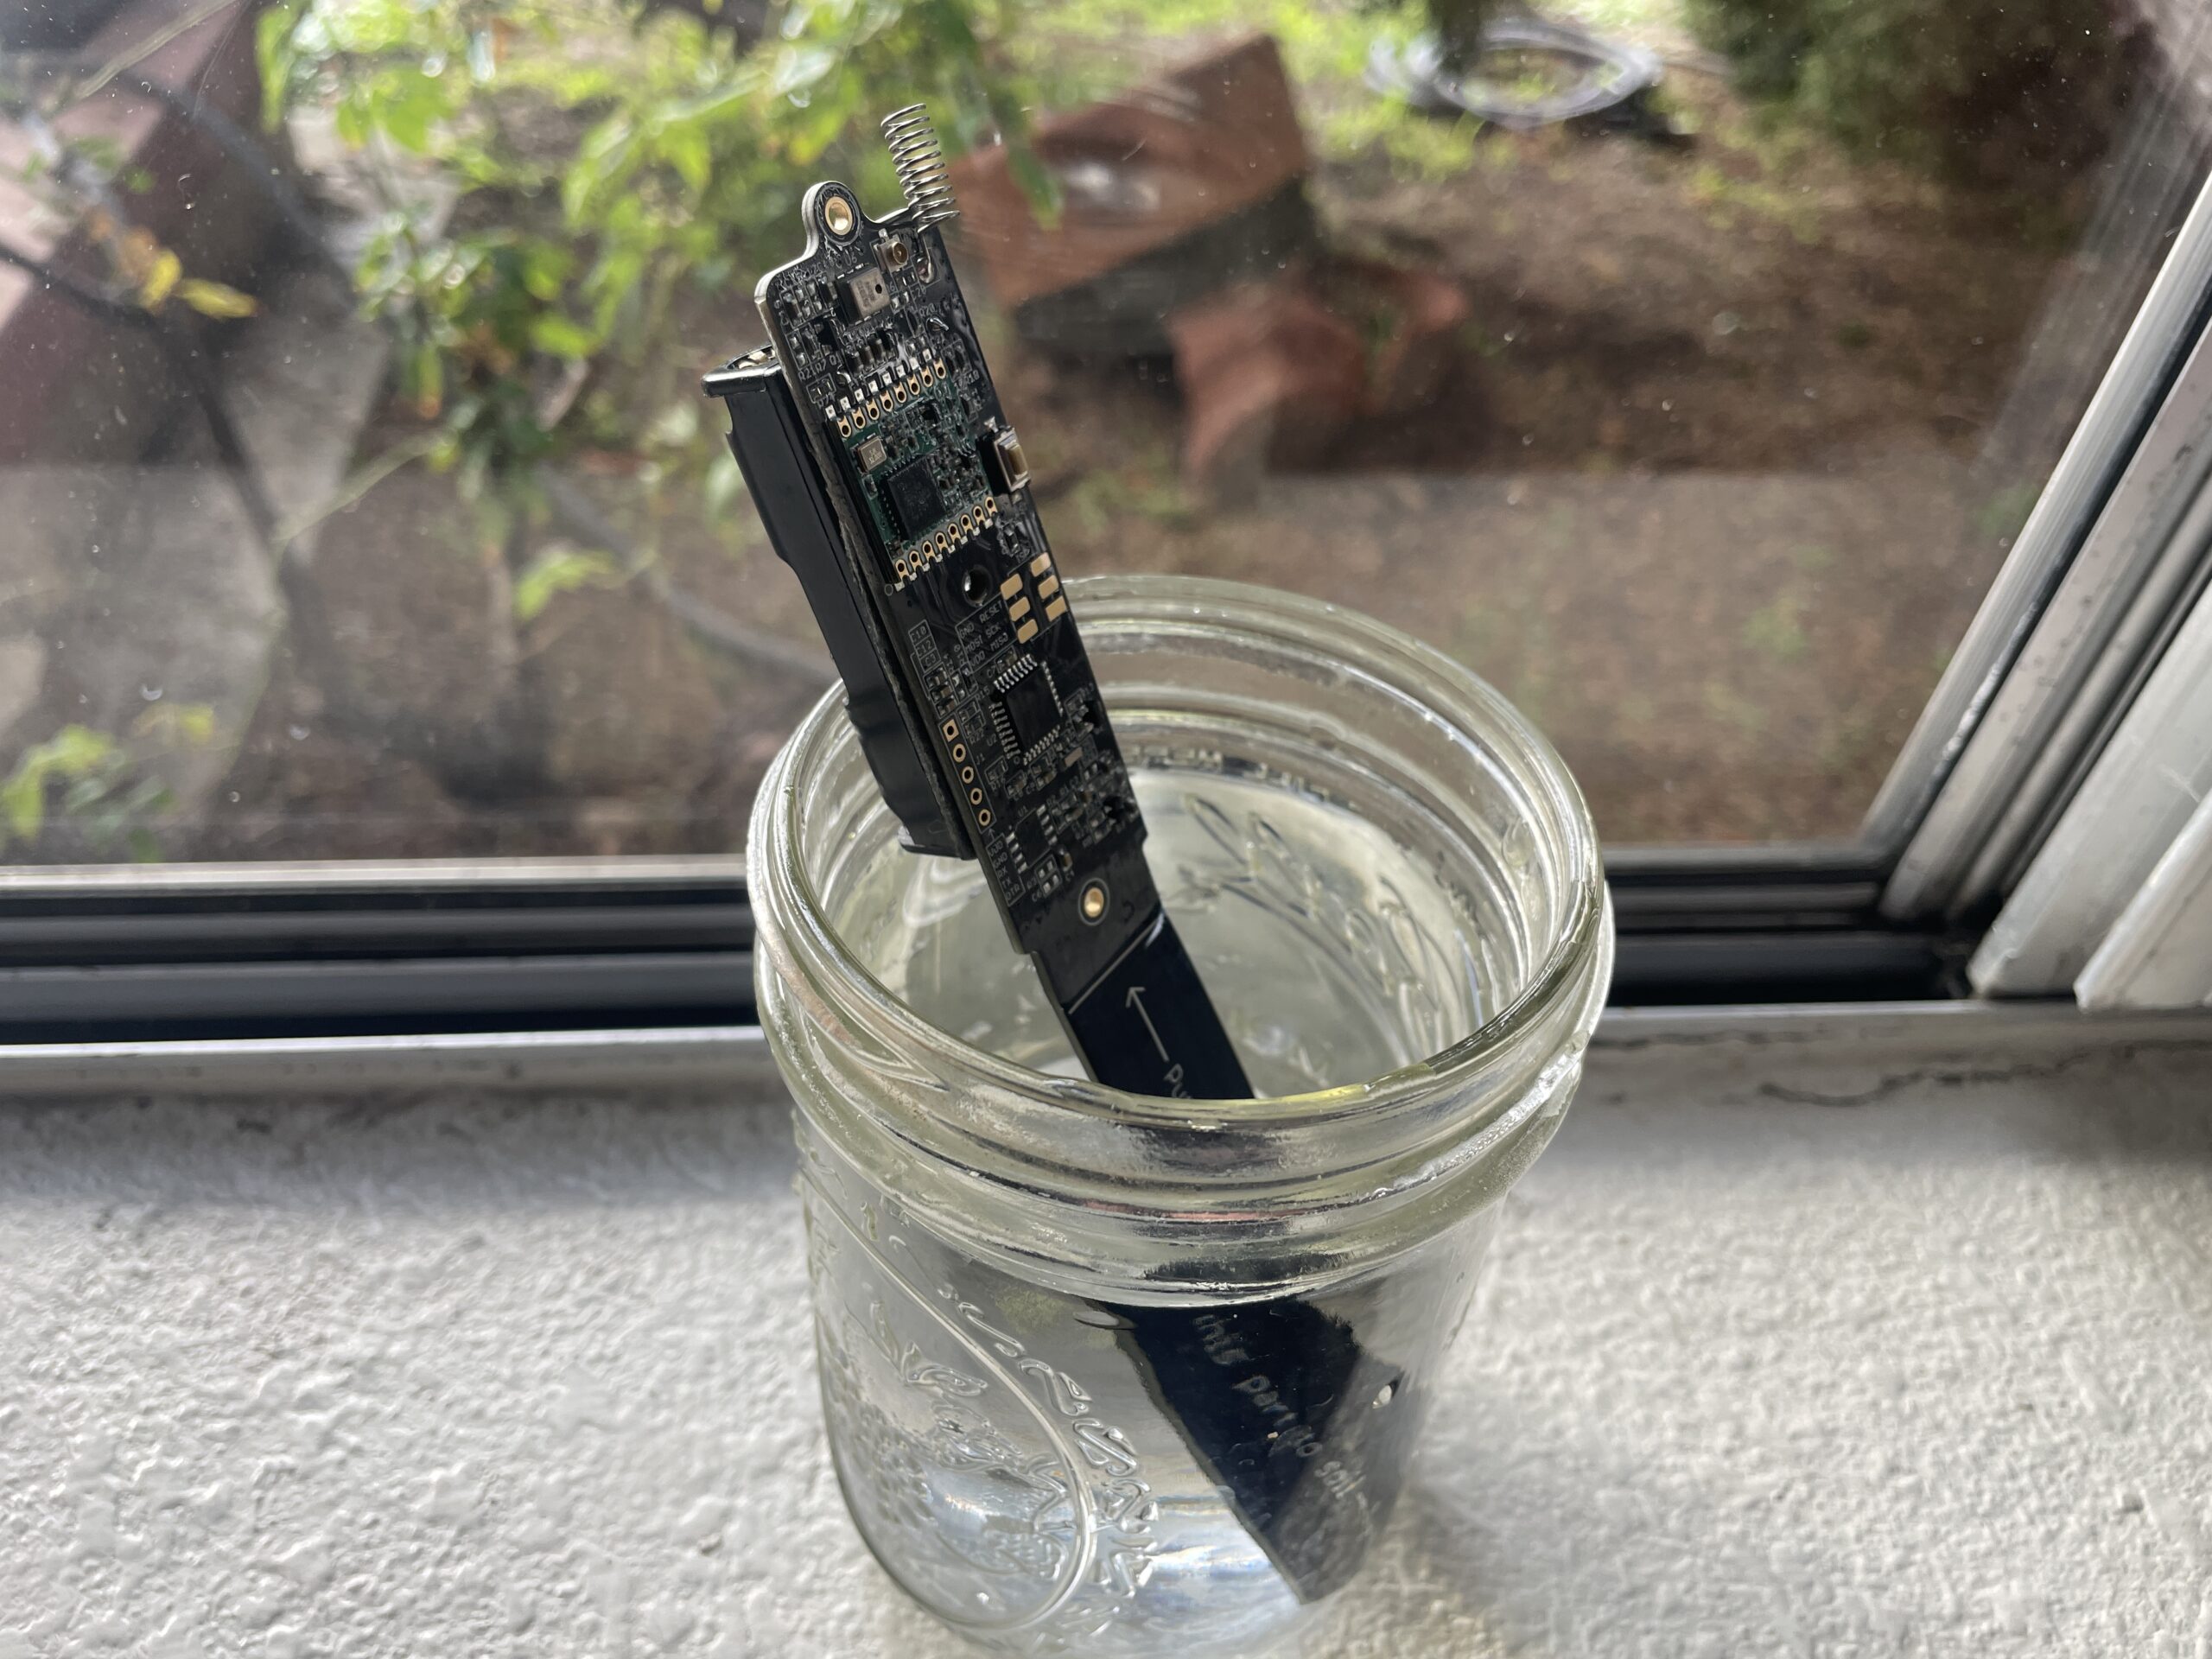
You want the device wet right up to the line that says “Put this part to soil.” You may find if you test that you get different values with saturated soil vs water, but water is way easier and cleaner, and the difference is probably within the accuracy parameters of the device.
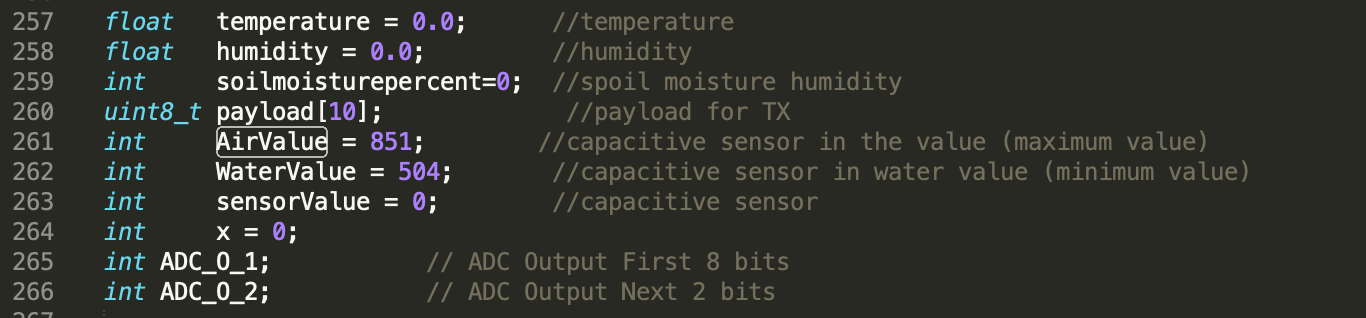
I did three cycles of fully wet and fully dry, then averaged ’em out to get a high value (Air Value) and a low value (Water Value) I could enter into the sketch.
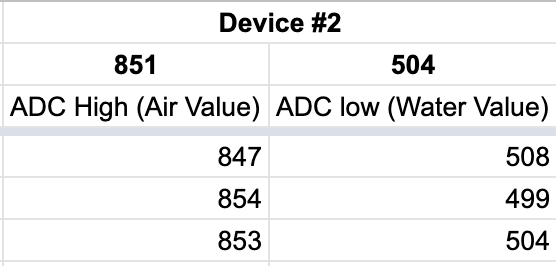
Once you have those, update your sketch’s Air Value and Water Value and re-upload your updated sketch to the device.
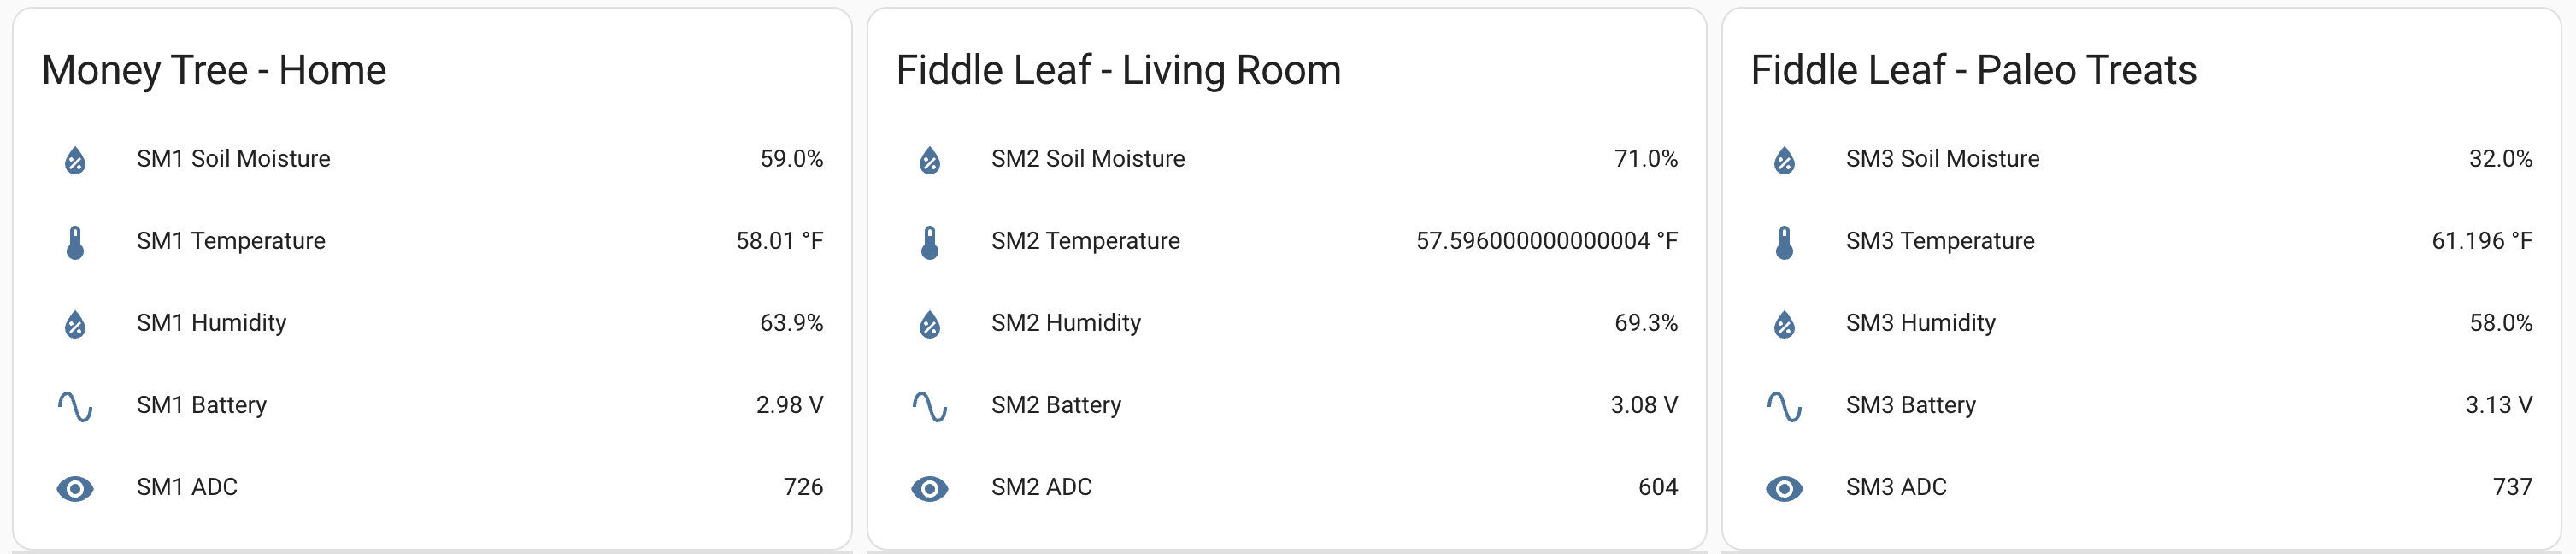
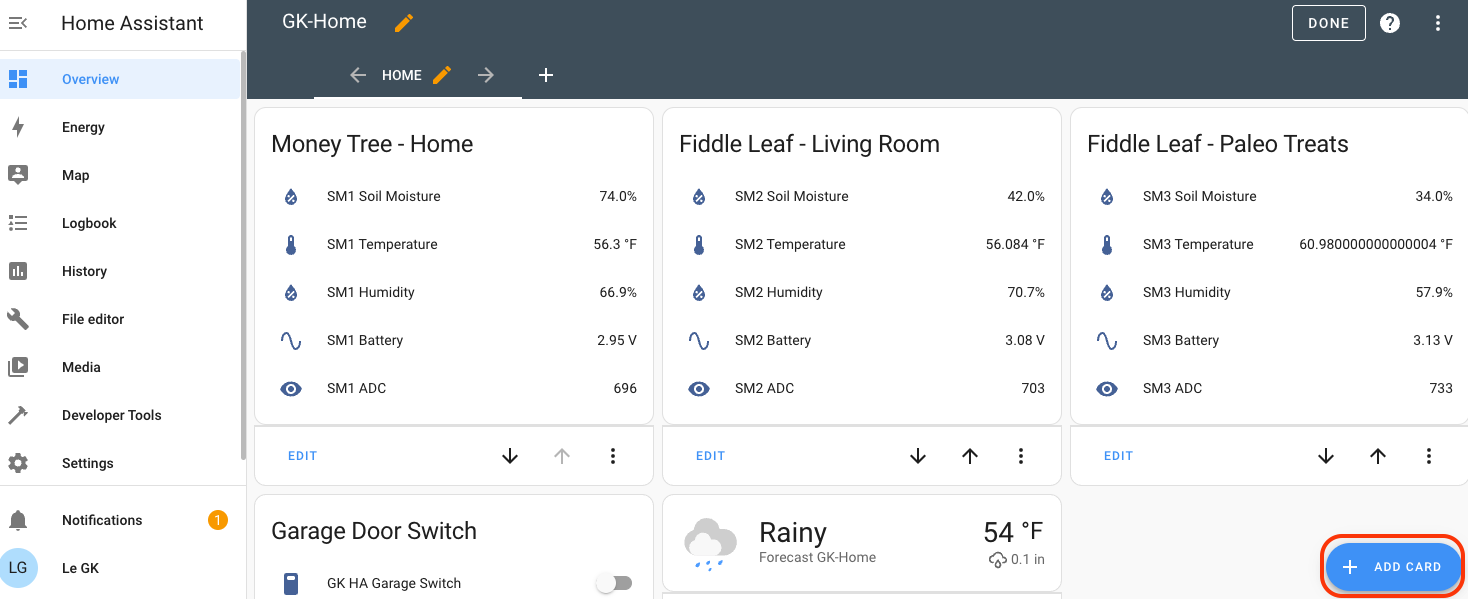
Take a breather, you’ve come a long way! The last step here can go two ways. If you’re the only one using this data, you can push it through from Helium Console to Home Assistant. That might look like this when you finish up. Here are 3 plants (2 at home, 1 at the office):
Adding the data from your sensor to Home Assistant takes 3 (broad) steps. First, send the data from Helium Console to an MQTT integration (details for that setup over on this post).
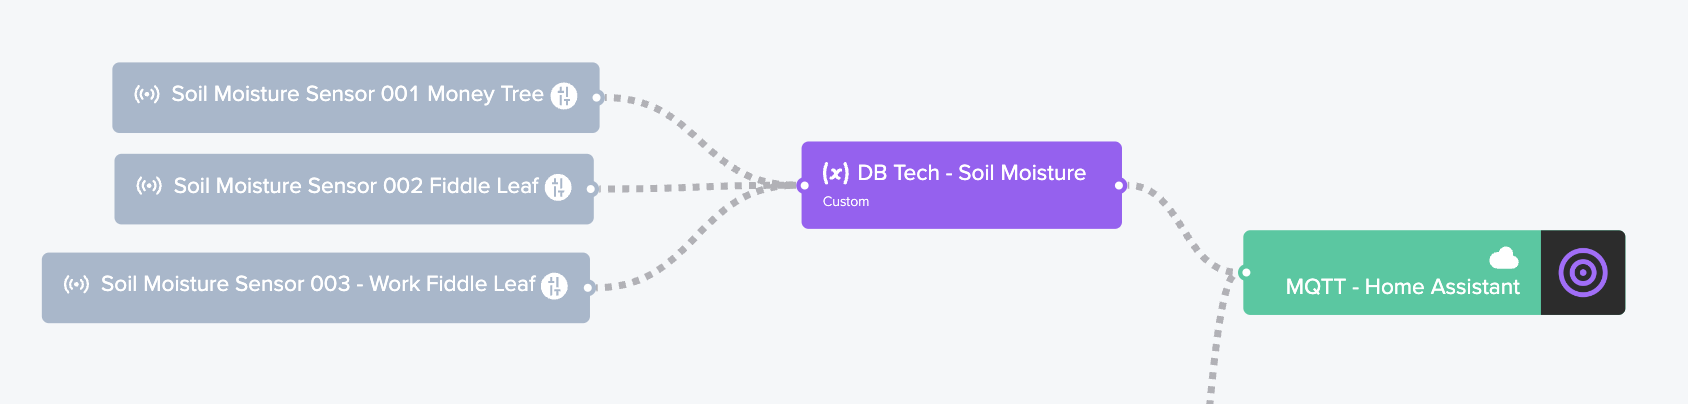
Second, update your configuration.yaml file in Home Assistant to include the MQTT data now coming from the sensors. I’m going to copy in mine, which starts with the door open/close sensor from my earlier blog post. That one is labeled “binary_sensor” in the yaml. You’re going to add in another one below it for the soil moisture device, labeled “sensor”. It’ll look like this.
mqtt:
binary_sensor:
- name: "Gate Sensor"
device_class: opening
payload_on: "1"
payload_off: "0"
payload_not_available: ""
value_template: "{{ value_json.decoded.payload.DOOR_OPEN_STATUS }}"
state_topic: "helium/xxx-YOUR-HELIUM-DEVICE-CONSOLE-ID-HERE-xxx/rx"
sensor:
- name: 'SM1 ADC'
state_topic: "helium/xxx-YOUR-HELIUM-DEVICE-CONSOLE-ID-HERE-xxx/rx"
state_class: measurement
value_template: '{{ value_json.decoded.payload.data.adc | int }}'
- name: 'SM1 Battery'
state_topic: "helium/helium/xxx-YOUR-HELIUM-DEVICE-CONSOLE-ID-HERE-xxx/rx"
state_class: measurement
device_class: voltage
unit_of_measurement: "V"
value_template: '{{ value_json.decoded.payload.data.battery | float | round(2) }}'
- name: 'SM1 Humidity'
state_topic: "helium/helium/xxx-YOUR-HELIUM-DEVICE-CONSOLE-ID-HERE-xxx/rx"
state_class: measurement
device_class: humidity
unit_of_measurement: "%"
value_template: '{{ value_json.decoded.payload.data.humidity | float | round(1) }}'
- name: 'SM1 Soil Moisture'
state_topic: "helium/helium/xxx-YOUR-HELIUM-DEVICE-CONSOLE-ID-HERE-xxx/rx"
state_class: measurement
device_class: moisture
unit_of_measurement: "%"
value_template: '{{ value_json.decoded.payload.data.soilMoisture | float | round(1) }}'
- name: 'SM1 Temperature'
state_topic: "helium/helium/xxx-YOUR-HELIUM-DEVICE-CONSOLE-ID-HERE-xxx/rx"
state_class: measurement
device_class: temperature
unit_of_measurement: "°F"
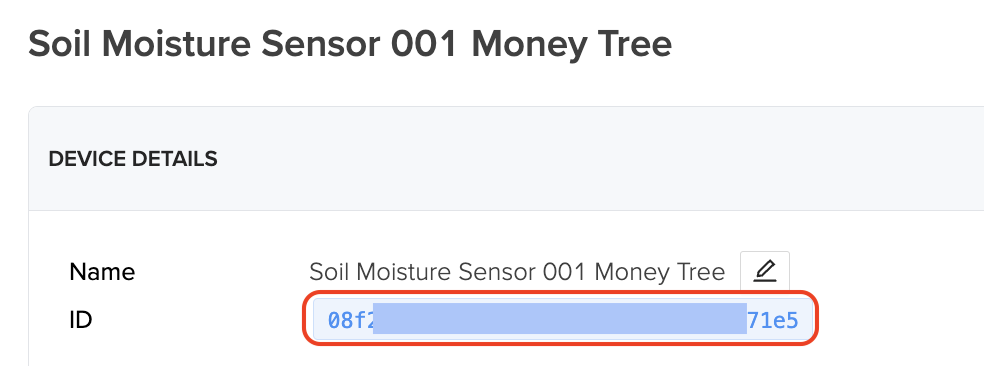
value_template: '{{ value_json.decoded.payload.data.temperature | float * 9 / 5 + 32 | round(1) }}'As you can see, you’ll need to enter in a “state_topic”. You’ll find that in Helium Console in the Device page. It’ll look something like this:
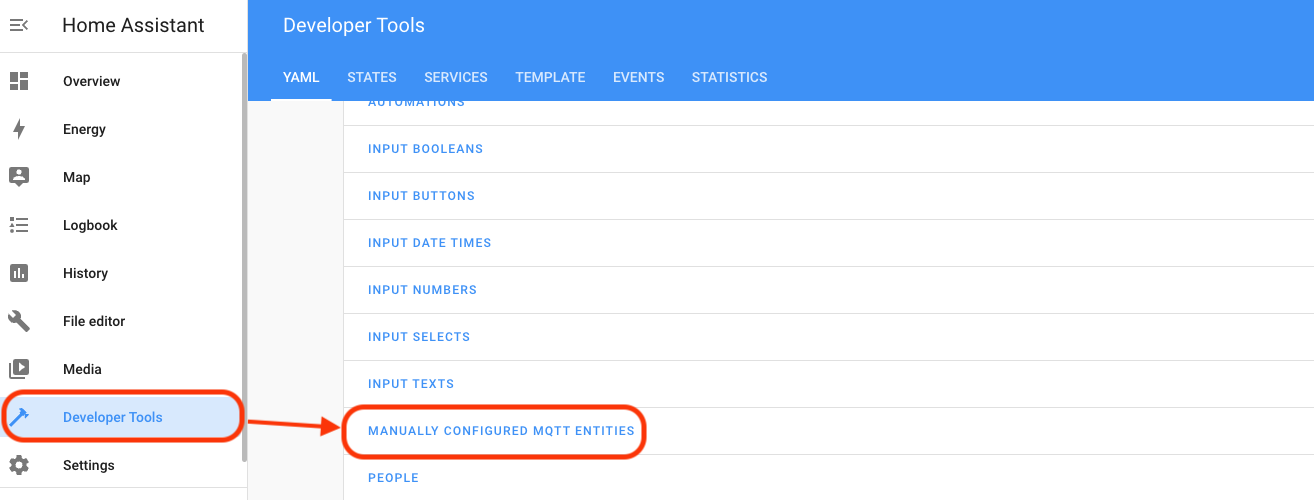
With the yaml file updated, go ahead and refresh that in Home Assistant. Developer Tools –> Manually Configured MQTT Entities.
Ok, so now that Console is sending it and HA is receiving it, the third step is to make it visible for ya.
Create “cards” in Home Assistant to show you what’s going on. Go to Overview –> 3 dot menu –> Edit Dashboard
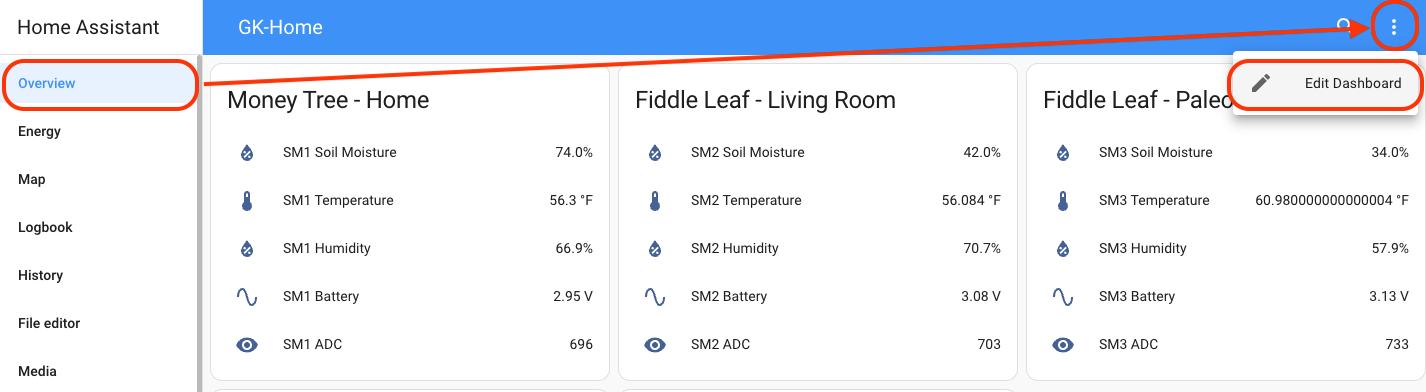
Now hit “Add Card” (blue button in bottom right) and search by name, then follow the prompts to show what you want to see. You probably want Entities or Statistic Graph, but it’s up to you.
That’s it! You’re all done if all you want to do is see it yourself.
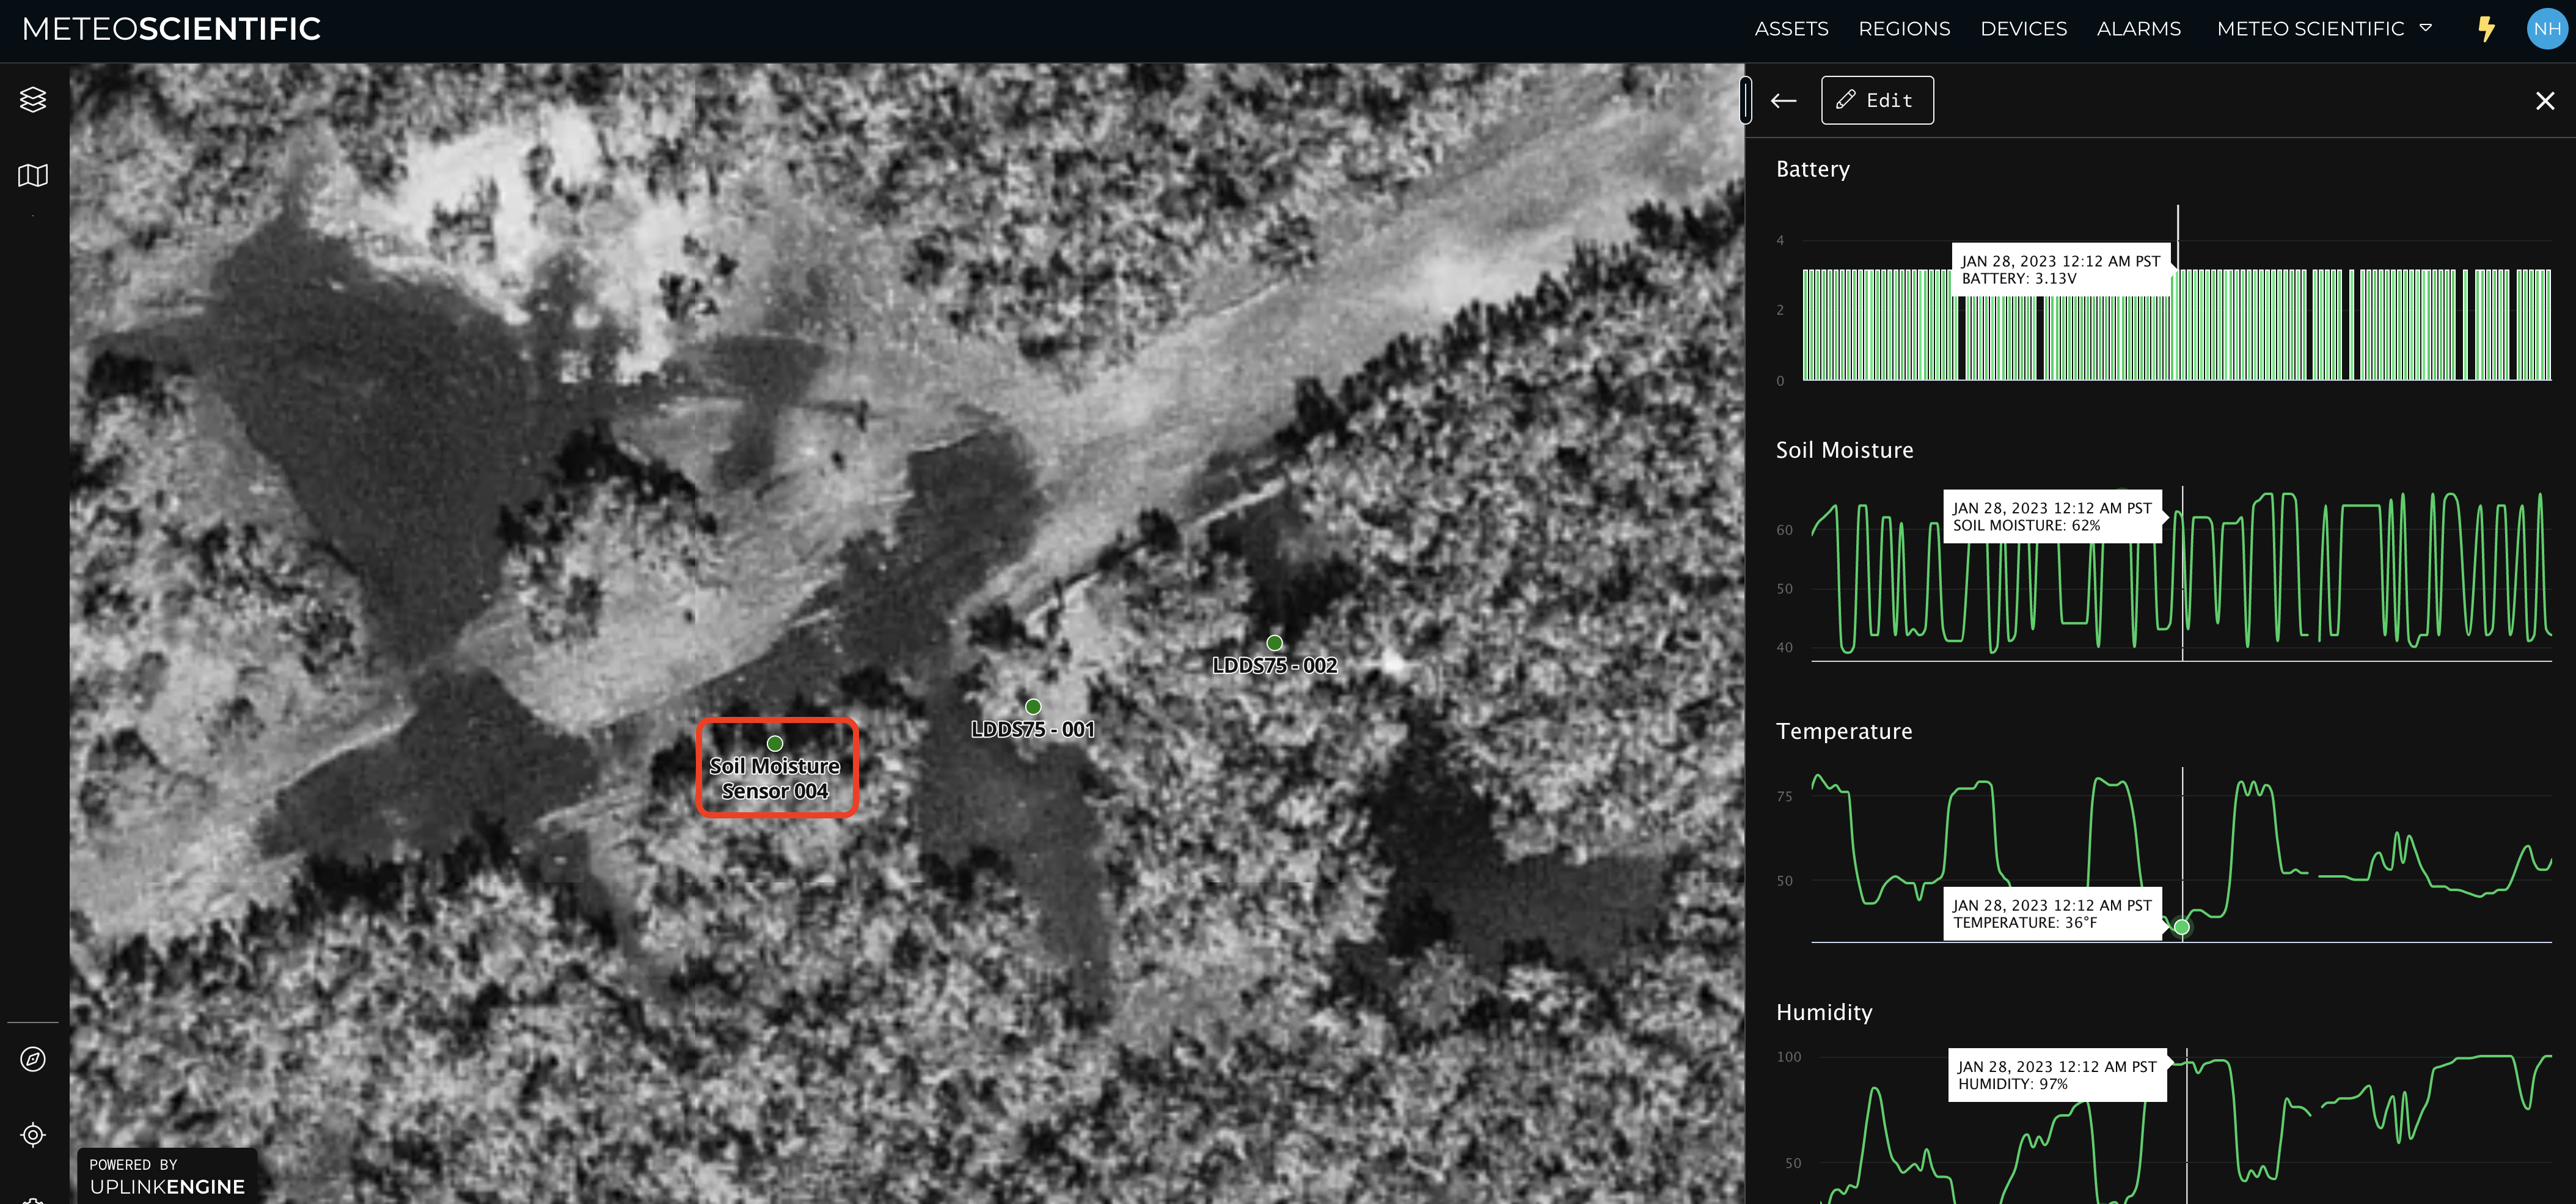
If you’re planning on sharing the data with someone else (a client, or your fellow geeks), consider UplinkEngine, which is a company I invested in back when it was still just HeliumVision.
They’re currently doing just bespoke solutions that look like this. I’ve outlined the sensor in red, and you can display the stats however you want, this is just what we’ve got going right now.
However you display your data, if you’ve followed this whole thing through, congratulations! You’ve added one more sensor to the Helium network, learned a ton, and hopefully will be able to keep your plant in top hydrated condition!
Rock on,
Nik
Notes & References
Working instructions for geeks here: https://github.com/dirkbeer/Helium_MakerfabsSoilMoistureSensorV3
Original Project here: https://community.home-assistant.io/t/makerfabs-soil-moisture-sensor-v3-lorawan-ttn-v3-and-ha-integration/446021
Denicola V3 decoder: https://gist.github.com/denicola2/79639d7b17bf1b828c7cfeffedee0a13
Useful notes specific to Helium here: https://big-pisces-61a.notion.site/Things-I-had-to-do-to-get-the-MakerFabs-Soil-Moisture-Sensor-V3-working-on-Helium-for-EU868-4775729c5f304c9ab6fd3efc7b99af02
Arduino is written in C++, so if you’re looking at it on the Sublime Text app, set the View to be C++.
In Arduino sketch, line 261 is “Air Value”. With the sensor bone dry, record the ADC displayed in Home Assistant and enter that as your Air Value. It’ll be close to 850.
Leave a Reply