I’ve written about the basics of Wingbits in a recent post; if you haven’t read that yet or you’re new to the project, take about 7 minutes and read through it; it’ll make the rest of this much easier to understand.
This is the first in a few of the “Advanced User Series” posts on Wingbits. I’ll be making a few assumptions for these: First, you understand the basics of the project. Second, you want to do the best job possible. Third, you’re not trying to do this the cheapest way possible. You can definitely do a shittier job more cheaply and easily than what I’m about to describe. If minimum effort is your game, this ain’t your post. Fourth and finally, you don’t mind mucking about (a little bit) with code, mostly copy/paste.
Let’s start with setting you up to see how your rig is working. We’ll do that using two tools that came with Wingbits and that are built by a Github user named Wiedehopf. Those are called Tar1090 and Graphs1090. This post will focus on Tar1090.
Tar1090 allows you to see what aircraft your rig is currently tracking, including their altitude (by color), the furthest point they were picked up, and if you want to dive into details, their airspeed and how far from you they are. It looks like this, and is hosted on the machine you’ve got Wingbits on.
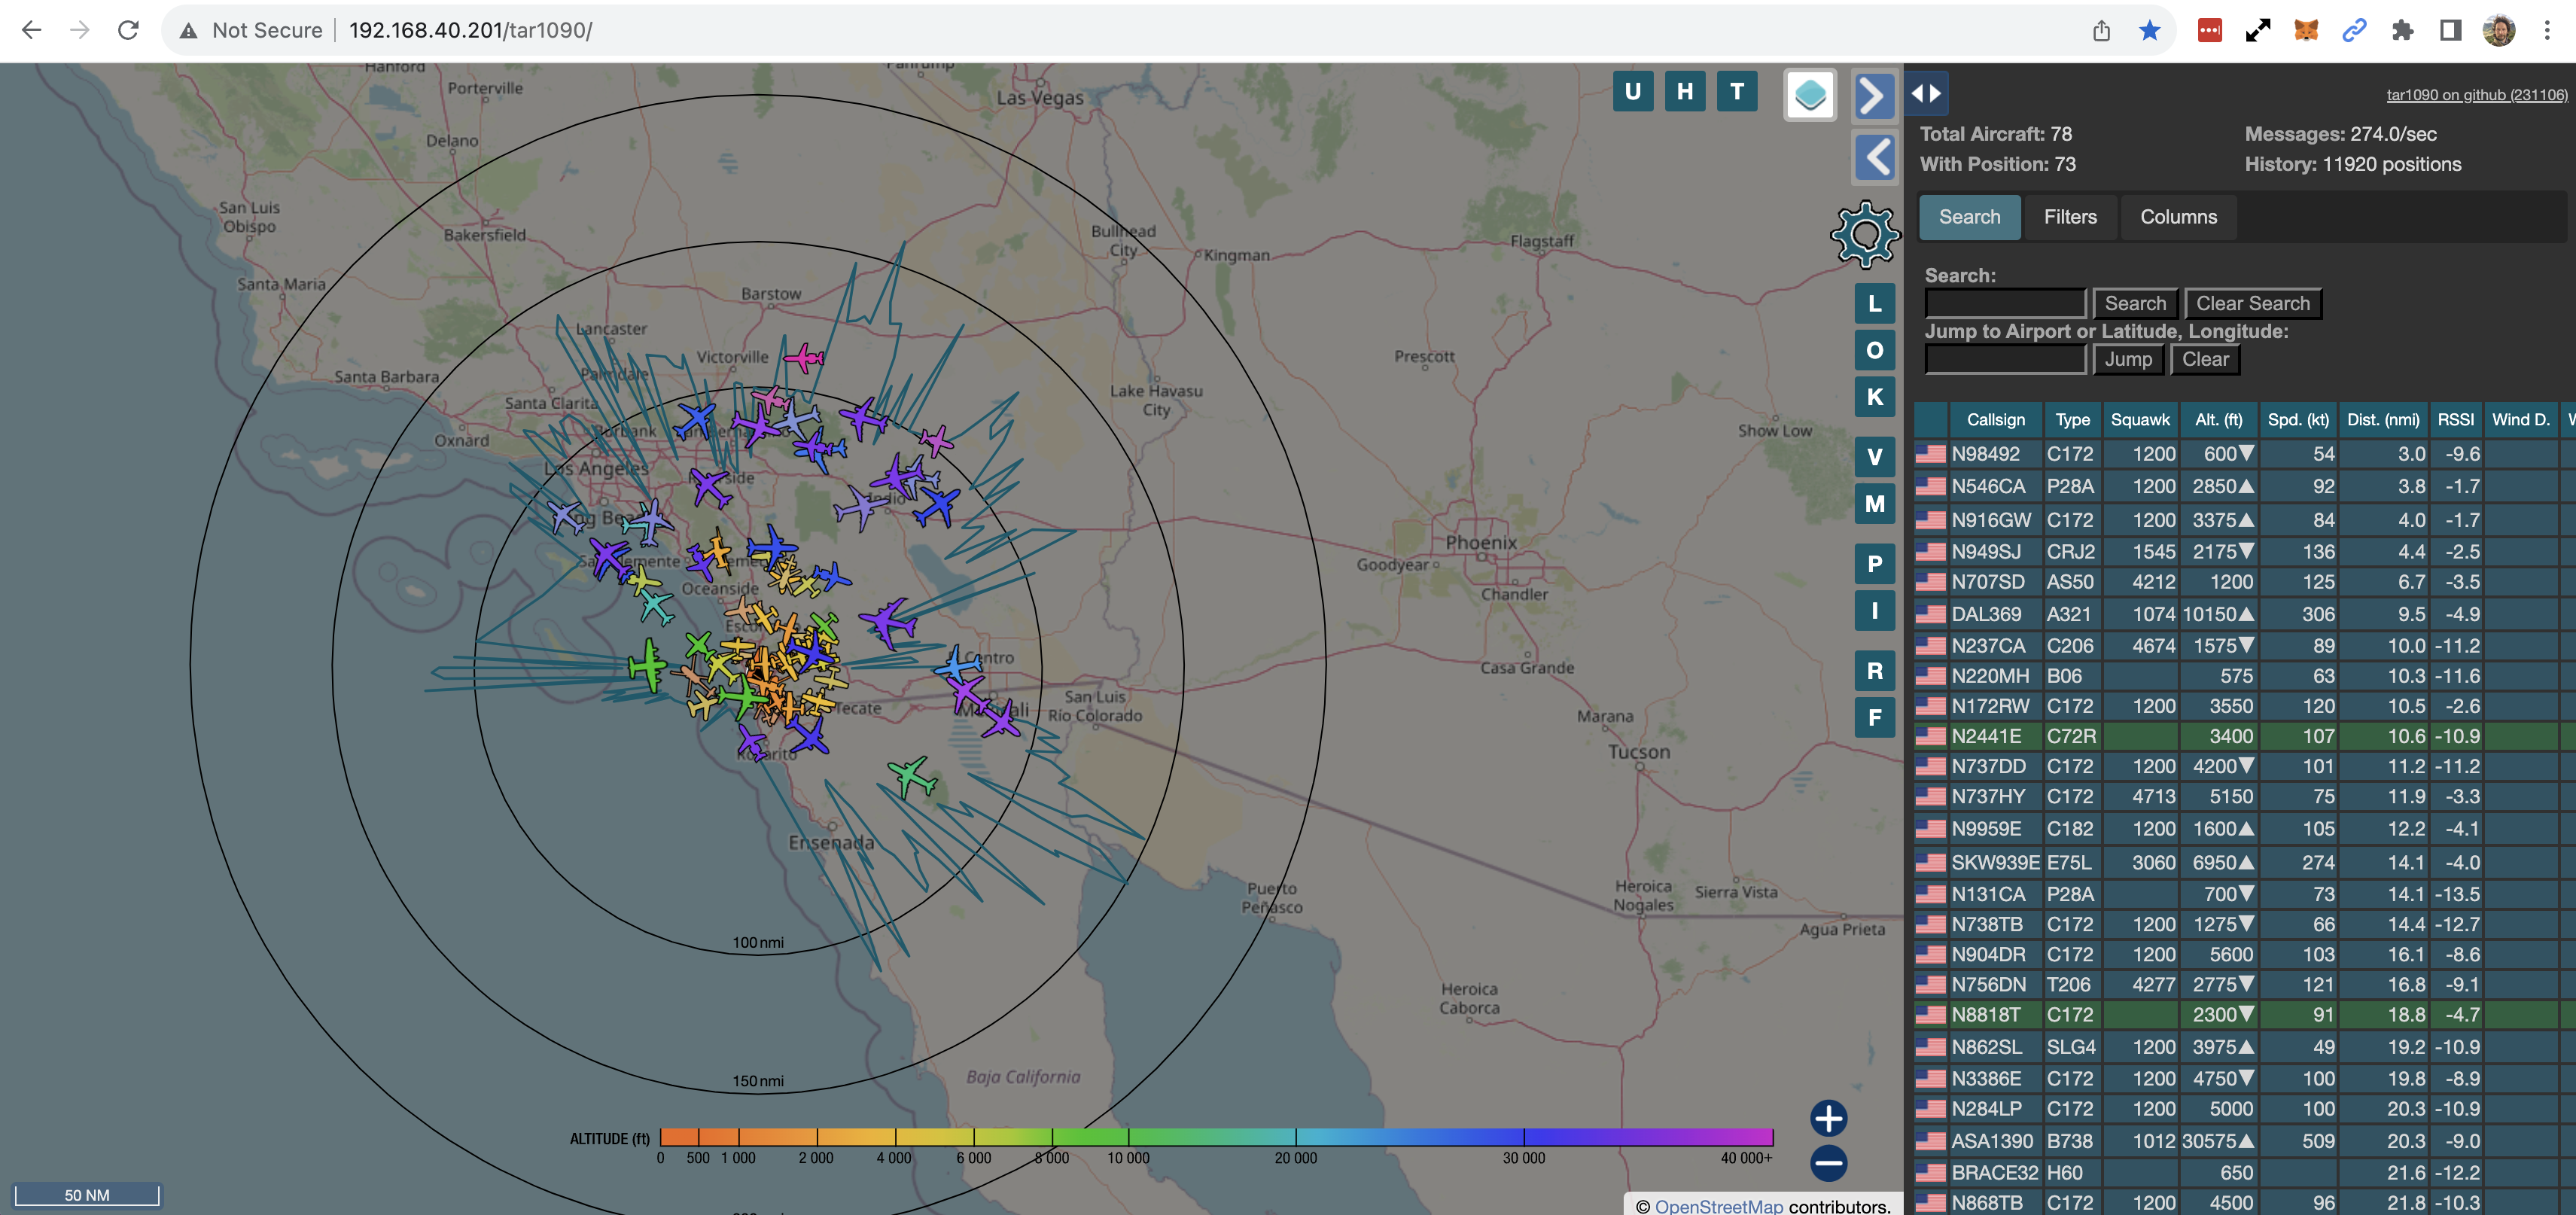
To see this, once you’ve installed Wingbits on your Pi and have it up and running, go to http://192.168.xx.xxx/tar1090/ replacing the xx.xxx with your IP address.
Ok, so why do you care about seeing that (other than that it’s pretty cool to watch all those planes zing around the sky)? Well, you might want to know what you’re rig is covering so you can decide whether or not to buy or bid on a SkyHex. The SkyHex map is made up of large (Uber res3) hexes, and looks like this in my local area:
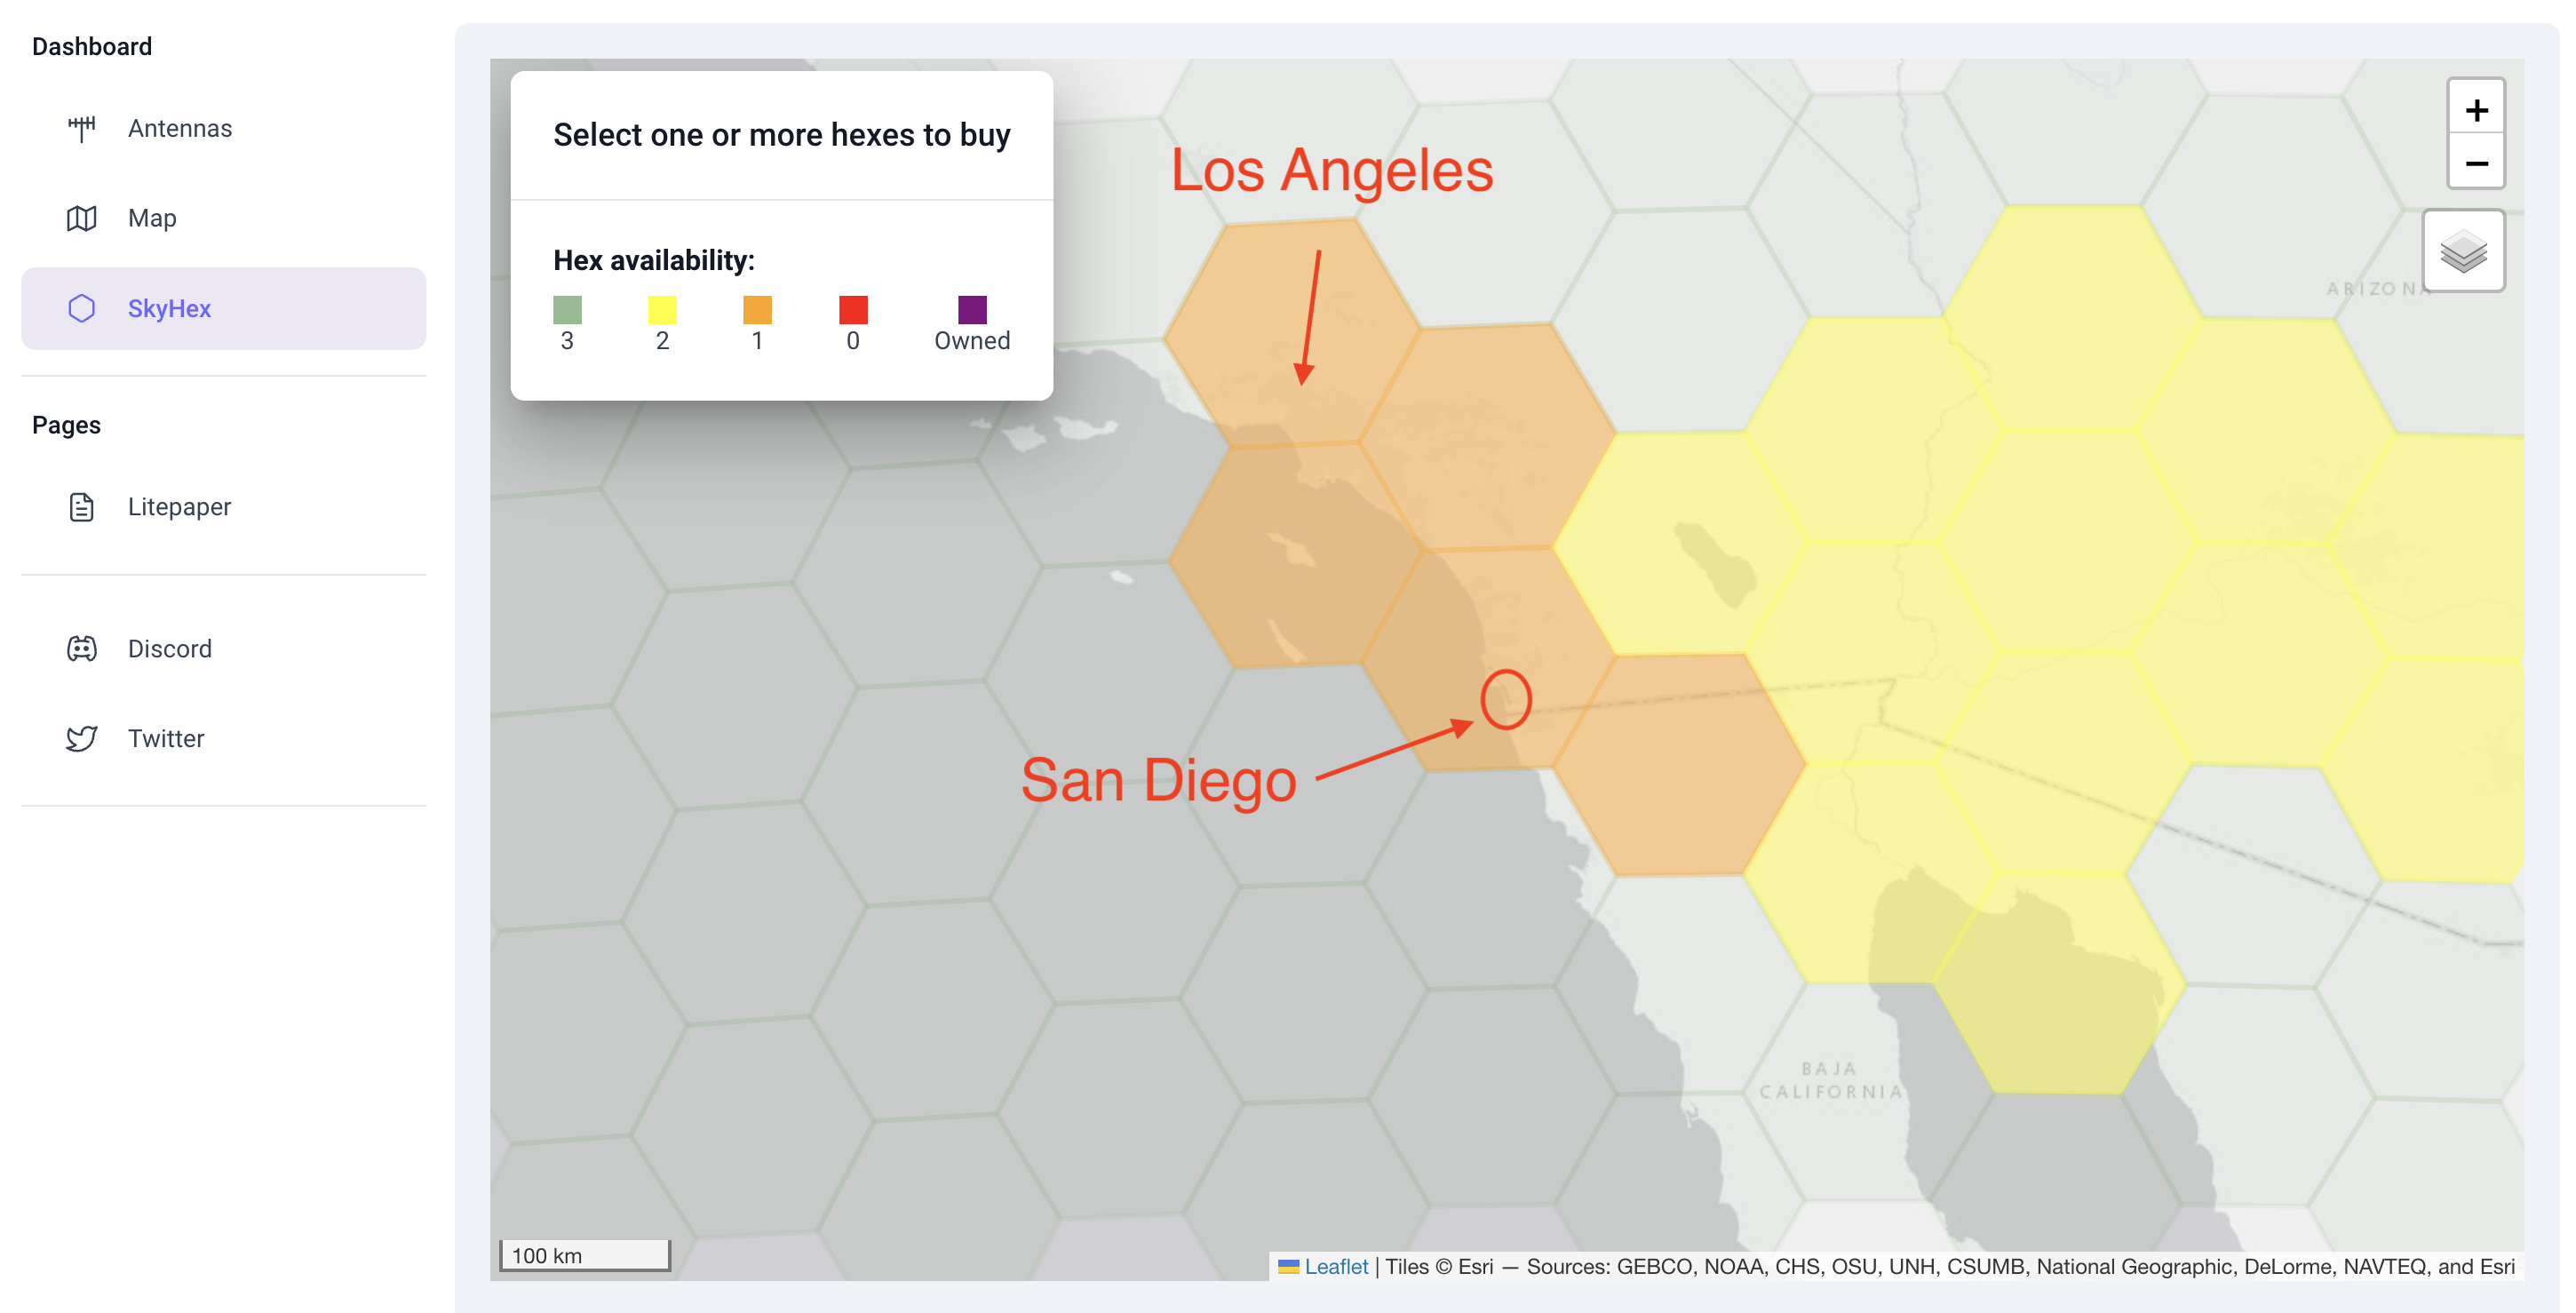
I live in the red circle, in San Diego. You can see that a couple of hexes around me have been bought at least once. Each SkyHex has 3 slots available. Owning a slot allows you to earn off signals received from that SkyHex. You don’t have to be deployed in the SkyHex to earn from the signals captured from it.
The question here is: Should I just buy the San Diego hex I’m in, or should I buy a few of the ones around me? What could I actually earn from?
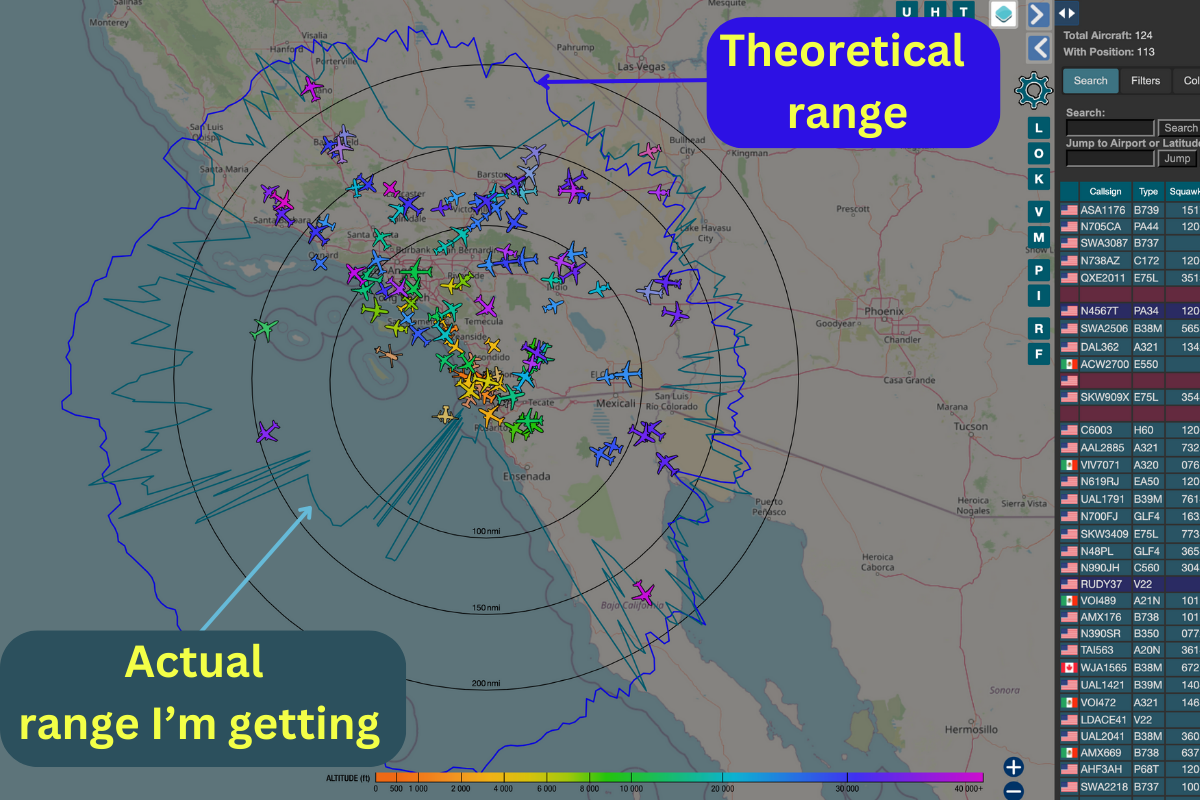
To figure that out, I’m going to overlay the SkyHex map on top of my tar1090. Now, in the instance below I used my massive graphic design skills to make it super easy to show you this. There isn’t currently a way to overlay the SkyHex map on the tar1090, so I did it in Canva. I highlighted the edge of my range (using a bone-stock antenna) with the blue.

On the surface, I should probably buy all the hexes above me (I’m the black dot with the white ring) and the one to my southeast, but not the south or southwest one. But wait…the next thing you’ll want to know is how much traffic is happening within the blue lines.
With a few tweaks, tar190 will allow you to see a heatmap of where most of your flights are tracked. This makes is easier to decide whether or not you want to buy surrounding hexes. After all, it’s probably not ultra useful to buy a hex where you can only occasionally track aircraft.
How do we set up the heatmap? Get ready for some geekery!
First, open up a terminal window and log into your Wingbits instance. In my case, it’s on a Raspberry Pi and I’m on a Mac, so I’m using (duh) Terminal. We’re going to add a directory and change ownership of it to let readsb store heatmap data. All this is detailed over in Wiedehopf’s guide, but I found some of it hard to understand and put together, so @acci over on the Wingbits Discord helped walk me through the basics. Thanks @acci!
Start by pasting in the following, one line at a time:
sudo mkdir /var/globe_history
sudo chown readsb /var/globe_history
Once those are done, you’ll want to go into your readsb file and add some lines to it. To do that:
sudo nano /etc/default/readsbAdd in the heatmap command --heatmap-dir /var/globe_history --heatmap 30 to the bottom, like this:
JSON_OPTIONS="--json-location-accuracy 2 --range-outline-hours 24 --write-json=/run/readsb/ --heatmap-dir /var/globe_history --heatmap 30"Once that’s done we’ve got two more steps. First, we’re going to restart the service.
sudo systemctl restart readsbThen we’re doing to go set up the URL so you can actually see the heatmap. It will be different than your normal tar1090 URL. Copy and paste the following address, changing out the xx to match your address, then bookmark it so you don’t have to remember it each time.
http://192.168.xx.xxx/tar1090/?heatmap=200000&realHeat&heatRadius=3It may take a few hours (or a few days, depending on your air traffic) to really fill in. You can change how it looks and what it displays using Wiedehopf’s system, but the above “args” will give you something like this:

Obviously that gives you a much better idea of how much area you’re consistently covering, and you can decide what hexes to buy based on that data. Feel free to play around changing out those args to suit what works best for you; you can change how long a timeframe you’re looking at, how big the individual heatmap dots are, their opacity, and more.
Now that I’ve seen that, I have a better idea of what I might reasonably cover and what SkyHexes I might buy.
Another important tool you can use with the tar1090 map is use the Hey What’s That instructions to get an idea of what your maximum theoretical range should be.
If you’re hitting it or coming close, you’ll know you don’t need to do much more. If you’re not, well, there’s work to do!
Remember, this is a crypto DePIN project, which puts it as a high-risk enterprise. Don’t put any money in you can’t afford to lose! I’ve gotten the most joy participating in these projects by focusing on learning new things and doing the best job possible. Earning tokens is a great way to keep score, but fairly obviously not a reliable way to pay the rent.
Huge thanks to @acci over on Discord for helping walk me through the heatmap workflow! Any mistakes are mine, no warranty or guarantee is made on any of this, have fun learning & pursuing excellence with me!
Leave a Reply